Tacos are universally loved, and their versatility makes them a fantastic meal option for any occasion. But if you’re aiming to maintain a healthy diet without sacrificing taste, chicken tacos can easily fit into your nutritious meal plan. With lean protein, healthy fats, & plenty of fresh vegetables, healthy chicken tacos perfectly balance flavor and nutrition.
This blog will walk you through a Healthy Chicken Taco Recipe that is quick, easy, and customizable. Whether you’re looking to meal prep or create a light dinner, these tacos check all the boxes: delicious, nutritious, and satisfying.
Why Choose Chicken for Tacos?
Chicken is a lean protein, offering numerous health benefits while keeping the calorie count in check. It’s lower in fat than other meats, making it an excellent choice for anyone looking to eat healthily while still enjoying the rich flavors of tacos. Plus, chicken is incredibly versatile, allowing it to adapt to different seasonings, cooking methods, and taco variations.
Healthy Chicken Taco Recipe
Ingredients:
For the Chicken:
1 lb (450g) boneless, skinless chicken breasts (organic or free-range if possible)
One tablespoon of olive oil
Two teaspoons taco seasoning (paprika, cumin, chili powder, garlic powder, onion powder, cayenne)
One tablespoon of fresh lime juice
Salt and pepper to taste
For the Toppings:
1 cup shredded lettuce (romaine or spinach for added vitamins)
1/2 cup diced tomatoes (rich in antioxidants)
1/2 cup diced avocado (heart-healthy fats)
1/4 cup diced red onion (for crunch)
1/4 cup chopped cilantro (for fresh flavor)
1/4 cup plain low-fat Greek yogurt (a protein-packed alternative to sour cream)
Tortillas (whole wheat, corn, or low-carb options)
Step-by-Step Instructions:
Prepare the Chicken
Begin by trimming any excess fat from chicken breasts. For more even cooking, place the chicken breasts between two sheets of plastic wrap & use meat mallet or rolling pin to quid them to an thickness.
Marinate the Chicken
Combine the taco seasoning, lime juice, olive oil, salt, and pepper in a small bowl. Coat the chicken breasts with this mixture. Allow the chicken to marinate for at least 15 minutes, but for best flavor, let it marinate in the refrigerator for up to 2 hours.
Cook the Chicken
Heat non-stick skillet or grill pan over medium-high heat. Heat the pan, then add the chicken breasts and cook for 6 to 7 minutes on each side, or until the internal temperature reaches 165°F (75°C). Be cautious not to overcook, as this can cause the chicken to become dry. After cooking, remove the chicken from the heat and let it rest for 5 minutes before slicing it into thin strips.
Warm the Tortillas
While the chicken rests, heat the tortillas. Place them on the stove burner for a few seconds on each side for a slight char, or heat them in a dry skillet for a softer option. Choose whole wheat or corn tortillas to keep things healthier and add more fiber.
Assemble the Tacos
Now comes the fun part! Take a tortilla and layer it with a few strips of chicken—top with shredded lettuce, diced tomatoes, avocado, red onion, and cilantro. For creaminess, add a spoonful of Greek yogurt. To enhance the flavor, squeeze fresh lime juice over the top.
Tips for Perfect Healthy Chicken Tacos
Use Lean Chicken Breast: Skinless chicken breast is low in fat, making it the healthiest option. For variety, you can also use lean turkey or ground chicken.
Add Extra Veggies: Enhance the nutritional value of your tacos by adding bell peppers, cucumbers, or even a light slaw for crunch.
Go Light on the Cheese: While cheese adds flavor, it’s calorie-dense. If you want cheese, opt for a small amount of sharp cheddar or feta, which have more muscular flavors and don’t require much.
Greek Yogurt vs. Sour Cream: Swap sour cream for plain low-fat Greek yogurt. It’s packed with protein and cuts down on calories without losing creaminess.
Make it Spicy: If you enjoy spice, add jalapeños or drizzle on your favorite hot sauce to elevate the flavor profile.
Nutritional Benefits of Healthy Chicken Tacos
This chicken taco recipe isn’t just tasty—it’s also packed with nutritional benefits. Here’s a quick breakdown of why this recipe is a healthy choice:
Chicken Breast: High in lean protein, promoting muscle repair and satiety.
Avocado: Full of heart-healthy monounsaturated fats and essential nutrients like potassium and fiber.
Tomatoes are great source of vitamins C & K and lycopene, supporting heart health.
Greek Yogurt: A protein powerhouse packed with probiotics for gut health.
Whole Wheat Tortillas: Higher in fiber than regular flour tortillas, supporting digestion and keeping you full longer.
Variations of the Healthy Chicken Taco Recipe
Low-Carb Option: Swap tortillas for lettuce wraps or serve the chicken and toppings over a bed of mixed greens to make a fresh taco salad.
Grilled Chicken Tacos: Grill the chicken for a smoky, outdoorsy flavor. This reduces the need for extra oil and enhances the taste.
Spicy Chicken Tacos: Add extra cayenne, chili flakes, or hot sauce to the chicken marinade for a spicy kick.
Gluten-Free Option: Choose corn tortillas or go grain-free with cauliflower or almond flour alternatives.
Why These Tacos Are Great for Meal Prep
These healthy chicken tacos are quick and easy to make and perfect for meal prepping. Cook chicken in advance & store it in the refrigerator for up to three days. When ready to eat, warm the tortillas, reheat the chicken, and assemble your tacos with fresh toppings. You can even pack these tacos for lunch by storing the chicken and toppings separately to prevent sogginess.
Conclusion
These Healthy Chicken Tacos are the ultimate balance of flavor, health, and ease. You’re creating a delicious, satisfying, and nutritious meal by focusing on lean chicken, fresh vegetables, and healthier toppings like Greek yogurt and avocado. Whether you’re preparing meals for the week or seeking a quick, nutritious dinner, this recipe will quickly become a staple in your kitchen.
So, the next time you’re craving tacos, skip the greasy takeout and try this healthy chicken taco recipe instead! It’s the perfect way to enjoy a flavorful meal without compromising on your health goals.
[vc_row][vc_column][vc_column_text]For fans of In-N-Out Burger, few items are as coveted as the secret menu classic: Animal Style Fries. Known for their rich, flavorful toppings and decadent twist on traditional fries, this dish has earned a cult following across the West Coast and beyond. If you’ve ever tried them, you know how addictive the combination of crispy fries, melted cheese, grilled onions, and special sauce can be.
The good news? You don’t have to live near an In-N-Out to enjoy this famous side dish. In this post, we’ll walk you through everything you need to know about Animal Style Fries and how to make them right in your kitchen. Get ready to bring the taste of this secret menu favorite to your home!
What Are Animal Style Fries?
Before we dive into the recipe, let’s first talk about what exactly Animal Style Fries are. For those unfamiliar with the In-N-Out experience, this West Coast fast-food chain has a not-so-secret menu that includes unique twists on its regular offerings. The most famous of these is the Animal Style preparation.
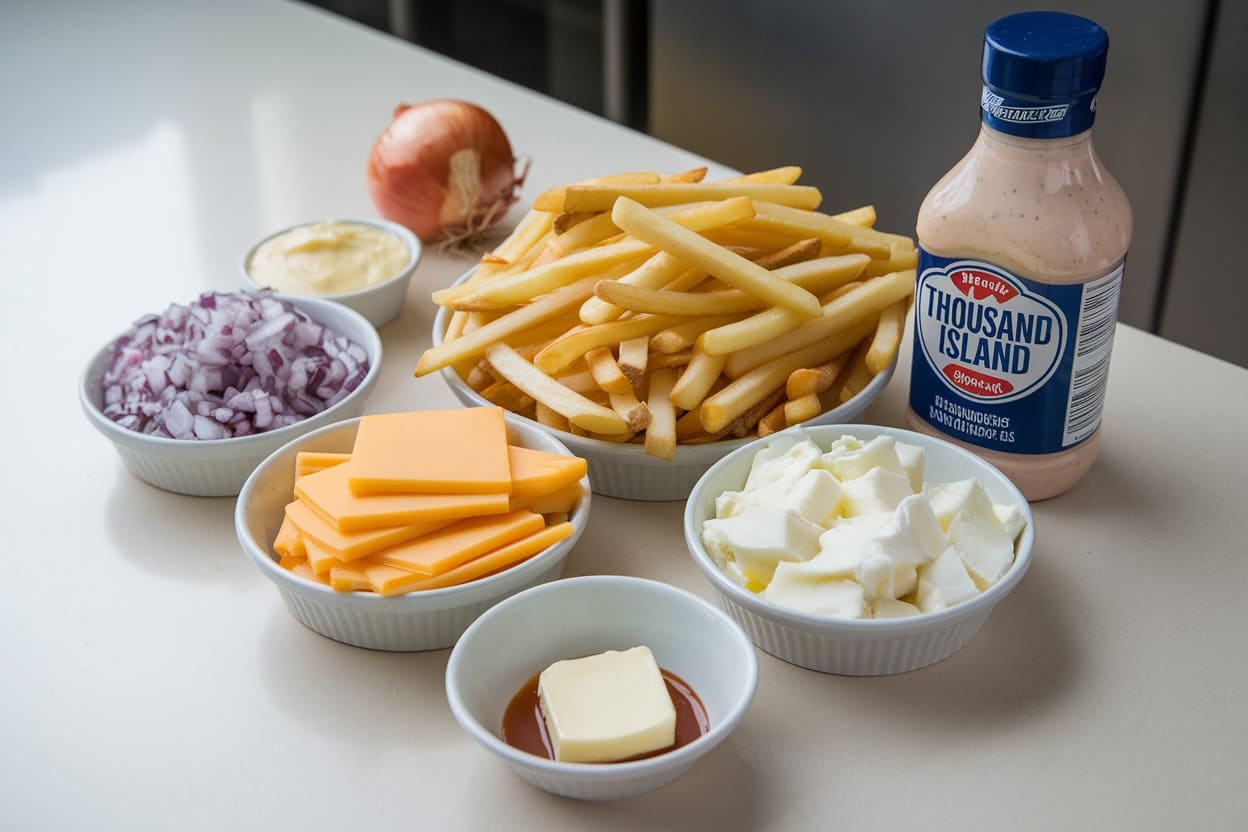
Animal Style Fries consist of:
Crispy French fries: Either freshly cut or frozen, fried to perfection.
Melted American cheese: Slices of cheese that add a creamy, gooey texture.
Grilled onions: Slowly sautéed until caramelized, offering a rich, sweet flavor.
Thousand Island dressing: Known as the “secret sauce,” this tangy dressing ties everything together.
What makes these fries special is the layering of textures and flavors. The crispy fries serve as the perfect base for the creamy melted cheese, sweet onions, and tangy sauce. It’s fast food elevated to a whole new level, making it more than just a side dish—it’s an experience!
Ingredients You’ll Need
To recreate the magic of In-N-Out Animal Style Fries at home, you don’t need to be a professional chef. In fact, the recipe is relatively simple and relies on basic ingredients, many of which you may already have in your kitchen. Here’s what you’ll need:
Frozen French fries (or freshly cut potatoes, if you prefer)
Oil for frying (vegetable or canola oil) if making fresh fries
Salt to season the fries
For the Toppings:
4 slices of American cheese
1 large onion, diced
1 tablespoon butter or oil for sautéing the onions
½ cup Thousand Island dressing (store-bought or homemade)
If you want to go the extra mile, consider making your own Thousand Island dressing. Here’s a simple recipe for it:
Homemade Thousand Island Dressing:
½ cup mayonnaise
2 tablespoons ketchup
1 tablespoon sweet pickle relish
1 teaspoon vinegar or lemon juice
Salt and pepper to taste
Mix these ingredients in a bowl, and you’ll have a delicious sauce ready to drizzle over your fries.
Step-by-Step Guide: How to Make Animal Style Fries
Now that you have all the ingredients, it’s time to get cooking! Follow these step-by-step instructions to make Animal Style Fries just like you’d get at In-N-Out.
If you’re using frozen fries, follow the package instructions. You can either bake or fry them based on your preference. Baking is the healthier option, but frying gives you that authentic crispy texture.
If you’re making fresh-cut fries, here’s a quick method:
Peel and cut potatoes into thin strips.
To get rid of extra starch, soak the chopped potatoes in cold water for thirty minutes.
Pat the fries dry, then fry them in batches at 350°F (175°C) until golden and crispy. After draining, sprinkle salt on the fries and pat dry.
For extra crispy fries, try a double-fry method:
Reduce the temperature at which you fry the potatoes to about 325°F until they are cooked but not yet golden.
Remove and let them rest for a few minutes.
Fry in the oil after raising the temperature to 375°F again until crispy and golden.
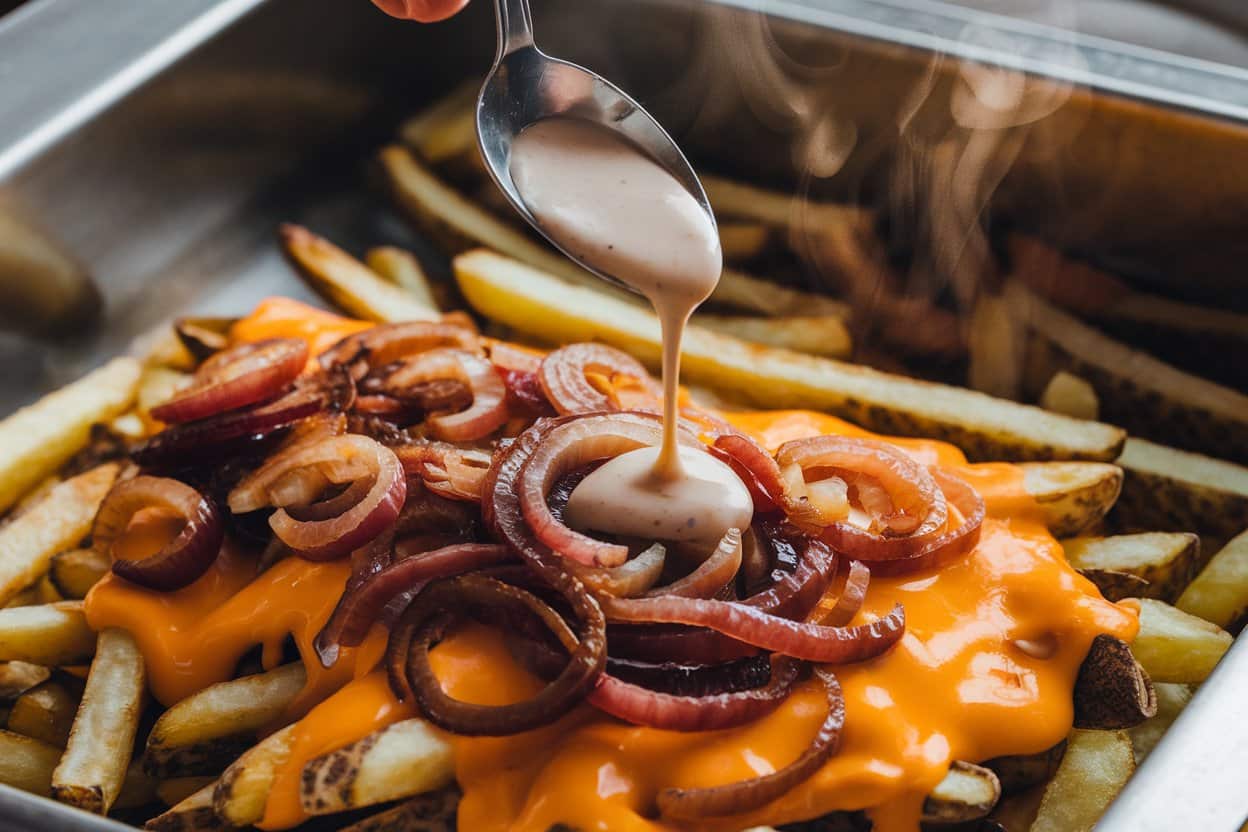
Caramelize the Onions
While the fries are cooking, it’s time to tackle the grilled onions, a key component of Animal Style Fries. Here’s how to make them perfectly:
Dice one large onion finely.
One tablespoon of oil or butter should be heated over medium heat in a skillet.
Simmer the chopped onions after adding them to the pan, stirring occasionally. You want the onions to caramelize and turn a rich golden brown. This process can take up to 15-20 minutes, but don’t rush it—the slower you cook, the sweeter and more flavorful the onions will be.
Melt the Cheese
Once your fries are ready and crispy, it’s time to add the cheese. While In-N-Out uses American cheese, feel free to use your favorite melting cheese if you prefer a variation.
Place slices of cheese directly onto the hot fries.
Let the residual heat from the fries melt the cheese, or place them under a broiler for a minute if you want extra meltiness.
Assemble the Fries
Now for the fun part—assembling your Animal Style Fries:
Lay the fries on a plate or baking dish.
Top with the melted cheese.
Scatter the grilled onions over the fries.
Generously drizzle the Thousand Island dressing over the top.
Making It Your Own-Variations on Animal Style Fries
While the traditional Animal Style Fries are incredible on their own, there’s no harm in experimenting with the recipe to make it your own. Try these entertaining variants:
Spicy Animal Style Fries: Add a kick by mixing in sriracha or hot sauce with the Thousand Island dressing, or sprinkle diced jalapeños on top.
Cheese Lovers’ Animal Style: Swap out American cheese for other melting cheeses like cheddar, mozzarella, or even a blend for extra cheesiness.
Bacon Animal Style Fries: Sprinkle crispy bacon bits on top of the fries for a smoky, savory addition.
Sweet Potato Animal Style Fries: For a healthier and slightly sweeter alternative, use sweet potato fries instead of regular fries.
Healthier Version: Bake the fries instead of frying them and use low-fat cheese and a light version of the sauce.
Feel free to use your imagination and add your preferred toppings!
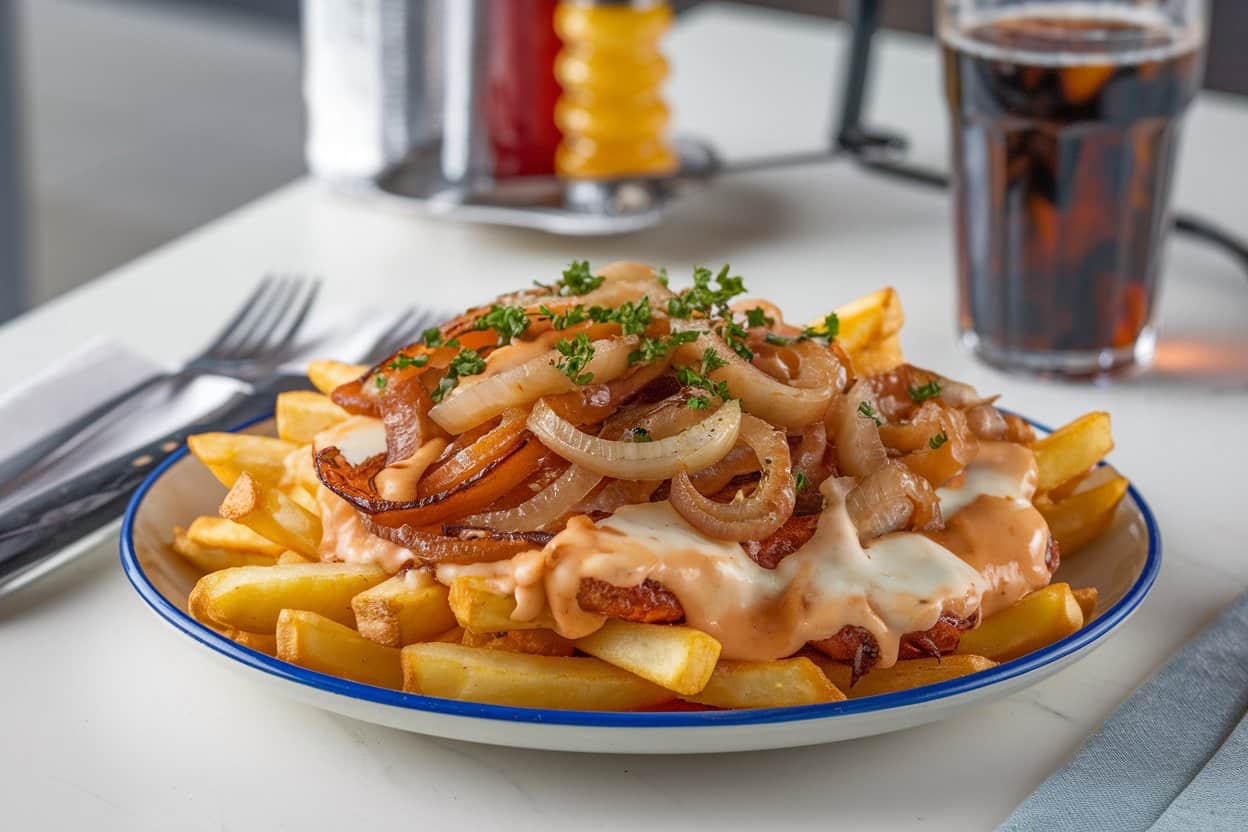
So, why are Animal Style Fries so popular? For one, they offer a perfect balance of flavors and textures that appeal to fast-food lovers and foodies alike. The crispy, salty fries are a classic comfort food, but adding cheese, grilled onions, and special sauce takes them to a whole new level.
Additionally, In-N-Out’s secret menu is part of the chain’s allure. Customers love the idea of ordering something “exclusive” and unique. Animal Style Fries, along with other secret menu items like the Animal Style Burger, create a sense of personalization and indulgence that keeps people coming back.
The dish also taps into the nostalgia of comfort food. Fries, cheese, and sauce—it’s a trio that hits all the right notes for a satisfying treat.
Conclusion
Now that you’ve unlocked the secrets behind In-N-Out’s iconic Animal Style Fries, why not give them a try at home? Whether you’re a longtime fan of the fast-food chain or simply looking to upgrade your homemade fries, this recipe delivers all the indulgence and flavor that make these fries so beloved. The combination of crispy fries, melted cheese, caramelized onions, and tangy Thousand Island dressing will satisfy even the most intense cravings.
What’s great about making them at home is the freedom to customize the dish to suit your personal taste. You can experiment with different cheeses, spice it up with jalapeños, or even try healthier alternatives like baked or sweet potato fries. Whichever way you choose to enjoy them, these Animal Style Fries are sure to become a go-to favorite in your kitchen. Don’t forget to share your own creative twists and let us know how your homemade version turns out![/vc_column_text][/vc_column][/vc_row][vc_row][vc_column width=”1/1″][us_separator size=”small”][us_text text=”Frequently Asked Questions (FAQs)” link=”%7B%22url%22%3A%22%22%7D” tag=”h2″][vc_tta_accordion][vc_tta_section title=”What are Animal Style fries?” tab_link=”%7B%22url%22%3A%22%22%7D”][vc_column_text]Animal Style fries are a popular item from In-N-Out Burger that consists of crispy French fries topped with melted cheese, grilled onions, and a special spread similar to Thousand Island dressing.[/vc_column_text][/vc_tta_section][vc_tta_section title=”What ingredients do I need to make Animal Style fries?” tab_link=”%7B%22url%22%3A%22%22%7D”][vc_column_text]To make Animal Style fries, you’ll need frozen or fresh French fries, American cheese, yellow onions, mayonnaise, ketchup, sweet pickle relish, and vinegar for the special spread. Optional toppings include additional seasonings or hot sauce.[/vc_column_text][/vc_tta_section][vc_tta_section title=”How can I achieve crispy fries?” tab_link=”%7B%22url%22%3A%22%22%7D”][vc_column_text]To achieve crispy fries, you can either deep-fry or bake them. If baking, make sure to spread them in a single layer on a baking sheet and use a high temperature (around 425°F) for even cooking. For frying, ensure the oil is hot enough (about 350°F) before adding the fries.[/vc_column_text][/vc_tta_section][vc_tta_section title=”Can I make the special spread ahead of time?” tab_link=”%7B%22url%22%3A%22%22%7D”][vc_column_text]Yes! The special spread can be made ahead of time and stored in the refrigerator for up to a week. Just mix mayonnaise, ketchup, relish, and a splash of vinegar, and keep it in an airtight container until you’re ready to use it.[/vc_column_text][/vc_tta_section][vc_tta_section title=”Can I customize the toppings for my Animal Style fries?” tab_link=”%7B%22url%22%3A%22%22%7D”][vc_column_text]Absolutely! While the classic Animal Style fries include cheese and grilled onions, you can customize your toppings with ingredients like jalapeños, bacon, or additional sauces to suit your taste preferences.[/vc_column_text][/vc_tta_section][vc_tta_section title=”Section”][/vc_tta_section][/vc_tta_accordion][/vc_column][/vc_row]
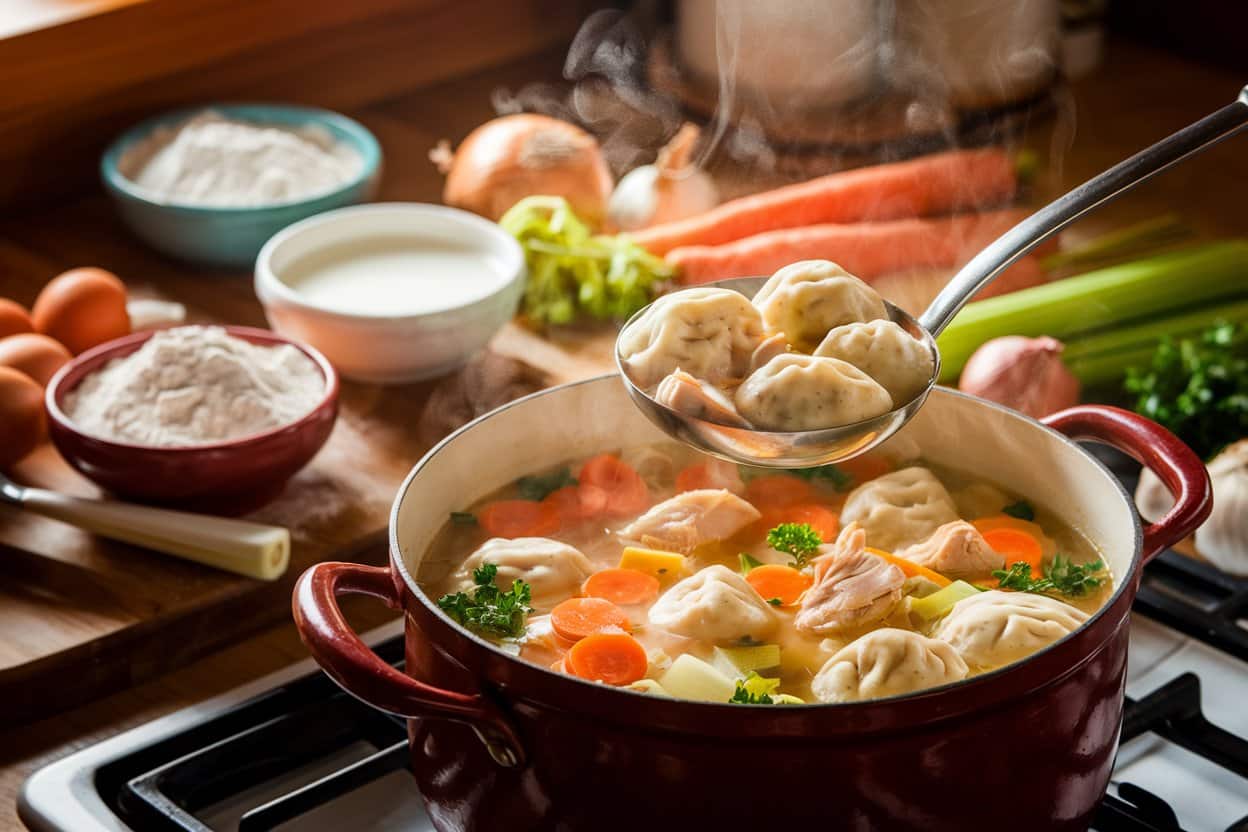
[vc_row][vc_column][vc_column_text]Nothing makes you feel more at home than a hot, filling cup of soup, especially when it’s homemade chicken dumpling soup. A classic comfort food, chicken dumpling soup offers a savory blend of tender chicken, fluffy dumplings, and rich, flavorful broth. It’s perfect for chilly nights or when you need a meal to lift your spirits. Not only does this dish evoke nostalgia, but it’s also incredibly easy to prepare, making it an ideal go-to for busy families. In this article, we’ll guide you through the steps of creating your very own bowl of chicken dumpling soup at home, providing pointers and advice to guarantee flawless results each and every time.
Why Chicken Dumpling Soup?
A Comfort Food Favorite
Chicken dumpling soup is beloved for its versatility and hearty appeal. Whether you’re under the weather, looking for a cozy meal, or just want something that tastes like a hug in a bowl, this dish delivers. The soup combines the protein of chicken, the satisfaction of dumplings, and the warmth of a homemade broth. It’s a one-pot meal that doesn’t require much beyond pantry staples, making it both affordable and time-efficient.
Nutritious and Balanced
Beyond the comfort factor, chicken dumpling soup is a balanced meal. With lean protein from the chicken, vegetables for vitamins and minerals, and dumplings made from simple ingredients like flour, eggs, and milk, it provides essential nutrients. Plus, the broth helps keep you hydrated and can soothe sore throats during the cold season.
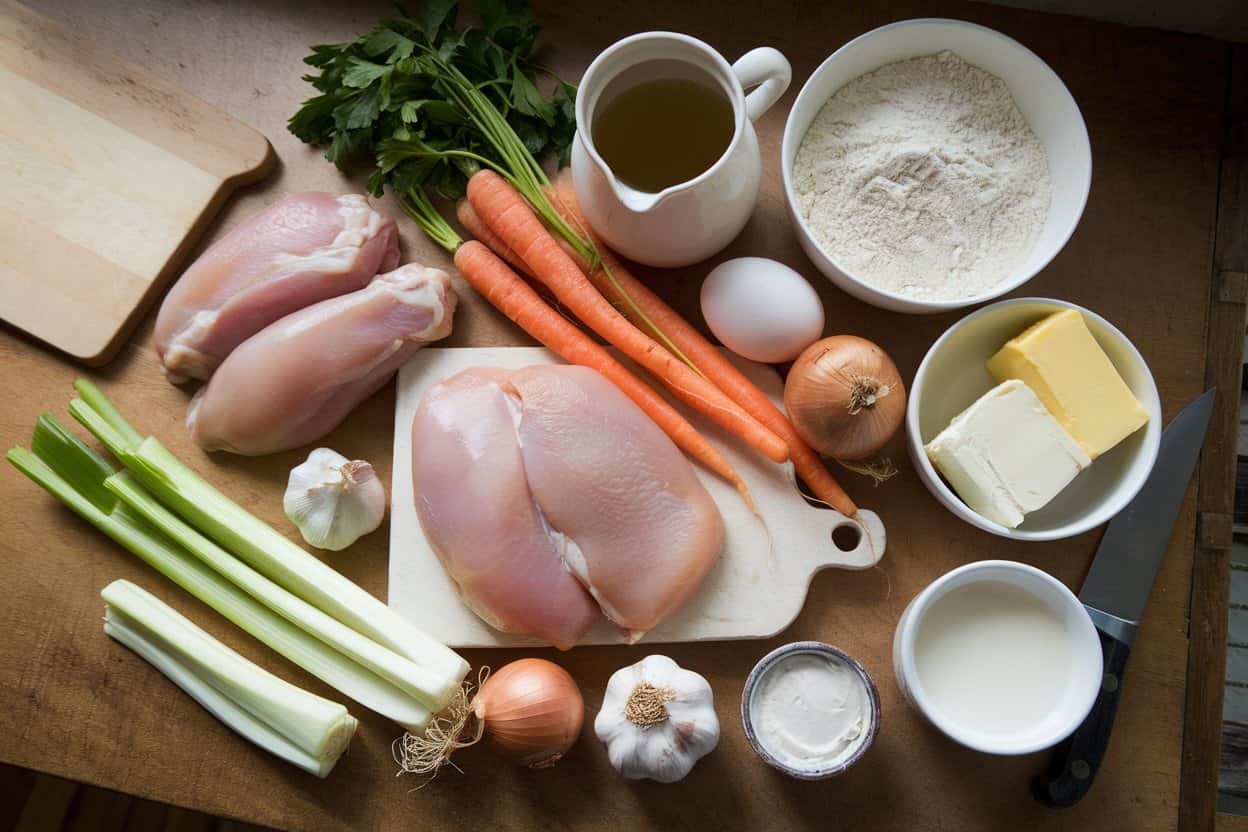
Ingredients for Homemade Chicken Dumpling Soup
Before we dive into the recipe, gather these ingredients to ensure you have everything on hand for a smooth cooking experience:
Step-by-Step Guide to Making Chicken Dumpling Soup
Prepare the Chicken and Vegetables
Start by bringing a big saucepan of olive oil or butter to a medium temperature. Add the diced onion, carrots, and celery. Sauté the vegetables until they begin to soften, which takes about 5-7 minutes. Stir in the garlic and heat for an additional minute.
Cook the Chicken
Place the chicken thighs or breasts in the pot, and pour in the chicken broth. If you’re using a store-bought broth, consider using a low-sodium version to control the salt levels. Add the bay leaf and thyme. Use a small amount of salt and pepper to season the mixture, then heat the soup until it boils. For twenty minutes, reduce the heat to a simmer to twenty-five minutes, or until the chicken is fully cooked and tender.
Once the chicken is cooked through, remove it from the pot and let it cool slightly. Using two forks, shred the chicken and reserve for later use.
Make the Dumpling Dough
While the soup is simmering, it’s time to make the dumpling dough. In a medium-sized dish, mix the flour, baking powder, and salt. Beat the egg, milk, and dissolved butter together thoroughly in a separate basin. Add the wet items to the dry mixture gradually, gently stirring until a soft, slightly sticky dough forms. Avoid overmixing the dough to keep the dumplings light and tender.
Add Dumplings to the Soup
Bring the soup back to a simmer, ensuring it’s not boiling too hard. Drop your dumpling dough into the stock by the spoonful. The dumplings should be about the size of a tablespoon. As they cook, they will expand and become fluffy. Cover the pot with a lid and let the dumplings cook for about 15 minutes, or until they are puffed up and cooked through. Avoid lifting the lid too often as the steam is crucial for cooking the dumplings properly.
Finish the Soup
Once the dumplings are done, return the shredded chicken to the pot. Stir gently to incorporate the chicken and taste the soup to adjust the seasoning. You may want to add more salt, pepper, or even a splash of lemon juice to brighten the flavors. If the broth has reduced too much, If necessary, add a bit more water or chicken stock to keep the soup’s consistency.
Serve and Enjoy
Ladle the chicken dumpling soup into bowls and Add some freshly sliced parsley as a garnish for some color and freshness. Serve it alongside crusty bread or on its own for a satisfying, comforting meal.
Homemade Broth: While store-bought broth is convenient, homemade chicken broth will elevate your soup. Simmer chicken bones with onions, carrots, and celery for a few hours to create a rich, flavorful base. You can freeze homemade broth for future use.
Use Chicken Thighs: Chicken thighs tend to have more flavor and stay moist during the cooking process, whereas chicken breasts can dry out. However, if you prefer leaner meat, chicken breasts are still an excellent option.
Tender Dumplings: For extra tender dumplings, use buttermilk in place of regular milk. The acidity in buttermilk helps to break down the gluten, resulting in a lighter, fluffier texture.
Flavor Variations: You can add extra herbs like rosemary or sage, or even mix in vegetables such as peas, corn, or potatoes for variety. You can also add some spice with a dab of cayenne pepper or hot sauce.
Make It Gluten-Free: For those with gluten sensitivities, A gluten-free flour combine can be used in place of the dumplings’ all-purpose flour. Make sure the broth you’re using is also gluten-free.
Chicken dumpling soup stores well and can be refrigerated for up to 3 days. To reheat, simply warm it over low heat on the stove, stirring occasionally. If you plan to freeze the soup, it’s best to freeze the soup base without the dumplings, as dumplings may not retain their texture after thawing. You can prepare the dumplings fresh when you’re ready to serve the soup again.
Conclusion
Whether you’re looking to impress guests, create a wholesome family dinner, or simply treat yourself, chicken dumpling soup is a winning recipe. With its combination of tender chicken, fluffy dumplings, and a rich, aromatic broth, this dish is a guaranteed crowd-pleaser. It’s nutritious, easy to prepare, and brimming with homemade goodness.
So, next time you’re in the mood for something comforting, why not whip up a batch of chicken dumpling soup? It’s a perfect way to bring warmth and love into your kitchen.[/vc_column_text][/vc_column][/vc_row][vc_row][vc_column width=”1/1″][us_separator size=”small”][us_text text=”Frequently Asked Questions (FAQs)” link=”%7B%22url%22%3A%22%22%7D” tag=”h2″][vc_tta_accordion][vc_tta_section title=”Can I use store-bought dumplings for this recipe?” tab_link=”%7B%22url%22%3A%22%22%7D”][vc_column_text]Yes, you can use store-bought dumplings to save time, but making homemade dumplings is simple and adds a personal touch to the soup. The homemade version often tastes fresher and fluffier![/vc_column_text][/vc_tta_section][vc_tta_section title=”What type of chicken should I use?” tab_link=”%7B%22url%22%3A%22%22%7D”][vc_column_text]You can use either boneless, skinless chicken breasts or thighs. Chicken thighs tend to have more flavor and stay juicier, while breasts are leaner and cook faster. Both work well for this soup.[/vc_column_text][/vc_tta_section][vc_tta_section title=”Can I make this soup ahead of time?” tab_link=”%7B%22url%22%3A%22%22%7D”][vc_column_text]Yes, you can make the soup base ahead of time and store it in the refrigerator for up to 3 days. However, it’s best to add the dumplings fresh when you’re ready to serve, as they can lose texture if stored for too long.[/vc_column_text][/vc_tta_section][vc_tta_section title=”How do I store and reheat chicken dumpling soup?” tab_link=”%7B%22url%22%3A%22%22%7D”][vc_column_text]Store leftovers in an airtight container in the refrigerator for up to 3 days. Reheat on the stove over low heat, stirring occasionally. If freezing, store the soup without dumplings and add fresh dumplings when reheating.[/vc_column_text][/vc_tta_section][vc_tta_section title=”Can I freeze chicken dumpling soup?” tab_link=”%7B%22url%22%3A%22%22%7D”][vc_column_text]You can freeze the soup without the dumplings, as they don’t hold up well when frozen. To freeze, place the cooled soup in an airtight container and store for up to 3 months. When ready to serve, thaw, reheat, and add freshly made dumplings.[/vc_column_text][/vc_tta_section][/vc_tta_accordion][/vc_column][/vc_row]
[vc_row][vc_column][vc_column_text]A healthy scalp is the foundation of vibrant, shiny hair, but many overlook its care. In today’s environment, pollution, product buildup, and even neglect can take a toll on your scalp, leading to issues like oiliness, flakiness, and even thinning hair. In this post, we’ll explore the importance of scalp detox, how to recognize when you need one, and introduce you to some top brands that offer effective scalp detox products. Let’s start with understanding what scalp detox is and why it matters.
What is Scalp Detox?
Scalp detox is thoroughly cleansing the scalp to remove excess oils, dead skin cells, and the buildup of hair products. Like your skin, your scalp can become congested with impurities, which block hair follicles and hinder healthy hair growth.
Why Does Scalp Detox It Matters?
Here are some simple bullet points explaining why scalp detox matters:
Removes Buildup: A scalp detox helps remove product buildup, dirt, and excess oil, making your scalp cleaner.
Promotes Hair Growth: A clean scalp encourages healthy growth by enabling healthy breathing and operation of hair follicles.
Balances Scalp pH: Detoxing can help balance the scalp’s pH levels, reducing issues like dryness or greasiness.
Improves Scalp Health: A detox can reduce inflammation and irritation, leading to a healthier scalp overall.
Enhances Absorption: With a detoxed scalp, hair care products can be better absorbed, making treatments more effective.
Boosts Confidence: A clean, healthy scalp can lead to shinier hair and improve your overall confidence in your hair’s appearance.
Common Causes of Scalp Issues
Product Buildup: Many people use styling products like gels, sprays, and dry shampoos without realizing how much residue they leave behind. Even regular shampoos can contribute to build up if not thoroughly rinsed, leading to clogged follicles.
Environmental Factors: Everyday exposure to pollution, dirt, and sweat can create an unhealthy environment for your scalp. These factors mix with oils and can cause scalp irritation, leading to flakiness and excessive oiliness.
Neglect: Often, scalp care is overlooked, with most people focusing solely on hair. Skipping regular scalp maintenance or washing too infrequently can result in problems like dandruff, excess oil, and even irritation.
Diet and Hydration: Poor nutrition and dehydration can affect your scalp’s health. A diet lacking essential nutrients can lead to dry skin and hair, while insufficient water intake can contribute to dryness.
Hormonal Changes: Changes in hormone levels, such as during puberty, menstruation, pregnancy, or menopause, can influence scalp health and oil production, often resulting in excessive oiliness or dryness.
Stress: High-stress levels can impact your overall health, including your scalp. Stress may lead to increased oil production or hair loss, making it essential to find effective stress-relief strategies.
Skin Conditions: Conditions like psoriasis, eczema, and seborrheic dermatitis can cause significant scalp issues, including redness, irritation, and flaking. If you suspect a skin condition, it’s best to consult a dermatologist for proper treatment.
Signs You Need a Scalp Detox
Recognizing when your scalp needs a detox is crucial for maintaining healthy hair. Here are some common signs that indicate it’s time for a cleanse:
Oily Scalp: An excess sebum production can result in a greasy appearance, often making hair feel weighed down and dirty.
Flakes: Dry, flaky skin is often a telltale sign of an unhealthy scalp. This can manifest as visible dandruff or simply as dryness on the scalp.
Itchiness: An itchy scalp may indicate irritation due to product buildup or an imbalanced scalp environment. This discomfort can be persistent and bothersome.
Thinning Hair: If you notice a decrease in hair density or thinning strands, it could be linked to clogged hair follicles caused by scalp neglect.
Importance of a Healthy Scalp
Hair Growth: Keeping your scalp free of buildup allows the hair follicles to function efficiently, promoting healthy hair growth. A clean and detoxed scalp is essential for maintaining the vibrancy and thickness of your hair.
Scalp Microbiome: The scalp’s microbiome, a delicate balance of microorganisms, plays a crucial role in its health. A disrupted microbiome can lead to conditions like dandruff or dermatitis. Regular detoxing helps maintain this balance and keeps the scalp healthy and irritation-free.
Diagnosis Techniques
To effectively address scalp problems, consider the following diagnostic techniques:
Self-Assessment: Start by examining your scalp at home. Look for visible flakes, oiliness, or irritation. Pay attention to your hair’s texture and volume.
Scalp Analysis: Inspect your scalp closely using a mirror or smartphone camera. Check for any areas of redness, irritation, or signs of buildup that may indicate a need for detox.
Consult a Professional: For a thorough evaluation, consult a dermatologist or trichologist. They can provide a professional assessment of your scalp health, helping to identify any underlying issues that may require treatment.
Top Scalp Care Products on Amazon
Now that you’re familiar with the signs and triggers of scalp issues, it’s time to look at practical solutions. Amazon provides a range of products aimed at profoundly cleansing the scalp, reducing buildup, and enhancing overall health. Here are some reputable brands:
Briogeo
Briogeo is known for using natural ingredients in hair care. They avoid harsh chemicals and create safe products for all hair types. They aim to make hair healthy and beautiful with gentle formulas that nourish the scalp and hair.
OGX
OGX provides a large selection of hair care items with unique ingredients worldwide. They focus on keeping hair hydrated and healthy without using strong chemicals, making their products great for everyday use. OGX encourages people to love their natural hair.
dpHUE
dpHUE specializes in hair care and uses apple cider vinegar to cleanse and balance the scalp. Their products are gentle and perfect for people with sensitive skin. They aim to remove buildup and make hair shiny without stripping it of natural oils.
Aveda
Aveda is all about natural and eco-friendly hair care. They make use of essential oils and plant-based substances. Hair and promote scalp health. Aveda cares for the environment and supports sustainable practices in its products.
WOW Skin Science
WOW Skin Science focuses on natural ingredients to clean and nourish hair. They use apple cider vinegar and essential oils to detoxify and add shine. WOW is committed to making safe, effective products without harmful chemicals that appeal to those who want a natural approach to hair care.
Conclusion
Taking care of your scalp is essential to your overall hair care routine. By understanding the causes of scalp issues and recognizing the signs that signal a need for detox, you can make informed choices for healthier hair. The right scalp care products can make a significant difference, helping to clear buildup and restore balance. Don’t overlook your scalp; it deserves as much attention as your hair. Embrace the power of a scalp detox and unlock the potential for beautiful, vibrant hair that truly shines[/vc_column_text][/vc_column][/vc_row][vc_row][vc_column width=”1/1″][us_cta title=”Discover Easy Detox Solutions!” color=”light” btn_label=”Explore More” btn_link=”%7B%22url%22%3A%22https%3A%2F%2Fsavenshine.com%2Fscalp-detox-effective-solutions%2F%22%7D”]Don’t stop at just understanding the importance of a scalp detox take action! In our next post on easy detox methods, amazing benefits, and top products for a healthier scalp. Get ready for beautiful, vibrant hair! Stay tuned![/us_cta][/vc_column][/vc_row]
[vc_row][vc_column][vc_column_text]Pasta, a cornerstone of Italian cuisine, has become a culinary icon across the globe. Its adaptability makes it perfect for nearly any meal, Whether it’s a gourmet dish or a straightforward weeknight supper. With a vast variety of pasta shapes and sizes, each is designed to hold different types of sauces, textures, and ingredients. From long, delicate strands to small, hearty tubes, every pasta type brings its own unique flair to the table.
Understanding the different types of pasta can elevate your cooking, helping you select the right pasta to match your sauces and ingredients. In this guide, we’ll explore various pasta types, their ideal pairings, and share a unique recipe for each that you can try at home.
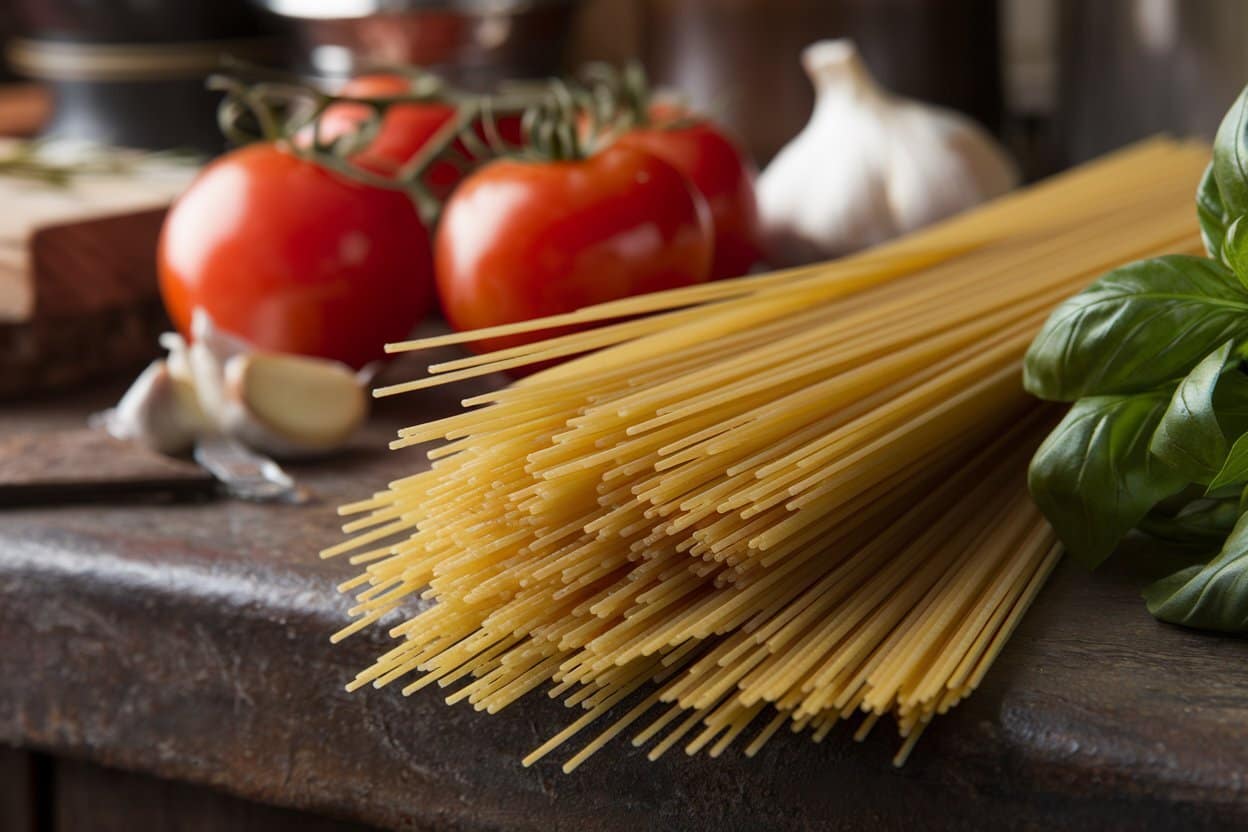
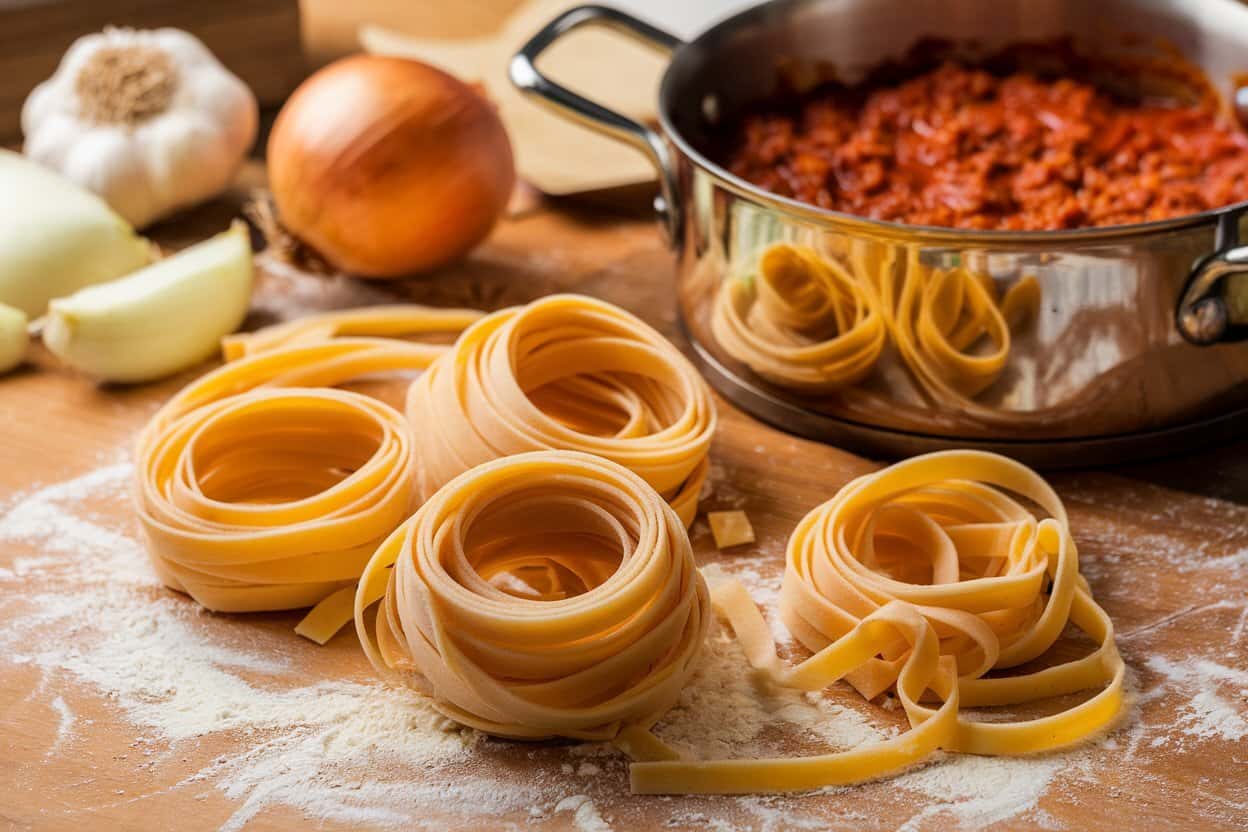
Spaghetti
Uncooked spaghetti alongside fresh ingredients like tomatoes, garlic, and basil, representing the essentials for a delicious Italian pasta dish.
Spaghetti is one of the most famous pasta types, consisting of long, thin, and cylindrical strands. It’s the go-to pasta for many traditional Italian dishes and offers a pleasant balance between texture and flavor absorption. The smooth surface of spaghetti is perfect for sauces that cling lightly.
Best Uses
Spaghetti is perfect for light to medium-bodied sauces, such as tomato-based marinara, garlic and olive oil, or creamy carbonara. It’s also a great base for seafood dishes or simple vegetable pairings.
Unique Recipe
Spaghetti with Lemon Garlic Shrimp
Ingredients:
Spaghetti
Shrimp
Lemon zest and juice
Olive oil
Garlic, parsley, and red pepper flakes
Instructions:
Cook spaghetti until al dente. In a pan, sauté garlic and red pepper flakes in olive oil, then add shrimp and cook until pink. Toss the pasta in the shrimp mixture, and finish with lemon juice, zest, and parsley for a light, zesty dish.
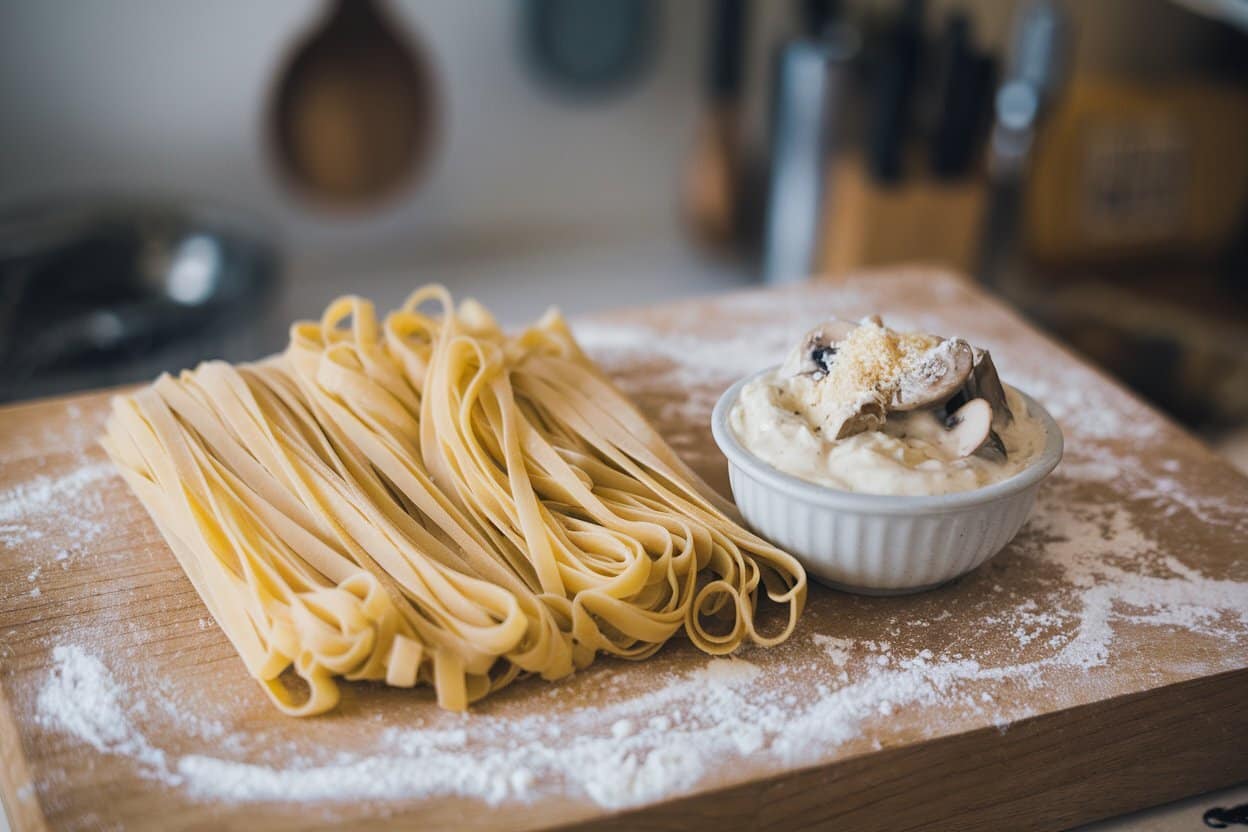
Fettuccine
Fresh fettuccine pasta on a floured cutting board with a side of creamy mushroom sauce, ready to be cooked.
Fettuccine is a flat, ribbon-like pasta that’s slightly thicker than its cousin, tagliatelle. Its broad surface makes it ideal for soaking up creamy, rich sauces. Fettuccine is an indulgent pasta often used in heartier dishes due to its thickness.
Best Uses
Fettuccine pairs wonderfully with creamy sauces such as Alfredo, truffle, or mushroom-based sauces. Its thickness also makes it an excellent choice for ragùs or meat-based dishes.
Sauté mushrooms and garlic in butter until golden. Add cream and thyme, allowing the mixture to thicken slightly. Toss cooked fettuccine in the sauce, top with grated Parmesan, and served for a luxurious, earthy meal.
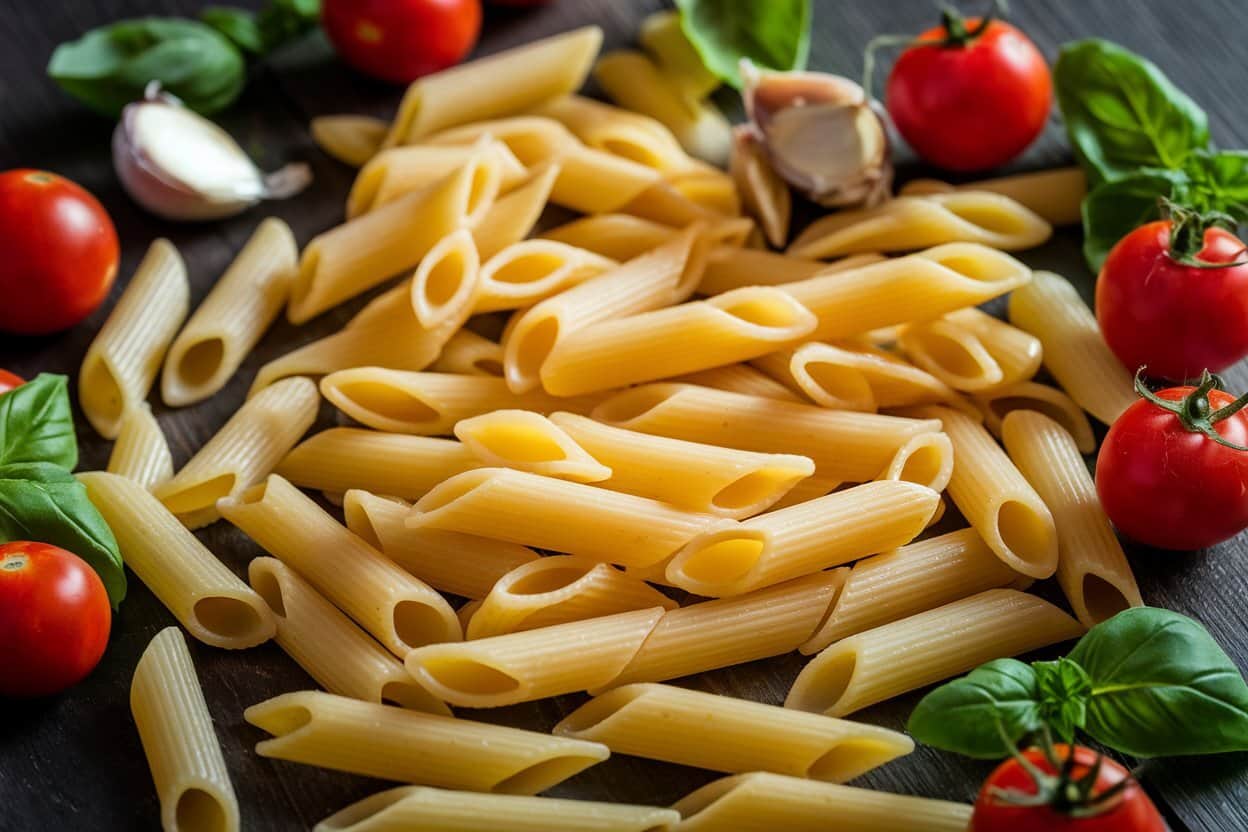
Fresh penne pasta with tomatoes, basil, and garlic – the perfect base for a delicious Italian dish.
Penne is a short, tube-shaped pasta with diagonal edges. Its ridges and hollow center make it perfect for grabbing onto thicker, chunkier sauces. The texture of penne ensures that it absorbs a generous amount of sauce in every bite, making each mouthful flavorful and rich.
Best Uses
Penne is great with hearty sauces like meat-based bolognese, arrabbiata, or even baked dishes such as penne al forno. The shape also works well in pasta salads.
Unique Recipe
Penne Arrabbiata
Ingredients:
Penne
Tomatoes (fresh or canned)
Garlic, chili flakes, and olive oil
Fresh basil
Instructions:
Add crushed tomatoes to olive oil and sauté garlic and chili flakes to make an arrabbiata sauce. Let it simmer until thickened. Toss in the cooked penne and finish with fresh basil for a spicy, tangy pasta dish.
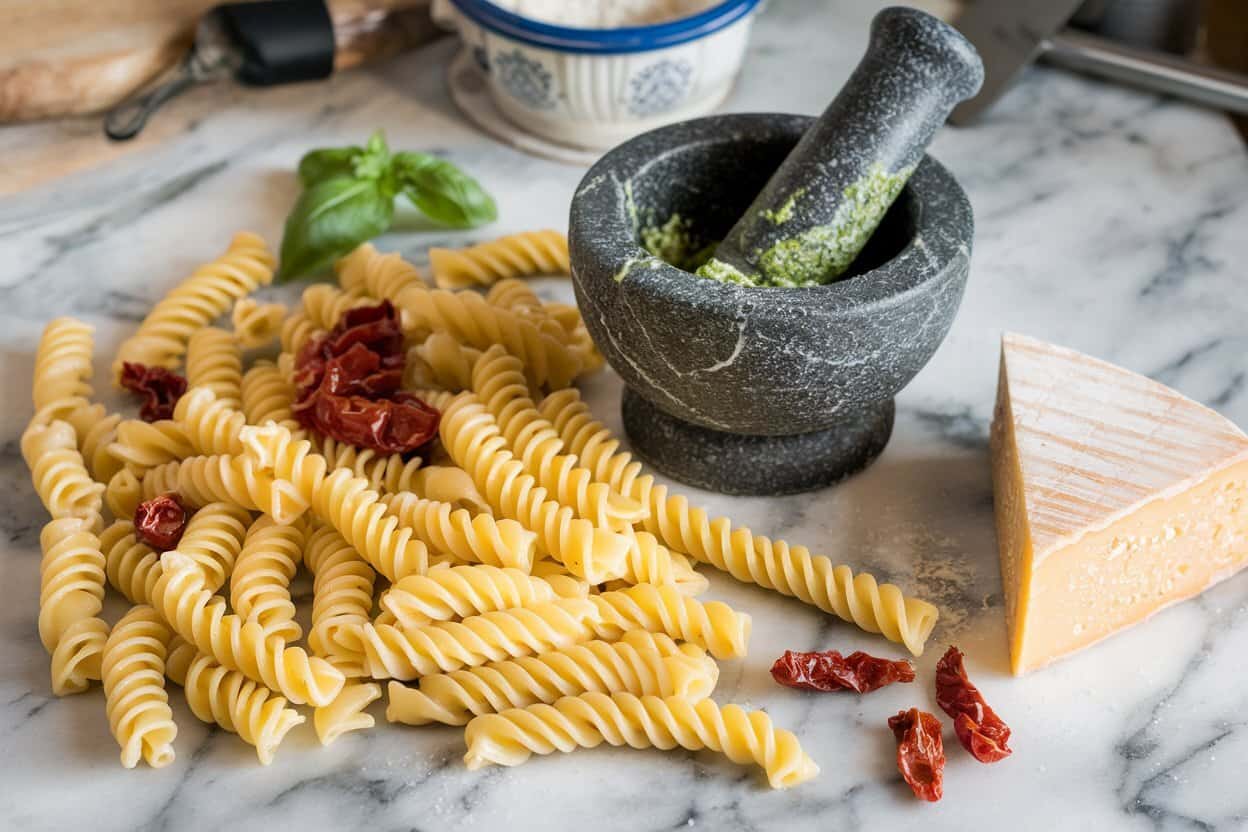
Fusilli
Fusilli pasta with sun-dried tomatoes, a block of cheese, and freshly made pesto in a mortar and pestle.
Fusilli is a spiral-shaped pasta that is designed to hold onto sauces in its twists and curls. This shape ensures that each piece of pasta catches plenty of sauce, making it ideal for rich or chunky sauces.
Best Uses
Fusilli is perfect for creamy sauces, like pesto, or for capturing vegetable-based sauces. It’s also a common choice for cold pasta salads due to its ability to maintain its shape and texture.
Unique Recipe
Fusilli with Basil Pesto and Sun-Dried Tomatoes
Ingredients:
Fusilli
Fresh basil pesto
Sun-dried tomatoes
Parmesan cheese and pine nuts
Instructions:
Toss cooked fusilli with a homemade basil pesto sauce, then add chopped sun-dried tomatoes for a burst of umami. For an additional crisp and flavorful layer, top with freshly grated Parmesan cheese and roasted pine nuts.
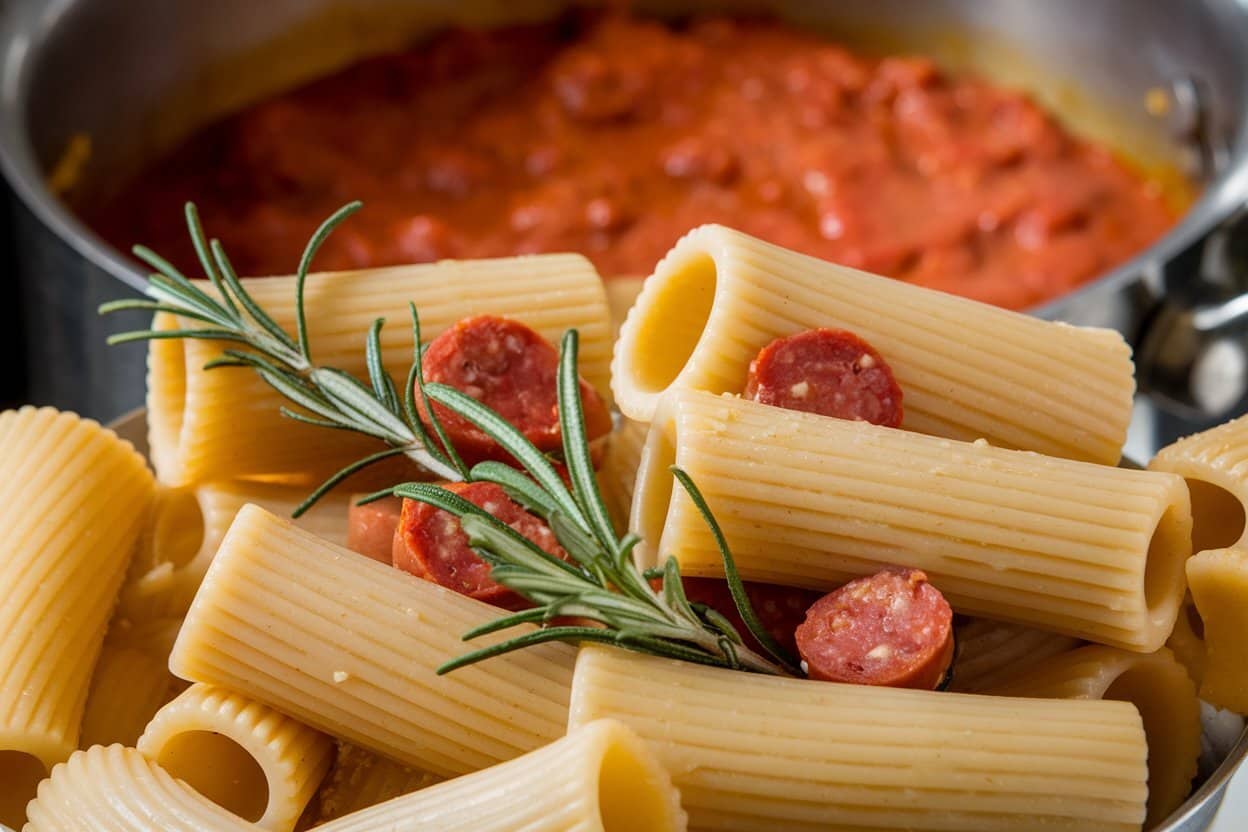
Rigatoni
Rigatoni pasta served with savory sausage and fresh rosemary, paired with a rich tomato sauce.
Rigatoni is a large, rigid tube pasta that’s perfect for capturing thick, hearty sauces both inside and out. Its robust structure makes it a fantastic choice for baked dishes or ragù.
Best Uses
Rigatoni works well with chunky meat sauces or vegetable-loaded dishes. It’s also perfect for casseroles and baked pasta dishes, as the sauce coats the pasta thoroughly, ensuring every bite is flavorful.
Unique Recipe
Baked Rigatoni with Sausage and Ricotta
Ingredients:
Rigatoni
Italian sausage (crumbled)
Ricotta and mozzarella cheese
Tomato sauce and garlic
Instructions:
Brown sausage with garlic, then mix it into a rich tomato sauce. Toss with cooked rigatoni and dollops of ricotta, Arrange it with mozzarella in a baking dish, and bake until golden and bubbling.
Uncooked lasagna sheets with homemade tomato sauce and freshly baked lasagna.
Lasagna sheets are wide and flat, traditionally used for layering in baked dishes. These pasta sheets are perfect for stacking sauces, cheese, meat, or vegetables into a hearty, multi-layered meal.
Best Uses
Lasagna is ideal for baked dishes, whether classic meat lasagna with béchamel and marinara, or vegetarian versions with roasted vegetables and cheese.
Unique Recipe
Classic Meat Lasagna
Ingredients:
Lasagna sheets
Ground beef
Tomato sauce and béchamel sauce
Mozzarella and Parmesan cheese
Instructions:
Layer cooked lasagna sheets with a rich meat sauce, béchamel, and mozzarella cheese. Repeat the layers and bake until the top is golden and bubbling. For a reassuring presentation, put some fresh parsley on top, crowd-pleasing dish.
Orecchiette
Orecchiette pasta with fresh broccoli, garlic, and red pepper flakes ready for cooking.
Orecchiette, meaning “little ears” in Italian, is a small, round, and slightly concave pasta. Its unique shape is ideal for catching sauces and small bits of meat or vegetables, making each bite flavorful.
Best Uses
Orecchiette is great for chunky sauces or sautéed vegetable dishes. It’s often used in southern Italian cuisine, particularly in combination with greens like broccoli rabe or sausage.
Unique Recipe
Orecchiette with Broccoli Rabe and Sausage
Ingredients:
Orecchiette
Italian sausage
Broccoli rabe
Garlic, olive oil, and chili flakes
Instructions:
Cook sausage until browned, then sauté garlic and chili flakes in olive oil. Add blanched broccoli rabe and toss with the cooked orecchiette for a flavorful, hearty dish with a balance of bitterness and savory sausage.
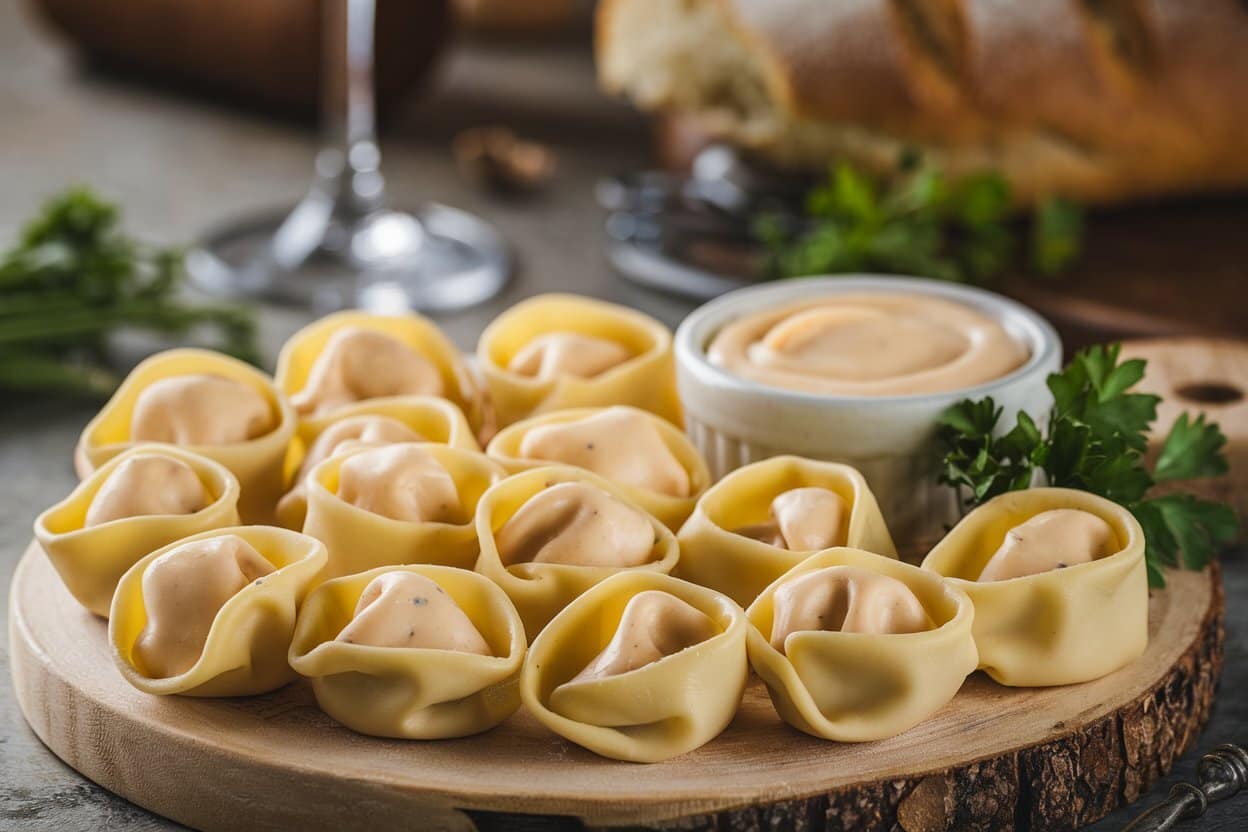
Tortellini
Tortellini pasta stuffed with a rich, creamy filling, served with a dipping sauce for a delicious appetizer.
Tortellini are small, ring-shaped pasta stuffed with cheese, meat, or vegetables. They are often enjoyed in soups or served with a light sauce that compliments their rich filling.
Best Uses
Tortellini is perfect for broths and creamy sauces. Its filling makes it hearty enough to be served with just a light drizzle of olive oil, or tossed in a creamy sauce.
Unique Recipe
Tortellini in Creamy Parmesan Sauce
Ingredients:
Cheese or meat-filled tortellini
Heavy cream
Parmesan cheese
Nutmeg and black pepper
Instructions:
Cook tortellini until al dente. In a saucepan, heat cream, nutmeg, and black pepper, then add Parmesan cheese and stir until melted. Toss the tortellini in the sauce and serve topped with extra cheese for a comforting, rich meal.
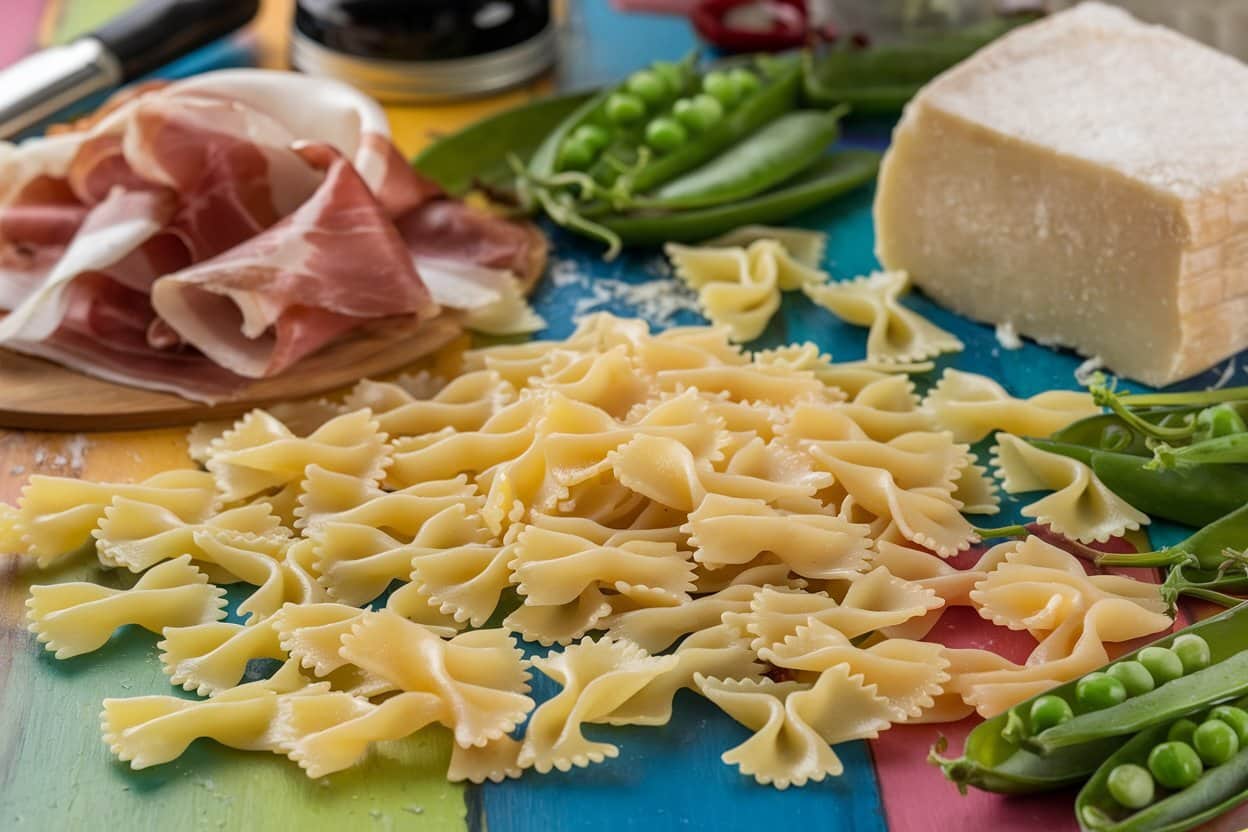
Farfalle (Bowtie Pasta)
Farfalle pasta paired with fresh green peas, prosciutto, and Parmesan, ready to be turned into a delicious Italian meal.
Farfalle, also known as bowtie pasta, is shaped like small butterflies or bowties. Its unique shape makes it not only visually appealing but also practical for holding onto sauces.
Best Uses
Farfalle works well in both hot dishes with creamy or tomato-based sauces and cold pasta salads. It’s also a fun addition to kid-friendly meals.
Unique Recipe
Farfalle with Creamy Pea and Prosciutto
Ingredients:
Farfalle
Fresh peas
Prosciutto
Parmesan cheese and heavy cream
Instructions:
Cook farfalle and toss with a creamy sauce made from heavy cream and Parmesan. Add fresh peas and crispy prosciutto for a sweet and savory combination.
Homemade tagliatelle pasta ready to be cooked, served with a classic tomato sauce simmering in the background.
Tagliatelle is a long, flat ribbon pasta similar to fettuccine but often a bit thinner. This pasta is perfect for soaking up thick sauces, particularly ragù.
Best Uses
Tagliatelle is best paired with hearty sauces like bolognese, as its flat surface holds onto the sauce well.
Unique Recipe
Tagliatelle alla Bolognese
Ingredients:
Tagliatelle
Ground beef and pork
Tomato paste, onions, carrots, and celery
Red wine and milk
Instructions:
Sauté the ground meats with finely chopped onions, carrots, and celery. Add red wine, tomato paste, and a splash of milk for richness. Let it simmer for a few hours and serve with freshly cooked tagliatelle for a traditional Italian comfort food.
Conclusion
Exploring the many shapes and sizes of pasta opens up endless culinary possibilities. Whether you’re craving a creamy fettuccine dish or a hearty baked rigatoni, each type of pasta brings its unique qualities to the table. Experiment with these recipes and pasta shapes to discover your personal favorites, and enjoy the versatility and deliciousness that pasta has to offer.[/vc_column_text][/vc_column][/vc_row][vc_row][vc_column width=”1/1″][us_separator][us_text text=”Frequently Asked Questions (FAQs)” link=”%7B%22url%22%3A%22%22%7D” tag=”h2″][vc_tta_accordion title_size=”1.2rem” title_tag=”h3″][vc_tta_section title=”What are the different types of pasta?” tab_link=”%7B%22url%22%3A%22%22%7D”][vc_column_text]There are numerous types of pasta, including spaghetti, penne, fettuccine, farfalle, and lasagna, each with unique shapes and uses in various dishes.[/vc_column_text][/vc_tta_section][vc_tta_section title=”How do I choose the right pasta for a recipe?” tab_link=”%7B%22url%22%3A%22%22%7D”][vc_column_text]The choice of pasta depends on the sauce and ingredients. For heavier sauces, use thicker pasta like fettuccine, while lighter sauces pair well with thinner pasta like angel hair.[/vc_column_text][/vc_tta_section][vc_tta_section title=”Can I use whole wheat or gluten-free pasta in these recipes?” tab_link=”%7B%22url%22%3A%22%22%7D”][vc_column_text]Yes, you can substitute whole wheat or gluten-free pasta in most recipes. Just be mindful of the cooking times, as they may differ from traditional pasta.[/vc_column_text][/vc_tta_section][vc_tta_section title=”How do I cook pasta perfectly?” tab_link=”%7B%22url%22%3A%22%22%7D”][vc_column_text]Boil water with salt, add pasta, and cook according to package instructions until al dente. Remember to stir occasionally and reserve some pasta water before draining.[/vc_column_text][/vc_tta_section][vc_tta_section title=”What are some popular pasta dishes I can make?” tab_link=”%7B%22url%22%3A%22%22%7D”][vc_column_text]Popular dishes include spaghetti carbonara, penne arrabbiata, fettuccine Alfredo, and lasagna. Each has its own flavor profile and can be customized.[/vc_column_text][/vc_tta_section][vc_tta_section title=”Can I make pasta from scratch?” tab_link=”%7B%22url%22%3A%22%22%7D”][vc_column_text]Absolutely! Homemade pasta is made from flour, eggs, and water. There are various methods to roll and cut it into different shapes.[/vc_column_text][/vc_tta_section][vc_tta_section title=”How should I store leftover pasta?” tab_link=”%7B%22url%22%3A%22%22%7D”][/vc_tta_section][/vc_tta_accordion][/vc_column][/vc_row]
[vc_row][vc_column][vc_column_text]Craving something rich, flavorful, and guaranteed to impress? This creamy tuscan chicken pasta recipe is about to become your new favorite dinner. Imagine tender chicken, sautéed garlic, sun dried tomatoes, and fresh spinach all swirled together in a decadent, Parmesan-infused cream sauce. It’s like a warm hug in a bowl, bringing the irresistible flavors of Italy right into your kitchen without the need for a passport.
Perfect for weeknights and ready in about 30 minutes or a cozy weekend meal, this dish combines elegance with simplicity. Let’s dive in!
Why This Tuscan Chicken Pasta Will Be Your New Go To
Dinner in a Flash: It’s quick enough for busy weeknights, yet indulgent enough for special occasions.
Irresistibly Creamy: The luscious, velvety sauce hugs each bite of pasta, bursting with rich, savory flavors.
Easy to Customize: Want to make it lighter? Add more veggies? Or kick up the spice? No problem this recipe adapts to your needs.
Minimal Cleanup: A one-pan wonder that won’t leave your sink piled high with dishes.
The Ingredients You’ll Need- Simple but Flavorful
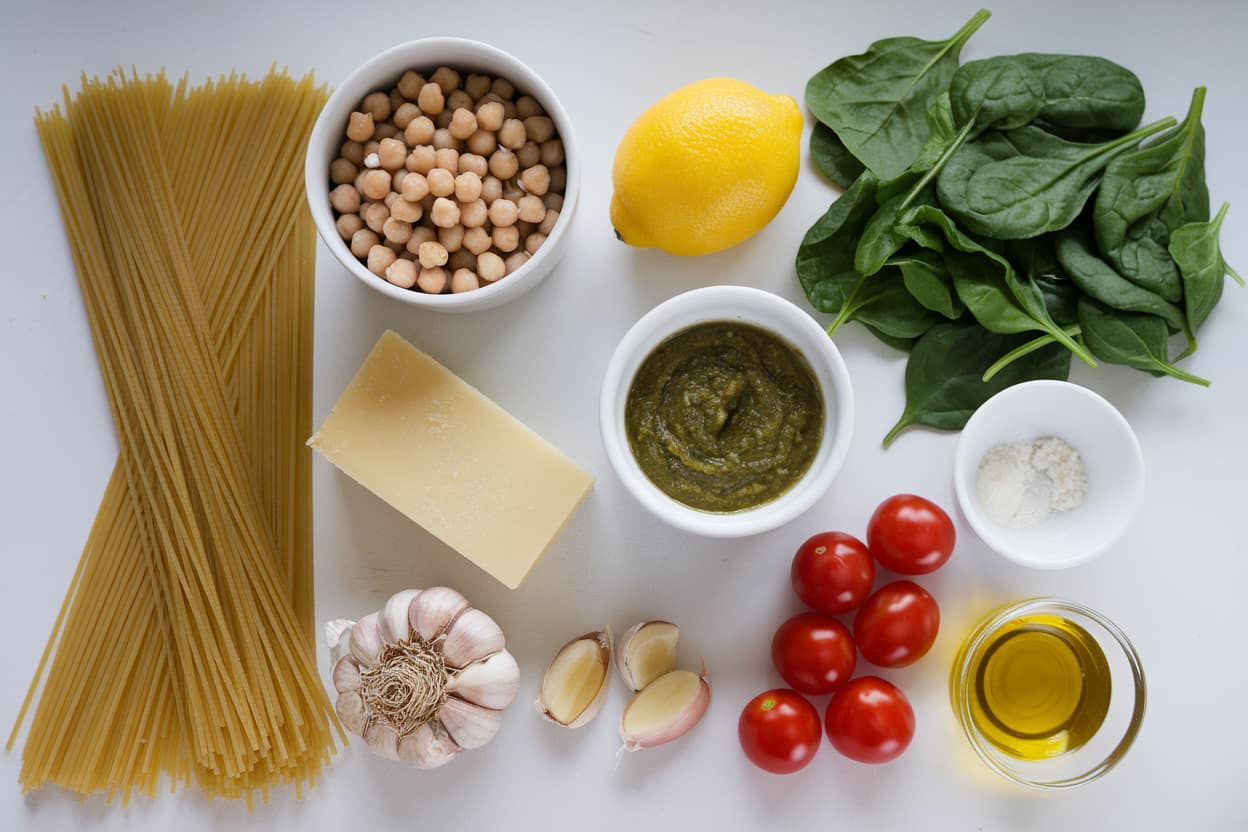
Simple yet flavorful ingredients for preparing Tuscan Chicken Pasta, featuring fresh chicken breasts, spinach, sun-dried tomatoes, and pasta.
What makes this dish stand out is how a few simple ingredients create something magical:
2 Chicken Breasts (boneless, skinless): Tender, juicy chicken forms the heart of the dish.
12 oz Pasta (penne, fettuccine, or rotini): Choose your favorite! I love using penne for that perfect sauce to pasta ratio.
1 cup Heavy Cream: For that silky, luxurious sauce we all dream of.
1 cup Parmesan Cheese (freshly grated): The secret ingredient for a deep, savory flavor.
½ cup Sun-Dried Tomatoes (in oil, drained): These add a punch of tangy, concentrated flavor that elevates the dish.
4 Garlic Cloves (minced): Because what’s an Italian dish without garlic?
2 cups Fresh Spinach: For a pop of color and nutrients.
1 cup Chicken Broth: Helps create the base of the creamy sauce.
2 tbsp Olive Oil: For perfectly charring the chicken to a golden brown.
Salt, Pepper & Red Pepper Flakes (optional): Adjust to taste seasoning is key.
Step by Step Guide to Tuscan Chicken Pasta Perfection
Let’s demonstrate how to prepare this delectable dinner in a few simple steps.
Cook the Pasta
Bring a pot of salted water to a boil and add the pasta. Cook according to the package instructions, stirring occasionally, until the pasta is al dente and cooked through. Once done, drain and set aside.
Pro Tip: Reserve about ½ cup of pasta water before draining to adjust the sauce consistency later if needed.
Sear the Chicken
While the pasta cooks, season your chicken breasts with salt and pepper. In a big skillet, warmth the olive oil over medium-high heat. Sear the chicken for 6-7 minutes on each side until beautifully golden and fully cooked. Once done, remove from the skillet, let it rest, then slice into thin strips.
Bonus Tip: Searing locks in the juices and adds a crispy, flavorful crust to the chicken.
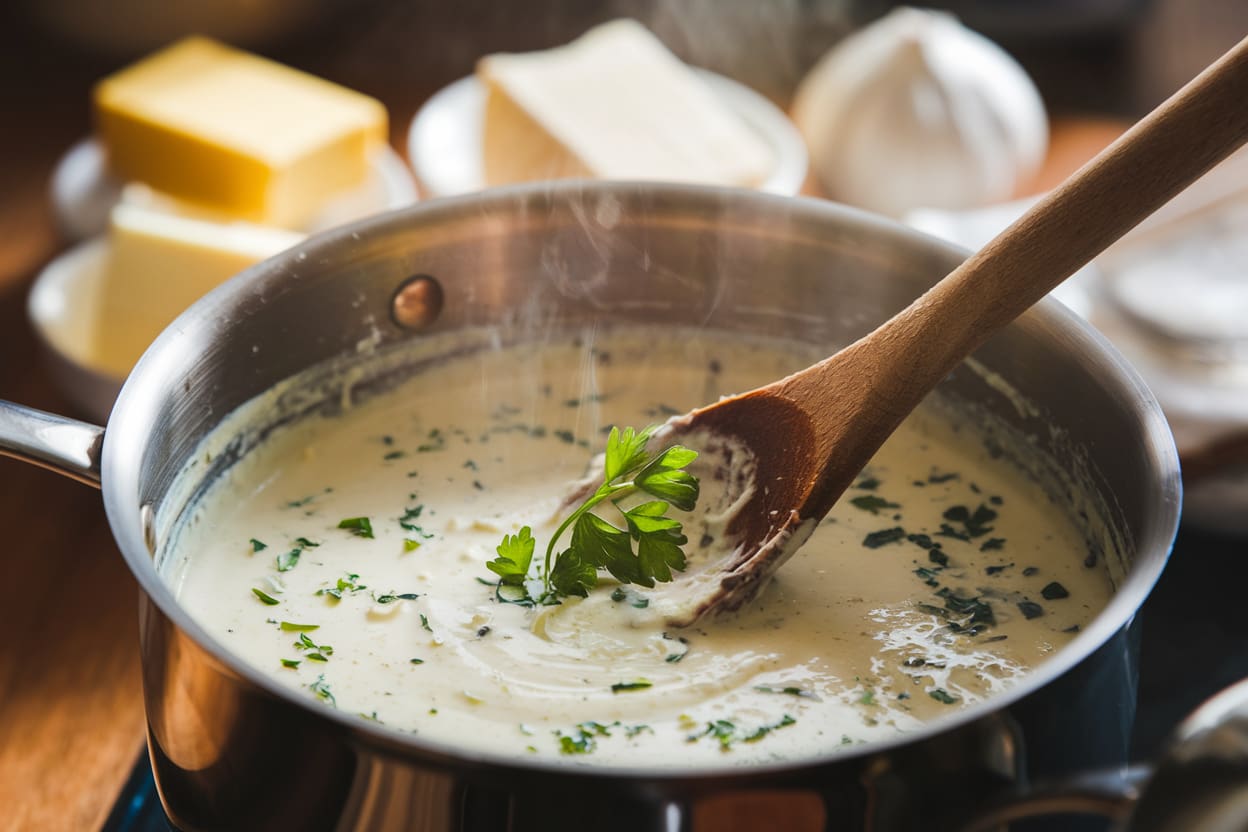
Make the Dreamy Cream Sauce
Dreamy cream sauce in the making, perfect for pairing with pasta or your favorite dish.
In the same skillet (don’t wipe it out you want those flavor bits), add minced garlic and sauté for about a minute until fragrant. Include the chicken broth to the pan, stirring to unwind any burnt bits from the bottom, which will elevate the overall flavor of the dish.
Now, gradually add the heavy cream and bring it to a simmer. Stir in sun dried tomatoes and let the sauce simmer for about 3-4 minutes. You’ll notice it starts to thicken and get creamy.
Add Spinach and Parmesan
Add the fresh spinach and toss, stirring to wilt. Next, add in that freshly grated Parmesan cheese, stirring until it melts into the sauce, making it thick and irresistibly creamy.
Bring It All Together
Now for the exciting part combining all the elements! Include the cooked pasta to the skillet and gently toss it in the creamy sauce until everything is well coated. Then layer in those slices of perfectly cooked chicken. Toss until every bite of pasta is coated in the delicious sauce. If the sauce feels too thick, just splash in a little reserved pasta water until it’s just right.
Garnish and Serve
Add red pepper flakes, salt, and pepper for seasoning (if you like a bit of spice). Garnish with extra Parmesan and freshly chopped parsley for an extra burst of flavor. Serve immediately and watch as everyone swoons over this restaurant-quality meal.
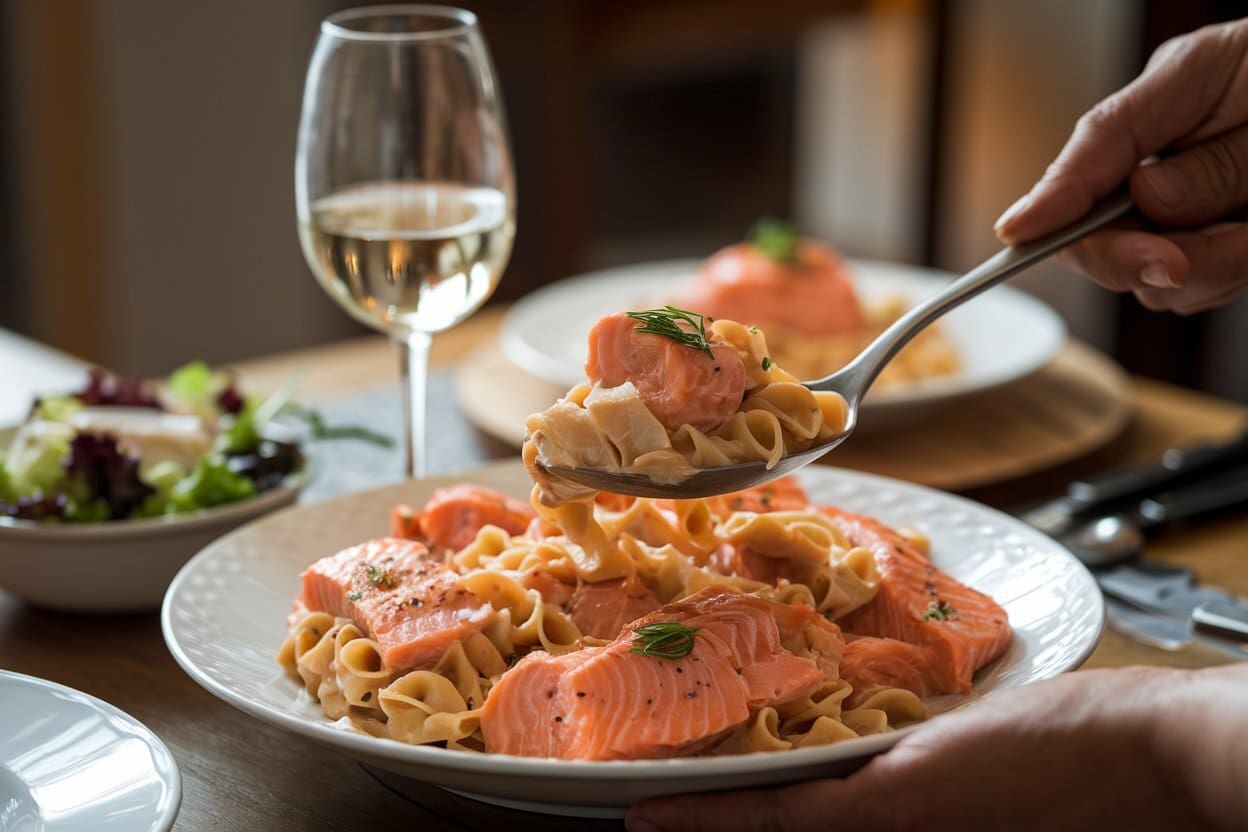
Flawless Tuscan chicken pasta paired with a glass of white wine, perfect for an elegant dinner setting.
Insider Tips for a Flawless Tuscan Chicken Pasta
Don’t Skimp on the Garlic: Garlic adds an essential layer of flavor, so feel free to add more if you’re a garlic lover.
Adjust the Creaminess: If you’d rather have a thinner sauce, substitute half of the heavy cream with half-and-half or milk. It’ll still be delicious!
Pasta Water Magic: Keep some pasta water handy! It’s the key to loosening the sauce without diluting the flavors.
Add Extra Veggies: Want more greens? Add mushrooms, zucchini, or bell peppers for a heartier dish.
Make it Spicy: The perfect amount of spice is added with a dash of red pepper flakes to counterbalance the creamy richness.
Conclusion
This creamy tuscan chicken pasta hits all the right notes—rich, savory, and just a little indulgent. Whether you’re cooking for family, entertaining guests, or just treating yourself, this dish delivers restaurant-quality flavor with minimal effort. The combination of tender chicken, tangy sun-dried tomatoes, and spinach wrapped in a luscious Parmesan cream sauce will make everyone want to eat more.[/vc_column_text][/vc_column][/vc_row][vc_row][vc_column width=”1/1″][us_separator size=”small”][us_text text=”Frequently Asked Questions (FAQs)” link=”%7B%22url%22%3A%22%22%7D” tag=”h2″][vc_tta_accordion title_size=”1.2rem” title_tag=”h3″][vc_tta_section title=”Can I use a different type of pasta for this recipe?” tab_link=”%7B%22url%22%3A%22%22%7D”][vc_column_text]Yes, you can use any pasta you like! Penne, fettuccine, or even spaghetti work well. Just adjust the cooking time based on the type of pasta you choose.[/vc_column_text][/vc_tta_section][vc_tta_section title=”Can I substitute the heavy cream with a lighter option?” tab_link=”%7B%22url%22%3A%22%22%7D”][vc_column_text]If you prefer a lighter version, you can substitute heavy cream with half-and-half or whole milk. However, the sauce may be slightly less creamy and thick.[/vc_column_text][/vc_tta_section][vc_tta_section title=”Can I make this recipe ahead of time?” tab_link=”%7B%22url%22%3A%22%22%7D”][vc_column_text]Yes, you can make it ahead! Store the pasta and sauce separately in the fridge for up to 2-3 days. When reheating, add a splash of water or milk to help revive the creaminess of the sauce.[/vc_column_text][/vc_tta_section][vc_tta_section title=”What vegetables can I add to this dish?” tab_link=”%7B%22url%22%3A%22%22%7D”][vc_column_text]You can add spinach, sun-dried tomatoes, or even mushrooms to enhance the flavors. Fresh spinach wilts quickly, so add it towards the end of cooking.[/vc_column_text][/vc_tta_section][vc_tta_section title=”How can I make this dish gluten-free?” tab_link=”%7B%22url%22%3A%22%22%7D”][vc_column_text]To make it gluten-free, simply use gluten-free pasta. Ensure that any other ingredients like chicken broth or seasoning are also gluten-free.[/vc_column_text][/vc_tta_section][/vc_tta_accordion][/vc_column][/vc_row]
[vc_row][vc_column][vc_column_text]In the world of weeknight dinners, there’s nothing quite as satisfying as a hearty, creamy dish that comes together quickly and effortlessly. That’s exactly where garlic parmesan chicken pasta shines. This recipe delivers on all fronts—rich in flavor, easy to make, and packed with protein. Whether you’re cooking for family, friends, or just treating yourself, this meal will easily become a favorite on your menu.
Why You’ll Love This Dish
This meal is the ideal balance of savory, creamy, and cheesy goodness. The garlic and Parmesan provide a robust flavor that compliments the tender chicken and pasta. The best part? It’s quick to prepare, making it the perfect option for hectic weeknights when you want to prepare a handmade meal without devoting a lot of time to the kitchen.
The combination of fresh garlic and Parmesan cheese adds a rich, aromatic base to the dish, while the creamy sauce brings everything together in a velvety finish. The chicken provides a hearty, satisfying bite, and the pasta soaks up every bit of that delicious sauce. It’s a complete meal that you can serve in under 30 minutes.
Here’s a simple and delicious recipe for garlic parmesan chicken pasta:
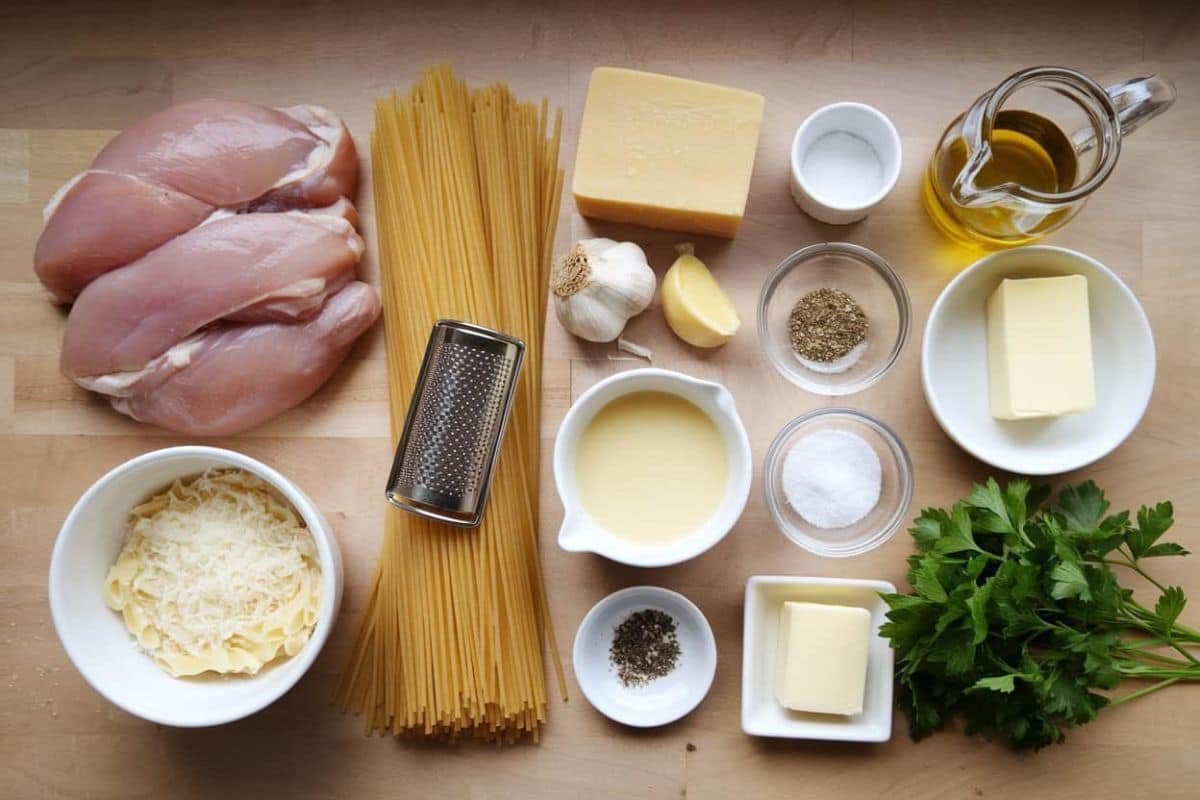
A beautifully arranged flat lay of the essential ingredients for making Garlic Parmesan Chicken Pasta – from fresh chicken breasts to Parmesan cheese, garlic, and herbs.
Ingredients:
2 chicken breasts, skinned and boneless (cubed)
8 oz pasta (penne, fettuccine, or your choice)
4 cloves garlic (minced)
1 cup heavy cream
1 cup grated Parmesan cheese
1 tablespoon olive oil
1 tablespoon butter
1 teaspoon Italian seasoning
Salt and pepper to taste
Fresh parsley (chopped, for garnish)
Red pepper flakes (optional for a little heat)
Ingredients Breakdown
To make garlic parmesan chicken pasta, you’ll need some simple ingredients that you probably already have in your pantry and fridge:
Chicken Breasts: The protein star of this dish. Chicken is tender and absorbs the sauce wonderfully.
Garlic: Fresh garlic is key here, offering that bold and delicious flavor that pairs beautifully with Parmesan cheese.
Parmesan Cheese: The hero ingredient, it gives the sauce a rich and nutty flavor that compliments the creaminess of the sauce.
Heavy Cream: This makes the sauce luxuriously creamy and adds to the richness of the dish.
Pasta: You can use any pasta you like—penne, fettuccine, or even bowtie pasta. Each variety gives the dish its own texture.
Italian Seasoning: A mixture of dried herbs, such as oregano, thyme, and basil adds an extra layer of flavor to the chicken.
Olive Oil and Butter: These fats provide the base for browning the chicken and making the sauce extra flavorful.
Salt and Pepper: Simple but essential for bringing all the flavors together.
Fresh Parsley: To brighten the dish and give it some color and freshness.
How to Make Garlic Parmesan Chicken Pasta
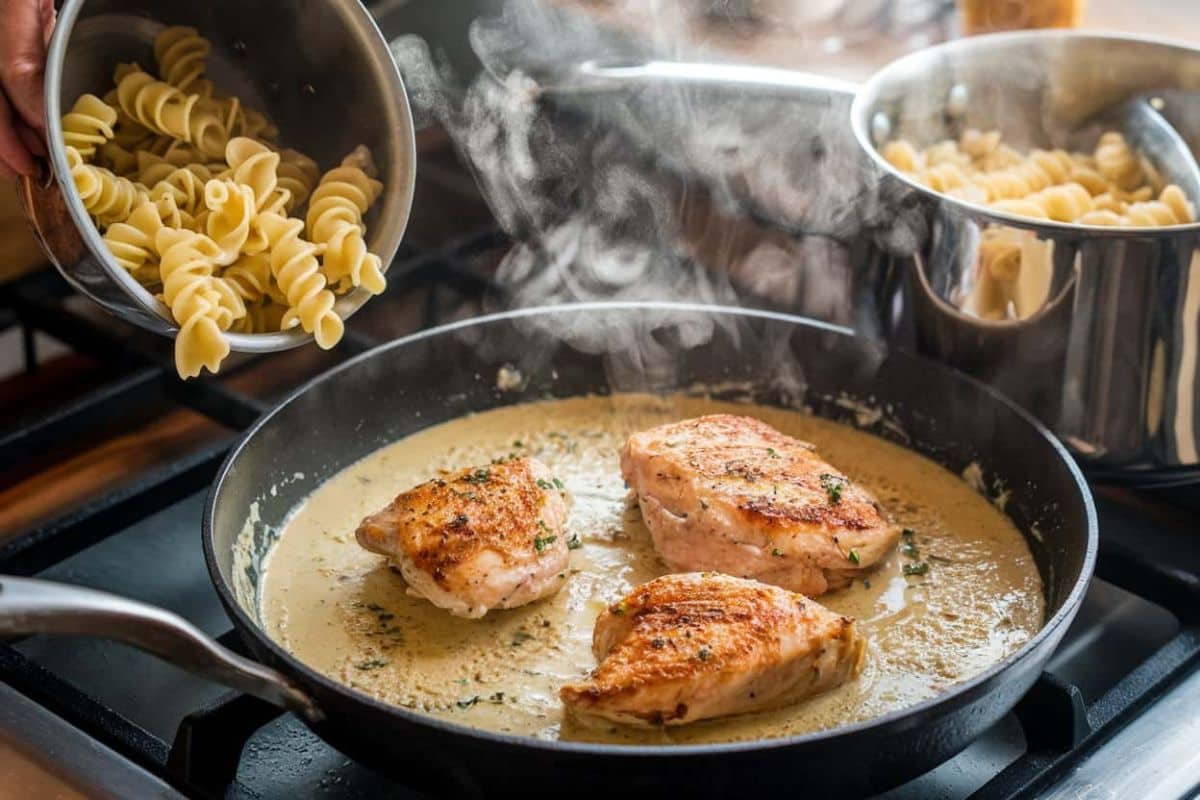
Creamy Garlic Parmesan Chicken Pasta being prepared on the stove with succulent chicken breasts and rotini pasta.
There are a few easy stages in this recipe, and in no time, you’ll have a delicious meal ready to serve.
Cook the Pasta:
Begin by boiling your pasta as directed on the packet. Don’t forget to add a generous amount of salt to the water, as this enhances the flavor of the pasta. Once cooked, drain it and set it aside.
Sear the Chicken:
While the pasta is cooking, season your chicken cubes with salt, pepper, and Italian seasoning. Heat a large skillet with melted butter and olive oil over medium heat. After adding the chicken, sauté it for 6 to 8 minutes, or until it is cooked through and golden brown. When finished, take the chicken out of the skillet and place it somewhere else.
Prepare the Sauce:
Within the same frying pan, add the chopped garlic and reduce the heat. Cook, stirring occasionally, until aromatic, about 1 minute; do not let it burn. After adding the heavy cream, thoroughly blend. After letting the cream simmer for a few minutes, gradually stir in the Parmesan cheese. Continue to stir up until the sauce thickens and turns creamy, melting the cheese.
Combine and Serve:
Add the cooked chicken back into the skillet and toss to rub it in the sauce. Then, add the drained pasta and toss everything together until each bite is covered in that luscious garlic-Parmesan sauce. Serve hot, garnished with more Parmesan cheese if desired and fresh parsley.
Tips for the Perfect Garlic Parmesan Chicken Pasta
Don’t overcook the chicken: Overcooking chicken can make it dry and tough. Make sure to cook it until just done to keep it juicy and tender.
Use freshly grated Parmesan: Freshly grated Parmesan cheese melts better and has a more intense flavor compared to pre-shredded cheese.
Control the heat: When making the garlic sauce, be sure to lower the heat so the garlic doesn’t burn. Burnt garlic can turn bitter and affect the overall taste of the dish.
Pasta options: While you can use any pasta, short pasta like penne or fusilli tends to hold the sauce better and is easier to eat with the chicken pieces.
Why This Dish Is Perfect for Busy Weeknights
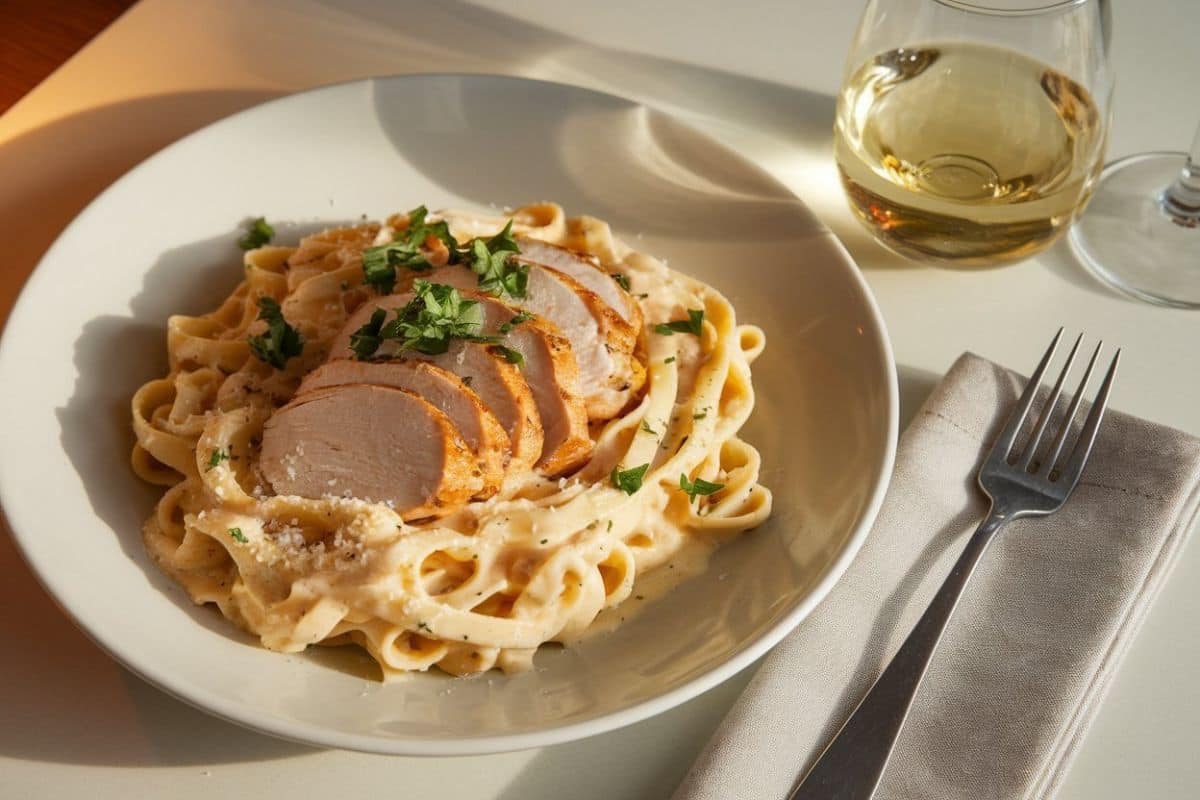
A perfectly plated serving of Garlic Parmesan Chicken Pasta – creamy, delicious, and topped with seared chicken slices and fresh parsley. Ideal for a cozy evening meal.
One of the best things about garlic parmesan chicken pasta is how quickly it comes together. In under 30 minutes, you have a complete meal that feels gourmet but requires minimal effort. It’s also a great option for meal prep. Just prepare a big quantity and refrigerate any leftovers for up to three days. The flavors actually intensify as the dish sits, making it a delicious option for lunch or dinner the next day.
Pairing Suggestions
For a complete meal, you can pair garlic parmesan chicken pasta with a light side salad or garlic bread. A crisp Caesar salad adds a refreshing contrast to the rich pasta, while any remaining sauce on your plate can be soaked up by the garlic bread. For drinks, a glass of chilled white wine like Chardonnay or Sauvignon Blanc complements the creamy, garlicky flavors perfectly.
Conclusion
If you’re looking for a delicious, comforting dish that’s easy to make, garlic parmesan chicken pasta is the answer. Its creamy garlic Parmesan sauce, tender chicken, and perfectly cooked pasta come together in a harmony of flavors that are sure to impress. Best of all, it’s a meal that’s ready in a flash, making it ideal for any busy night of the week. Give it a try, and it just might become a staple in your household.[/vc_column_text][/vc_column][/vc_row][vc_row][vc_column width=”1/1″][us_separator size=”small”][us_text text=”Frequently Asked Questions (FAQ)” link=”%7B%22url%22%3A%22%22%7D” tag=”h2″][vc_tta_accordion][vc_tta_section title=”Can I use a different type of pasta for this recipe?” tab_link=”%7B%22url%22%3A%22%22%7D”][vc_column_text]Yes! You can use any pasta you prefer, such as fettuccine, penne, or even whole wheat pasta. The recipe is versatile and works well with most types of pasta.[/vc_column_text][/vc_tta_section][vc_tta_section title=”Can I substitute the chicken with another protein?” tab_link=”%7B%22url%22%3A%22%22%7D”][vc_column_text]Absolutely! You can use shrimp, turkey, or even tofu as a substitute for chicken in this dish. Just adjust the cooking time accordingly for your chosen protein.[/vc_column_text][/vc_tta_section][vc_tta_section title=”Can I make this dish ahead of time?” tab_link=”%7B%22url%22%3A%22%22%7D”][vc_column_text]Yes, Garlic Parmesan Chicken Pasta can be made ahead of time. Store it in an airtight container in the refrigerator for up to 3 days. Reheat on the stovetop with a little cream or milk to restore its creamy texture.[/vc_column_text][/vc_tta_section][vc_tta_section title=”Can I make this recipe gluten-free?” tab_link=”%7B%22url%22%3A%22%22%7D”][vc_column_text]Yes! Simply substitute regular pasta with your favorite gluten-free pasta. The other ingredients are naturally gluten-free, making this dish easy to adapt for gluten-free diets.[/vc_column_text][/vc_tta_section][vc_tta_section title=”How do I prevent the sauce from becoming too thick?” tab_link=”%7B%22url%22%3A%22%22%7D”][vc_column_text]
If your sauce becomes too thick, you can thin it out by adding a little more cream, milk, or pasta water until you reach your desired consistency.
[vc_row][vc_column][vc_column_text]Chickpea pasta has emerged as a favorite among health-conscious individuals, offering a nutritious, protein-packed, and gluten-free alternative to traditional wheat pasta. Whether you’re looking for a healthy weeknight dinner or a satisfying meal for a gluten-free lifestyle, chickpea pasta provides a versatile base that fits into any diet. In this post, we’ll explore the nutritional benefits of chickpea pasta, share practical tips for cooking it, and offer culinary inspiration to enhance your enjoyment of this plant-based pasta in innovative ways.
Why Choose Chickpea Pasta?
Gluten-Free Alternative: Made from ground chickpeas, this pasta is naturally gluten-free. It’s an excellent option for people with celiac disease or gluten sensitivity while providing a satisfying pasta-like texture.
High in protein and dietary fiber: Chickpea pasta is a powerhouse of nutrients, Provides around 11-15 each serving contains 8 grams of dietary fiber and 16 grams of protein. This makes it ideal for those on plant-based diets or anyone seeking a protein boost without adding meat. Dietary fiber aids in the regulation of digestion and enhances satiety, which is key for maintaining healthy eating habits.
Low Glycemic Index: Since chickpea pasta is lower in carbs and has a low glycemic index, it acts to stabilize blood glucose levels, making it a great option for people managing diabetes or anyone wanting to avoid sugar spikes and crashes.
Vitamins and Minerals: Chickpeas are rich in essential nutrients such as iron, magnesium, potassium, and folate, all of which contribute to maintaining energy levels and overall health.
Tips for Cooking Chickpea Pasta
Cooking chickpea pasta is easy, but it does require a few adjustments to ensure the perfect texture. Follow these tips to avoid messiness and enjoy a well-cooked dish:
Use plenty of water: Chickpea pasta tends to foam more than traditional pasta, so be sure to use ample water—around 4-6 cups per 8 ounces of pasta. This helps reduce foam buildup and ensures the pasta cooks evenly without becoming sticky.
Cook to al dente: Chickpea pasta cooks faster than wheat-based varieties, so keep a close eye on it. Aim for al dente (firm to the bite) in about 7-9 minutes. Excessive cooking can result in a soft and mushy consistency, so taste test it a minute or two before the recommended time on the package.
Rinse after cooking: After draining, give your chickpea pasta a quick rinse with cold water. This step removes excess starch, which helps prevent clumping or stickiness, ensuring your pasta retains its structure and texture.
Recipe Spotlight: Garlic-Lover’s Mushroom Chickpea Pasta
Ingredients laid out for a delicious Mediterranean pasta: spaghetti, chickpeas, spinach, cherry tomatoes, Parmesan cheese, pesto, garlic, and olive oil.
This recipe brings together garlic, mushrooms, and chickpea pasta for a quick and healthy dinner. The meal is plant-based and can be prepared in under 30 minutes, making it perfect for busy weeknights.
Ingredients:
8 oz chickpea pasta
2 tbsp olive oil
1 cup mushrooms, sliced
3-4 cloves garlic, minced
1/4 cup Parmesan cheese (optional)
Salt and pepper to taste
Fresh parsley for garnish
Instructions:
Pasta should be cooked as focused on the package and then set aside.
Garlic should be sautéed until fragrant in a skillet with heated olive oil over medium heat.
When the mushrooms are soft, add them and simmer, about 5 minutes.
Mix the cooked pasta with the mushrooms and garlic. Season with salt, pepper, and (if preferred) Parmesan cheese.
Garnish with parsley and serve hot.
This dish combines the savory flavor of mushrooms with the robust taste of garlic, while chickpea pasta adds a healthy twist. You can also add fresh spinach, grilled chicken, or roasted veggies to make the meal more substantial.
Other Recipe Ideas
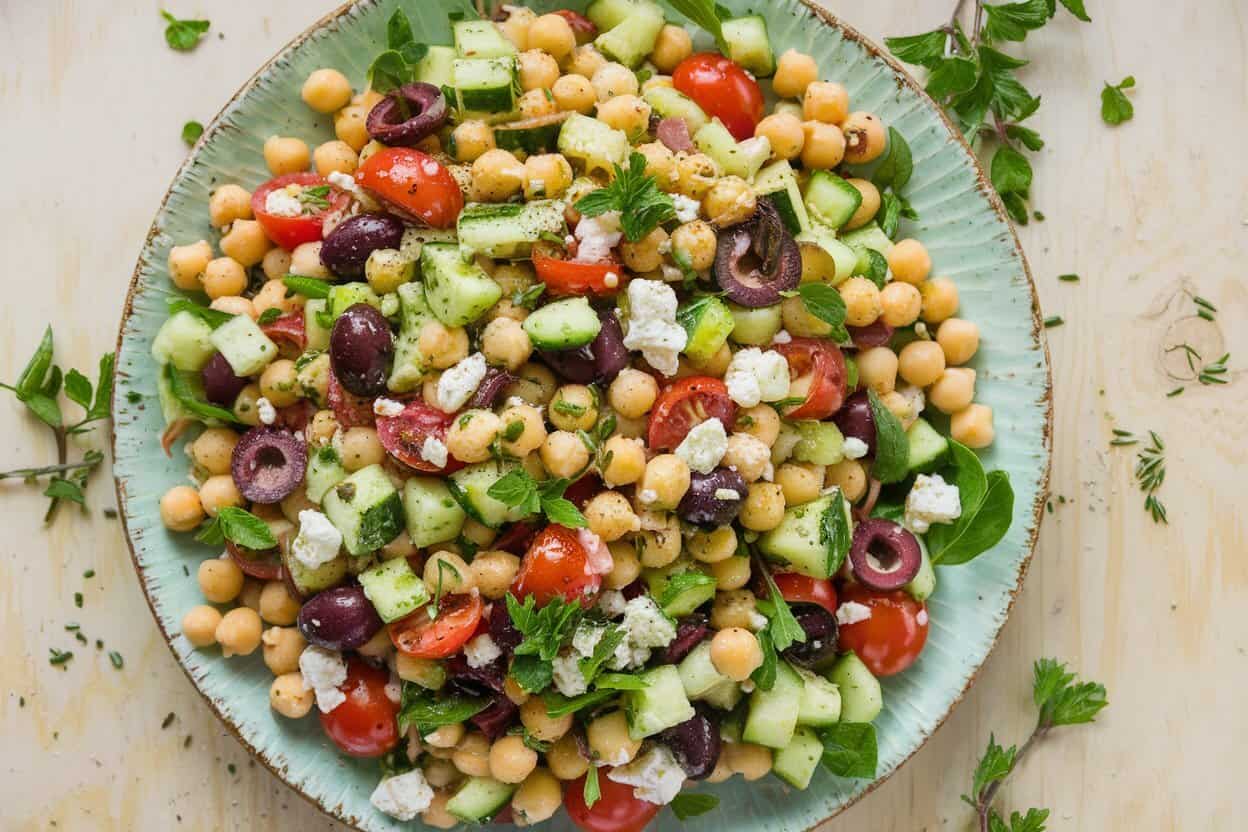
A refreshing Mediterranean chickpea salad with cucumbers, cherry tomatoes, Kalamata olives, feta cheese, and fresh herbs, perfect for a light and healthy meal.
Pesto Chickpea Rotini
This Mediterranean-inspired dish combines chickpea pasta with a vibrant pesto sauce, sautéed spinach, crunchy pistachios, and creamy feta. It delivers the perfect balance of plant-based protein, healthy fats, and antioxidants, making it both satisfying and nutritious. This recipe is a go-to for anyone craving bold flavors with a healthy twist.
Chickpea Pasta Salad
For a cool and refreshing option, toss chickpea pasta with diced cucumbers, juicy cherry tomatoes, and a light vinaigrette. Add in Kalamata olives and extra chickpeas for a protein boost, creating a perfect make-ahead meal that’s brimming with Mediterranean flavors and ready to enjoy at any time.
Spicy Chickpea Arrabbiata
Turn up the heat with this fiery chickpea pasta dish! Toss your pasta with a spicy arrabbiata sauce made from garlic, crushed tomatoes, and red pepper flakes. Add some sautéed spinach or roasted veggies for extra nutrition. This high-protein meal is perfect for spice lovers looking for a bold, energizing dinner.
Creamy Avocado Chickpea Pasta
Blend ripe avocados, garlic, lemon juice, and a little olive oil to make a silky sauce for your chickpea spaghetti for a rich and creamy touch. Toss with cherry tomatoes, fresh basil, and a sprinkle of red pepper flakes for a dish that’s bursting with healthy fats and bright flavors. This meal is a perfect mix of indulgence and nutrition.
Lemon Garlic Chickpea Spaghetti
Brighten up your dinner with a simple yet zesty lemon garlic chickpea spaghetti. Cook chickpea pasta to al dente and toss with a light sauce of olive oil, minced garlic, and freshly squeezed lemon juice. Add chopped parsley and grated Parmesan cheese for a fresh, citrusy dish that’s quick to prepare and packed with protein and flavor.
Chickpea Pasta and Sustainability
Climbing plants with green pods growing in a sunlit field.
Switching to chickpea pasta isn’t just a smart choice for your health—it’s also an environmentally friendly one. Chickpeas, the star ingredient in this pasta, are a member of the legume family, which plays a vital role in sustainable agriculture. Unlike traditional wheat, chickpeas require significantly less water to grow and are highly drought-tolerant, making them an ideal crop for areas facing water scarcity. This reduces the overall water footprint of your meal compared to wheat-based pasta.
Incorporating chickpea pasta into your diet also helps reduce the demand for resource-intensive crops like wheat and corn, contributing to a more diverse and resilient food system. Because chickpeas are a plant-based protein source, when compared to proteins derived from animals, they have a smaller carbon impact. Choosing chickpea pasta can therefore help decrease the environmental impact of your meals, making it a great option for those looking to align their food choices with eco-friendly values.
Ultimately, by opting for chickpea pasta, you’re not only nourishing your body with a nutritious, plant-based diet while simultaneously promoting more environmentally friendly farming methods and making the world a healthier place.
Conclusion
Chickpea pasta is a versatile, nutrient-rich option that fits into many dietary lifestyles, from gluten-free to plant-based and low-carb. Whether you want to cook a quick weeknight dinner like Garlic-Lover’s Mushroom Chickpea Pasta or prepare a meal-prepped salad, chickpea pasta delivers on taste, texture, and health benefits. By making the switch, you’re not only fueling your body with wholesome, plant-based nutrition but also contributing to a more sustainable future.[/vc_column_text][/vc_column][/vc_row][vc_row][vc_column width=”1/1″][us_separator size=”small”][us_text text=”Frequently Asked Questions (FAQ)” link=”%7B%22url%22%3A%22%22%7D” tag=”h2″][vc_tta_accordion][vc_tta_section title=”What is chickpea pasta made from?” tab_link=”%7B%22url%22%3A%22%22%7D”][vc_column_text]Chickpea pasta is made primarily from chickpea flour, which is made by grinding dried chickpeas into a fine powder. This makes it a gluten-free alternative to traditional wheat pasta.[/vc_column_text][/vc_tta_section][vc_tta_section title=”Is chickpea pasta a good source of protein?” tab_link=”%7B%22url%22%3A%22%22%7D”][vc_column_text]Yes, chickpea pasta is a great source of plant-based protein. It typically contains about 14-20 grams of protein per serving, compared to about 7 grams in traditional pasta.[/vc_column_text][/vc_tta_section][vc_tta_section title=”How does chickpea pasta compare to regular pasta in terms of taste and texture?” tab_link=”%7B%22url%22%3A%22%22%7D”][vc_column_text]Chickpea pasta has a slightly nutty flavor and a firmer texture than regular pasta. While it may taste a bit different, many people find it to be a satisfying and delicious alternative.[/vc_column_text][/vc_tta_section][vc_tta_section title=”How do you cook chickpea pasta?” tab_link=”%7B%22url%22%3A%22%22%7D”][vc_column_text]Chickpea pasta is cooked similarly to regular pasta. Boil it in salted water for about 7-10 minutes, or until it reaches your desired level of tenderness. It’s important to stir it occasionally to prevent sticking.[/vc_column_text][/vc_tta_section][vc_tta_section title=”Can chickpea pasta be used in all the same recipes as regular pasta?” tab_link=”%7B%22url%22%3A%22%22%7D”][vc_column_text]Yes, chickpea pasta can be used in most recipes that call for regular pasta. It works well in salads, stir-fries, and traditional pasta dishes. Just keep in mind that its unique flavor and texture might slightly alter the final dish.[/vc_column_text][/vc_tta_section][vc_tta_section title=”Section”][/vc_tta_section][/vc_tta_accordion][/vc_column][/vc_row]
Worldwide, millions of people suffer from depression, a prevalent mental health problem. An individual’s capacity to operate is severely hampered by depression, which is characterized by intense feelings of melancholy, pessimism, and disinterest in everyday tasks. Because of their advanced education and clinical experience, advanced practice nurses (APNs) play a more and more important role in addressing depression. This comprehensive overview explores how APNs contribute to the treatment of depression, their responsibilities, treatment methodologies, and the unique benefits they offer in mental health care.
What is Depression?
Depression, recognized clinically as Major Depressive Disorder (MDD), is a severe mood disorder that disrupts daily life. It’s more than just feeling down or having a bad day; it is a persistent state of emotional turmoil that affects various aspects of life, including work, relationships, and self-esteem. The impact of depression can be profound, often leading to challenges in performing daily tasks and a decreased quality of life.
Symptoms and Diagnosis of Depression
Symptoms
Depression manifests utilizing a range of symptoms, including persistent feelings of sadness, loss of interest or pleasure in daily activities, significant changes in appetite or weight, disrupted sleep patterns, and chronic fatigue. Individuals may also experience feelings of worthlessness or excessive guilt, difficulty concentrating, and, in severe cases, suicidal thoughts. Recognizing these symptoms is important for accurate diagnosis and effective treatment.
Diagnostic Process
Advanced Practice Nurses (APNs) play a vital role in the diagnostic process for depression. They conduct comprehensive assessments that include detailed interviews and standardized questionnaires, to gauge the intensity of depression symptoms, use a tool like the Patient Health Questionnaire-9 (PHQ-9). Examining the patient’s medical history in detail aids in determining any underlying issues or risk factors, leading to a well-informed diagnosis and tailored treatment plan.
The Role of Advanced Practice Nurses in Depression Treatment APN
Who Are APNs?
Advanced Practice Nurses (APNs) are registered nurses who have pursued advanced education and training, typically holding Master’s or Doctoral degrees. They are equipped to provide a wide range of healthcare services, comprising the diagnosis and treatment of mental health conditions such as depression. Their advanced training allows them to offer comprehensive care, combining pharmacological and therapeutic approaches.
Types of APNs and Their Roles in Depression Treatment
Nurse Practitioners (NPs)
Nurse Practitioners (NPs) specializing in psychiatric and mental health are instrumental in treating depression. They perform thorough assessments to diagnose depression and determine its severity. NPs have the authority to prescribe antidepressants and manage medication regimens, adjusting treatments as necessary based on patient response. They also provide various forms of psychotherapy, including Cognitive-Behavioral Therapy (CBT) and Interpersonal Therapy (IPT), to help patients manage their symptoms effectively.
Clinical Nurse Specialists (CNSs)
Clinical Nurse Specialists with a focus on psychiatric-mental health provide advanced care and consultation for managing depression. They develop individualized treatment plans and offer specialized care for complex cases. CNSs also play a critical role in educating patients and their families about depression and its management, helping them understand treatment options and coping strategies.
Psychiatric Nurse Practitioners
The focus of psychiatric nurse practitioners is mental health treatment, managing complex cases of depression with a combination of pharmacological and therapeutic interventions. They work collaboratively with psychiatrists, psychologists, and other healthcare professionals to ensure a comprehensive & integrated approach to treatment.
Responsibilities of APNs in Depression Treatment
Comprehensive Assessment
One of the primary responsibilities of APNs is to conduct comprehensive assessments of patients with depression. This process involves gathering detailed information about the patient’s emotional state, behavior, and medical history. APNs use various assessment tools and methods to evaluate the severity of symptoms, identify contributing factors, and develop personalized treatment plans.
Medication Management
APNs play a crucial role in medication management for depression. They prescribe antidepressants and monitor their effectiveness and side effects. This entails scheduling routine follow-up visits to evaluate the patient’s reaction to medicine, adjust dosages, or switch medications if necessary. Effective medication management is essential for achieving optimal treatment outcomes and minimizing adverse effects.
Therapeutic Interventions
In addition to medication management, APNs provide various forms of psychotherapy to help patients manage depression. Cognitive-behavioral Therapy (CBT) is used to help patients identify and change negative idea patterns & behaviors that contribute to their depression. Interpersonal Therapy (IPT) focuses on enhancing interpersonal relationships and communication skills. Psychodynamic Therapy explores unconscious processes and past experiences that may influence current depressive symptoms. Each of these therapeutic approaches offers valuable tools for managing and overcoming depression.
Patient Education
An APN’s responsibility includes educating patients about their disease and available treatments. APNs offer information about the causes of depression, its treatments, and symptom management techniques. They help patients understand their diagnosis, make informed decisions about their care, and adopt coping strategies to improve their overall well-being.
Collaborative Care
APNs work as part of a multidisciplinary team to provide thorough care for patients with depression. They collaborate with psychiatrists, psychologists, social workers, and additional medical specialists to handle every facet of the patients’ health. Patients will receive comprehensive care that addresses their physical, emotional, and social needs thanks to this joint technique.
Crisis Intervention
In cases of severe depression or crises, APNs provide immediate intervention and stabilization. This includes assessing the risk of self-harm or suicide, developing safety plans, and coordinating with emergency services or hospitalization if needed. Effective crisis intervention is crucial for ensuring the safety & well-being of patients in critical situations.
Treatment Approaches for Depression by APNs
Pharmacological Treatments
Antidepressants are a cornerstone of depression treatment APN. APNs prescribe various classes of antidepressants based on the patient’s specific symptoms and history.
Selective Serotonin Reuptake Inhibitors (SSRIs), like fluoxetine (Prozac) and sertraline (Zoloft), are commonly prescribed due to their favorable side effect profile. These medications work by growing serotonin levels in the brain, which helps alleviate depressive symptoms.
Serotonin-norepinephrine reuptake Inhibitors (SNRIs), including venlafaxine (Effexor) and duloxetine (Cymbalta), affect both serotonin and norepinephrine. They are used to treat a range of depressive symptoms and can be particularly effective for patients who do not respond to SSRIs.
Tricyclic Antidepressants (TCAs), like amitriptyline and nortriptyline (Pamelor), are often reserved for cases that are resistant to other treatments. While effective, TCAs can have more side effects and require careful monitoring.
Monoamine Oxidase Inhibitors (MAOIs), including phenelzine (Nardil) and tranylcypromine (Parnate), are typically used for severe cases of depression or when other medications have failed. MAOIs require dietary restrictions to avoid potentially dangerous interactions.
Psychotherapy
Cognitive-Behavioral Therapy (CBT): APNs use CBT to help patients address and change negative thought patterns and behaviors. This evidence-based Therapy is effective in treating depression by assisting individuals to develop healthier thinking and coping strategies.
Interpersonal Therapy (IPT): This Therapy focuses on improving interpersonal relationships and communication skills. APNs use IPT to help patients address relationship issues and life transitions that may contribute to their depression.
Psychodynamic Therapy: By exploring unconscious processes and past experiences, psychodynamic Therapy helps patients understand how these factors influence their current emotional state. APNs use this approach to increase self-awareness and address underlying issues contributing to depression.
Lifestyle and Complementary Therapies
Exercise: Regular physical activity is an essential adjunct to depression treatment. APNs may recommend exercise as it has been shown to improve mood and overall well-being, enhancing the effectiveness of other therapies.
Nutrition: A balanced diet supports mental health and can impact mood and energy levels. APNs may provide nutritional counseling to help patients adopt healthy eating habits that complement their depression treatment.
Mindfulness and Relaxation Techniques: Techniques such as mindfulness meditation, yoga, & deep breathing exercises can help control your stress and improve emotional regulation. APNs often incorporate these techniques into treatment plans to support overall mental health.
Support Groups: Support groups provide a sense of community and reduce feelings of isolation. APNs may refer patients to groups where they can connect with others experiencing comparable challenges and receive mutual support.
Benefits of APN-Led Depression Treatment
Personalized Care
APNs provide personalized care that is tailored to each patient’s unique needs. By conducting comprehensive assessments and developing individualized treatment plans, APNs ensure that care is specific to the patient’s symptoms, history, and preferences.
Enhanced Accessibility
APNs enhance accessibility to mental health services, particularly in underserved areas where mental health professionals may be scarce. Their ability to offer medication management and psychotherapy helps bridge gaps in care and improve patient access.
Continuity of Care
APNs build long-term relationships with their patients, providing continuity of care that is crucial for managing chronic conditions like depression. This ongoing support helps improve treatment adherence, track progress, and make essential adjustments to treatment plans.
Collaborative Approach
APNs work within multidisciplinary teams, contributing to a holistic approach to depression treatment. Their collaboration with other healthcare professionals ensures that all aspects of the patient’s health are addressed, leading to better overall outcomes.
Challenges and Considerations
Addressing Mental Health Stigma
The stigma surrounding mental illness may discourage people from getting depression treatment. APNs are essential in lowering stigma because they encourage candid conversations about mental health and offer sympathetic, non-judgmental care. APNs encourage patients to seek and continue treatment by fostering a supportive environment.
Training and Competency
To deliver effective depression treatment, APNs must stay informed about the latest research & advancements in mental health care. Ongoing education and professional development are essential to maintaining competency and ensuring the provision of high-quality care.
Insurance and Access Issues
Insurance coverage and healthcare policies can impact access to mental health services. APNs may encounter challenges related to insurance limitations and reimbursement rates, which can affect the availability of care for some patients. Advocacy for mental health parity and improved insurance coverage is necessary to address these issues and ensure equitable access to treatment.
Conclusion
Advanced Practice Nurses (APNs) play a crucial role in Depression Treatment APN, offering a comprehensive approach that includes assessment, medication management, therapy, and patient education. Their expertise and dedication contribute significantly to managing depression, ensuring that patients receive personalized, effective care. As mental health services evolve, APNs remain integral in improving patient outcomes and advancing the overall quality of depression treatment. Their commitment to providing compassionate and informed care is essential for helping individuals manage and overcome depression, ultimately enhancing their quality of life.
Frequently Asked Questions (FAQ)
Why am I depressed?
Depression can result from a combination of factors, including genetic predisposition, brain chemistry imbalances, life events, and chronic stress. Personal experiences and underlying mental health conditions also play a role.
What is Depression Treatment APN?
Depression Treatment APN involves care provided by an Advanced Practice Nurse specializing in managing depression through assessment, medication, therapy, and education.
How does Depression Treatment APN work?
Depression Treatment APN offers personalized care plans, including medication management, therapy sessions, and patient education tailored to individual needs.
What is TMS treatment for depression?
Transcranial Magnetic Stimulation (TMS) is a non-invasive treatment for depression that uses magnetic fields to stimulate nerve cells in the brain. It is used when other treatments, like medication and therapy, are ineffective.
How do you stop feeling so depressed?
To stop feeling so depressed, consider seeking professional help through therapy or medication and engage in regular exercise, a balanced diet, and healthy sleep habits. Building a support network and practicing mindfulness or relaxation techniques can also be beneficial.
How to control anxiety and depression?
Control anxiety and depression by seeking professional help, engaging in therapy or medication, and practicing stress-reduction techniques like mindfulness and exercise. Maintaining a healthy lifestyle and a supportive network also plays a key role.
[vc_row][vc_column][vc_column_text]If you’ve ever wanted to recreate that restaurant-quality salmon pasta at home, you’re in the right place. While it might seem like an indulgent dish reserved for special occasions, Make salmon pasta with a few essential materials and techniques, and it’s surprisingly easy. Whether you’re a beginner or a seasoned cook, this step-by-step guide will help you master the secrets to preparing a gourmet salmon pasta meal that’s bursting with flavor.
Let’s dive in and discover how to bring this delicious dish from sea to table!
Why Salmon Pasta Deserves a Spot in Your Recipe Arsenal
Salmon pasta is an elegant, yet approachable dish that combines the richness of tender salmon with the comforting bite of pasta. The flavors are incredibly versatile, allowing you to craft anything from a light, lemony pasta for summer evenings to a creamy, indulgent version perfect for cozy nights in.
What makes this dish truly stand out is how easy it is to customize to your taste. Whether you prefer smoked salmon or fresh filets, creamy sauces or zesty, oil-based ones, salmon pasta offers endless opportunities for experimentation. It’s also loaded with nutrients—pasta gives you a filling energy boost, while salmon is a fantastic source of protein and omega-3 fatty acids.
Here’s a detailed recipe for a classic Creamy Garlic Salmon Pasta that’s sure to impress your family or guests:
Ingredients:
2 salmon fillets (fresh or smoked)
300g pasta (fettuccine, penne, or your choice)
1 cup heavy cream
1/2 cup grated parmesan cheese
2 cloves garlic (minced)
2 tbsp butter
1 lemon (zest and juice)
Fresh parsley (chopped)
Salt and pepper to taste
1/2 cup reserved pasta water
Follow these steps to create your own delicious version of salmon pasta, tailored to your preferences and ready to impress:
To make gourmet salmon pasta, you’ll want to start with high-quality, fresh ingredients. This dish’s flavors are basic, so the quality of your salmon and pasta really shines through.
Fresh salmon fillet being lightly seared in a pan with lemon slices, ready for a delicious and healthy meal.
Salmon
You have a few options when it comes to the salmon:
Fresh Salmon Filets: These are perfect for those who prefer tender, juicy flakes of fish throughout the dish. Fresh filets give you more control over the texture.
Smoked Salmon: For a rich, salty flavor with a slightly firmer texture, smoked salmon is an excellent choice. It’s especially good in lighter sauces, like lemon and herb butter.
Canned Salmon: If you’re short on time, canned salmon can work as a quick alternative. It’s not as luxurious, but it still delivers on flavor.
Pasta
The texture of pasta might vary significantly depending on the kind you select:
Long Pasta: Fettuccine, spaghetti, or linguine are excellent for creamy sauces, where you want the sauce to cling to every strand.
Short Pasta: Penne, rigatoni, or farfalle work well in chunkier dishes where you want the pasta to catch bits of salmon and vegetables.
Fresh Herbs and Vegetables
For an added layer of flavor and brightness, fresh herbs like parsley, dill, or basil complement salmon beautifully. Vegetables like spinach, cherry tomatoes, or asparagus can add color and texture, while boosting the nutritional value of the dish.
Preparing the Salmon
How you prepare your salmon depends on the type you’re using:
Fresh Salmon Filets: Season your filets with salt, pepper, and a bit of lemon zest. Melt a tiny amount of butter or olive oil in a pan over medium heat. Sear the salmon filets skin-side down for about 4-5 minutes, The salmon should be cooked through but still moist after two to three minutes of cooking on the opposite side. Remove and set aside.
Smoked Salmon: Since it’s already cooked, smoked salmon is ready to add straight into the pasta. Simply slice it into thin strips or bite-sized pieces and toss it in at the last step.
Canned Salmon: Drain the canned salmon and break it into chunks. You can add it to the sauce once it’s heated to keep things quick and easy.
Cooking the Pasta to Perfection
Boil a large pot of salted water for your pasta. Cooking it until it’s firm to the bite but not overly done is crucial. Overcooked pasta becomes mushy, especially when mixed with sauce.
Save roughly ½ cup of the pasta water before emptying. This water with starch is a covert weapon for creating a silky sauce that clings to the pasta, adding richness without needing to overload on cream or butter.
Crafting the Perfect Sauce
Creamy garlic sauce simmering in a pan, garnished with herbs for added flavor.
The sauce can make or break your salmon pasta, and fortunately, there are several routes you can take depending on the style you’re aiming for.
Creamy Garlic Sauce
A classic creamy garlic sauce is indulgent yet easy to make. Here’s how to do it:
The pan used to cook the fish was added a tablespoon of butter and sauté minced garlic for about a minute until fragrant.
Pour in heavy cream (about 1 cup) and let it simmer for a couple of minutes.
Stir in grated parmesan cheese (½ cup) and allow the sauce to thicken.
Once the sauce has reached a smooth and creamy consistency, add a small amount of the pasta water that was set aside.
Add some salt, pepper, and freshly squeezed lemon juice for seasoning.
Lemon Butter Sauce
For a lighter option, try a lemon butter sauce:
In a pan over low heat, melt the butter.
Simmer the minced garlic for one minute after adding it, then whisk in the lemon zest and juice.
Once the sauce is thoroughly combined and somewhat thickened, whisk in a few tablespoons of olive oil and a little amount of the pasta water that was set aside.
For a hit of freshness, toss in some fresh herbs, such as parsley or dill.
Bringing It All Together
Now that your pasta, salmon, and sauce are ready, it’s time to combine everything:
To the sauce, add the cooked pasta, tossing well to coat every strand or piece.
Flake the seared salmon into chunks and gently fold it into the pasta.
If you’re using smoked salmon, stir it in at this stage to warm it through without cooking it further.
Add any finishing touches, like fresh herbs, a sprinkling of parmesan cheese, or lemon zest.
For extra flavor, try tossing in lightly sautéed spinach, roasted cherry tomatoes, or grilled asparagus.
Perfect Presentation
Serving up a delicious plate of creamy fettuccine pasta with tender salmon, accompanied by a refreshing glass of white wine and a light salad – a perfect gourmet meal.
The final step in creating your gourmet salmon pasta is presentation. Even a simple dish can look elegant with the right plating. Here’s how to make it restaurant-worthy:
Twirl the Pasta: Use tongs to twirl a portion of pasta onto each plate, creating a neat mound.
Top with Salmon: Gently place larger chunks of salmon on top of the pasta.
Finish with Garnishes: As a final touch, add some red pepper flakes, fresh parsley, and a tiny quantity of extra virgin olive oil.
Serve with a Side: For a complete meal, serve your salmon pasta with a side of garlic bread or a simple green salad.
Conclusion
Salmon pasta doesn’t have to be complicated or reserved for special occasions. With these step-by-step secrets, you can create a gourmet meal in the comfort of your own kitchen. Whether you’re opting for a creamy garlic sauce or a light lemon butter variation, the use of fresh ingredients is essential for success and mastering simple techniques like cooking your pasta al dente and perfectly preparing your salmon.
So next time you’re in the mood for a sophisticated yet comforting dish, remember these salmon pasta secrets and elevate your dinner to gourmet levels[/vc_column_text][/vc_column][/vc_row][vc_row][vc_column width=”1/1″][us_separator size=”small”][us_text text=”Frequently Asked Questions (FAQ)” link=”%7B%22url%22%3A%22%22%7D” tag=”h2″][vc_tta_accordion][vc_tta_section title=”Can I use a different type of pasta for this recipe?” tab_link=”%7B%22url%22%3A%22%22%7D”][vc_column_text]Yes, while fettuccine is often used for creamy sauces, you can substitute it with other pasta types like spaghetti, linguine, or even penne for a different texture.[/vc_column_text][/vc_tta_section][vc_tta_section title=”What’s the best way to cook the salmon for this dish?” tab_link=”%7B%22url%22%3A%22%22%7D”][vc_column_text]For optimal flavor and texture, grilling or pan-searing the salmon fillets is ideal. You can also bake or poach the salmon if you prefer a lighter cooking method.[/vc_column_text][/vc_tta_section][vc_tta_section title=”Can I use canned or smoked salmon instead of fresh fillets?” tab_link=”%7B%22url%22%3A%22%22%7D”][vc_column_text]Yes, canned or smoked salmon can be used if you’re short on time. However, fresh fillets offer the best taste and texture for this gourmet dish.[/vc_column_text][/vc_tta_section][vc_tta_section title=”How do I make the creamy sauce?” tab_link=”%7B%22url%22%3A%22%22%7D”][vc_column_text]The sauce typically consists of heavy cream, butter, garlic, and Parmesan cheese. You can also add a splash of white wine or lemon juice to enhance the flavor.[/vc_column_text][/vc_tta_section][vc_tta_section title=”What herbs and seasonings work best with salmon pasta?” tab_link=”%7B%22url%22%3A%22%22%7D”][vc_column_text]Fresh dill, parsley, lemon zest, and black pepper are commonly used to season the salmon and pasta, bringing out fresh, zesty flavors. You can also add a pinch of red pepper flakes for heat.[/vc_column_text][/vc_tta_section][vc_tta_section title=”Can I make this dish ahead of time?” tab_link=”%7B%22url%22%3A%22%22%7D”][vc_column_text]While it’s best served fresh, you can prepare the sauce and pasta ahead of time and store them separately. Reheat gently and combine them when you’re ready to serve.[/vc_column_text][/vc_tta_section][vc_tta_section title=”How can I make this dish healthier?” tab_link=”%7B%22url%22%3A%22%22%7D”][vc_column_text]To lighten the dish, use low-fat cream or substitute with Greek yogurt for the sauce. You can also grill the salmon with minimal oil and add more vegetables like spinach or asparagus.[/vc_column_text][/vc_tta_section][vc_tta_section title=”Can I use other seafood instead of salmon?” tab_link=”%7B%22url%22%3A%22%22%7D”][vc_column_text]Absolutely! You can substitute the salmon with shrimp, scallops, or even a white fish like cod or tilapia for a different twist on the dish.[/vc_column_text][/vc_tta_section][vc_tta_section title=”What side dishes pair well with salmon pasta?” tab_link=”%7B%22url%22%3A%22%22%7D”][vc_column_text]This dish pairs well with a light side salad, garlic bread, or roasted vegetables like asparagus or broccoli to complement the rich flavors of the pasta.[/vc_column_text][/vc_tta_section][vc_tta_section title=”How long will leftovers last in the fridge?” tab_link=”%7B%22url%22%3A%22%22%7D”][vc_column_text]Leftover salmon pasta can be stored in an airtight container in the fridge for up to 2-3 days. Reheat on low heat to avoid drying out the salmon.[/vc_column_text][/vc_tta_section][vc_tta_section title=”Section”][/vc_tta_section][/vc_tta_accordion][/vc_column][/vc_row]
 Healthy Chicken Taco Recipe
 Conclusion