[vc_row][vc_column][vc_column_text]Now that you’ve recognized the importance of scalp health and the symptoms that indicate you may need a detox, it’s time to dive into potential solutions. In this stage, we’ll explore various methods to detox your scalp, highlight the benefits of doing so, and help you compare Amazon products to find the best fit for your specific needs.
How to Detox Your Scalp?
When detoxing your scalp, several approaches range from DIY home remedies to professional-grade products.
DIY Remedies
Many people prefer to start with natural solutions for scalp detoxification. Here are some popular DIY remedies:
Apple Cider Vinegar Rinse
Benefits: Apple cider vinegar (ACV) is known for its antimicrobial properties, helping to combat dandruff and scalp irritation. It also aids in balancing the scalp’s pH, enhancing hair shine and softness.
How to Use
Mix one part ACV with two parts a spray bottle filled with water.
Spray the mixture onto your scalp and gently massage it after shampooing.
Leave it on for 5-10 minutes, then rinse thoroughly with water.
Frequency: Use this rinse once a week for best results.
Baking Soda Scrub
Benefits: Baking soda is a natural exfoliant, removing product accumulation and dead skin cells from the scalp.
How to Use
Mix two tablespoons of baking soda and water to form a spreadable paste.
Directly apply the paste to the parts of your scalp that have accumulation.
Gently massage for a few minutes, then rinse thoroughly with water.
Frequency: Limit this treatment to once a month, as excessive use can lead to dryness.
Coconut Oil Treatment
Benefits: Coconut oil is a natural moisturizer that can hydrate the scalp and hair while providing antifungal properties.
How to Use
A few tablespoons of coconut oil should be heated till liquid.
After separating your hair, gently massage the oil into your scalp.
Leave it on for at least 30 minutes (or overnight) before washing it out with shampoo.
Frequency: Use this treatment once a week for hydration and detoxification.
Tea Tree Oil Treatment
Benefits: Tea tree oil works well to treat dandruff and scalp infections because of its well-known antifungal and antibacterial qualities.
How to Use
Add a few drops of tea tree oil to your regular shampoo or dilute it using a carrier oil, such as olive or coconut oil.
Apply to your scalp, massage gently, and leave it on for 5-10 minutes before rinsing.
Frequency: To prevent skin irritation, tea tree oil should only be applied once every two weeks due to its powerful potency.
Note: While DIY remedies may offer short-term relief, they may not be able to address more severe issues with the health of the scalp. If symptoms persist, consider using expert products for more comprehensive care.
Professional Products
For people looking for more reliable and practical outcomes, professional scalp detox products are designed to thoroughly and effectively cleanse the scalp. Professional product categories and examples include the following:
Scalp Detox Shampoos
Benefits: These shampoos tackle pollutants, excess oil, and product accumulation. They often contain salicylic acid, tea tree oil, and charcoal, which help cleanse and purify the scalp.
Recommended Products
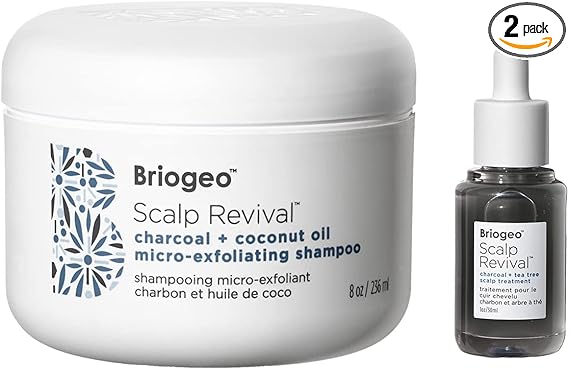
Briogeo Scalp Revival Charcoal + Tea Tree Scalp Treatment Shampoo: This product uses charcoal to absorb impurities and oil from the tea tree to soothe the scalp.
Kérastase Specifique Bain Divalent Shampoo balances oil production while gently cleansing the scalp.
Exfoliating Scalp Scrubs
Benefits: Scalp scrubs provide physical exfoliation to remove dead skin cells and buildup while stimulating blood circulation.
Recommended Products
Christophe Robin Cleansing Purifying Scrub with Sea Salt: This scrub utilizes sea salt to exfoliate and cleanse the scalp, providing a refreshing sensation.
Dove Exfoliating Body Polish: While primarily for the body, this product can also be used on the scalp to provide gentle exfoliation.
Scalp Treatments and Masks
Benefits: These treatments are designed to penetrate the scalp deeply, providing nourishment and hydration while detoxifying. They often contain ingredients like aloe vera, jojoba oil, and vitamins.
Recommended Products:
Aveda Scalp Remedy Dandruff Solution: This treatment helps to relieve dryness and flakiness while balancing the scalp’s natural moisture.
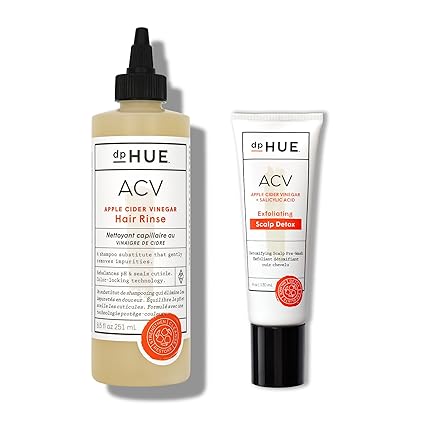
dpHUE Apple Cider Vinegar Scalp Scrub: This product combines the benefits of ACV with exfoliating properties for a thorough detox.
Professional Treatments
Benefits: Visiting a salon for professional scalp treatments can provide a more profound cleansing experience. These treatments often involve steam, specialized masks, and professional-grade products tailored to your scalp’s needs.
Recommendation: Look for salons that offer scalp detox treatments or consultations with a certified trichologist to receive personalized care and recommendations.
Critical Benefits of Scalp Detox
Unclogging Follicles: Scalp detoxing helps to clear away product buildup, dead skin, and excess oils, ensuring your hair follicles remain clear and ready for new growth. This leads to stronger, healthier hair over time.
Better Product Absorption: A clean scalp means that oils, serums, and treatments can be absorbed more effectively. Without layers of buildup blocking their way, these products can penetrate the scalp and deliver nutrients where they’re needed most.
Dandruff and Itch Relief: Detoxing your scalp can alleviate itching, flaking, and other irritation caused by excess oil and buildup, leaving your scalp feeling refreshed and comfortable.
Detailed Explanation of Scalp Detox Products on Amazon
Now that we’ve discussed the methods and benefits of scalp detoxing let’s look at some effective products available on Amazon that can help you achieve a healthy, balanced scalp.
Detox and exfoliate your scalp with Briogeo’s Charcoal + Coconut Oil Shampoo for refreshed, healthy hair!
Known for its gentle exfoliating properties, this shampoo cleanses the scalp while keeping it hydrated and refreshed.
Key Ingredients: Charcoal for deep cleansing, coconut oil for hydration, and peppermint for a refreshing feel
How it Works: Activated charcoal draws out impurities and excess oil, while coconut oil hydrates the scalp. Peppermint oil adds a cooling sensation, invigorating the scalp.
Benefits: Gently exfoliates, maintains moisture, and refreshes the scalp, making it ideal for sensitive scalps.
Application Tips: Apply a generous amount to damp hair, gently massage into the scalp, let sit for a few minutes, and then rinse well.
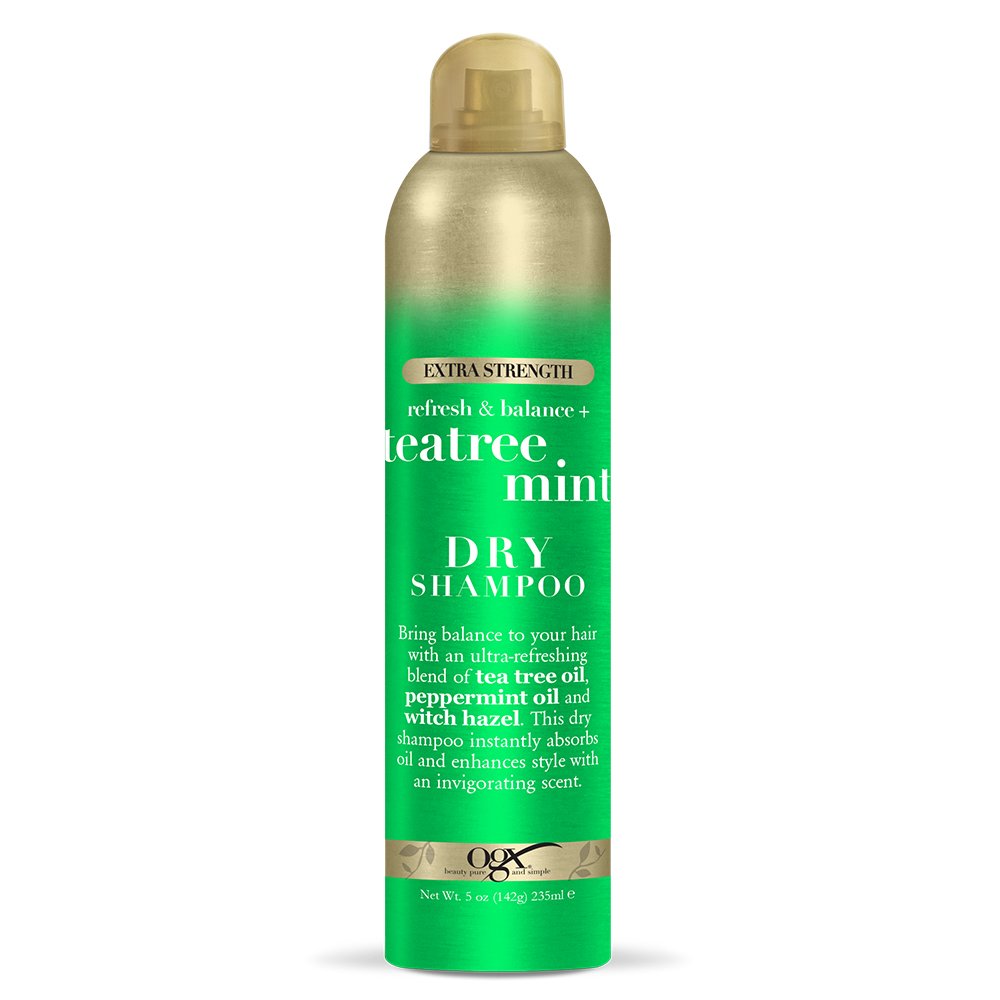
2. OGX Tea Tree Mint Shampoo
Refresh and revitalize your scalp with OGX Tea Tree Mint Shampoo for a clean, invigorated feel!
Known for its oil-balancing properties, this shampoo soothes the scalp while effectively cleansing it.
Key Ingredients: Tea tree oil for antibacterial properties, mint for soothing the scalp
How it Works: Tea tree oil provides antibacterial benefits, and mint soothes irritation while helping to balance oil production.
Benefits: Reduces scalp irritation and itchiness, controls oil, and refreshes hair.
Application Tips: Apply to wet hair, focusing on the scalp, massage until a lather forms, and then give it a good rinse. For best results, follow with a conditioner.
3. dpHUE Apple Cider Vinegar Hair Rinse
Cleanse and balance your hair with dpHUE Apple Cider Vinegar Hair Rinse for a soft, shiny finish!
Known for its gentle detoxifying properties, this rinse balances the scalp’s pH without stripping natural oils.
Key Ingredients: Apple cider vinegar to balance pH levels without stripping natural oils
How it Works: Apple cider vinegar restores pH balance and detoxifies hair while moisturizing properties prevent dryness.
Benefits: Provides a gentle detox for dry or color-treated hair, reduces frizz, and enhances shine.
Application Tips: Use in place of shampoo; apply to wet hair, massage into the scalp, leave for 3-5 minutes, then rinse thoroughly.
4. Aveda Pramāsana Purifying Scalp Cleanser
Purify and balance your scalp with Aveda Pramāsana Cleanser for healthier, revitalized hair!
This scalp cleanser is recognized for its natural ingredients, thoroughly purifying and keeping the scalp hydrated.
Key Ingredients: Seaweed extract and babassu oil for a thorough cleanse without irritation
How it Works: Seaweed extract cleanses impurities, while babassu oil provides hydration and balances moisture levels.
Benefits: Cleanses thoroughly without harsh chemicals, soothes the scalp, and promotes a healthy environment.
Application Tips: Apply to a dry scalp before shampooing, massage gently for a few minutes, then rinse and follow with your regular shampoo.
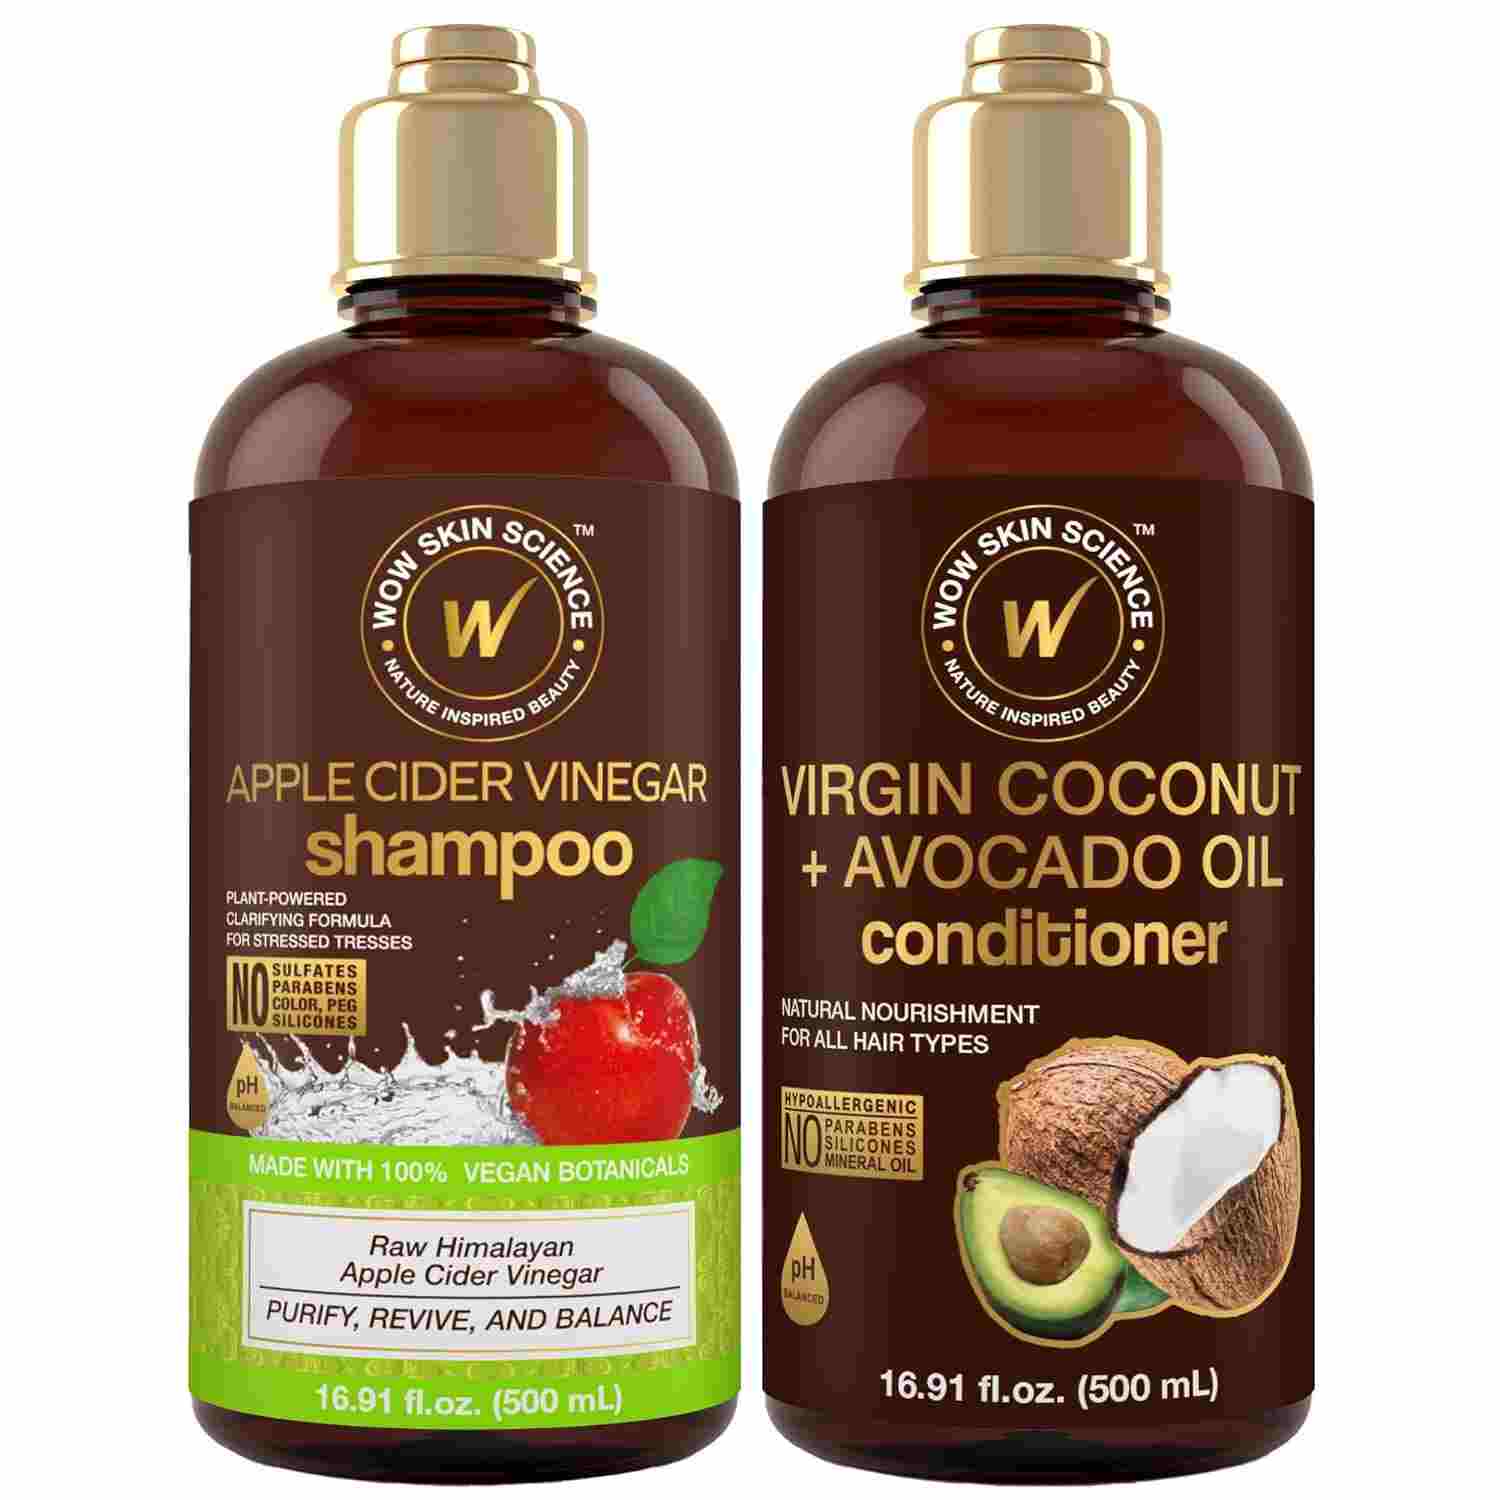
5. WOW Skin Science Apple Cider Vinegar Shampoo
Cleanse and restore shine with WOW Skin Science Apple Cider Vinegar Shampoo for healthier, vibrant hair!
This shampoo helps remove dirt and buildup from your scalp while moisturizing your hair. Made with apple cider vinegar, it fights dandruff and makes your hair healthy and shiny. Perfect for a gentle cleanse without drying out your hair.
Key Ingredients: Apple cider vinegar for clarifying, aloe vera for soothing
How it Works: Apple cider vinegar clarifies and detoxifies the scalp, while aloe vera soothes irritation and nourishes hair.
Benefits: Combats dandruff and itching, removes buildup and promotes a healthier scalp for hair growth.
Application Tips: Apply to wet hair, massage into the scalp, sit for a couple of minutes, then rinse thoroughly for best results.
How to Choose the Right Product Based on Scalp Concerns?
Selecting the right scalp detox product depends on your specific scalp issues. This little advice will assist you in making an informed choice, as well as tea tree oil to calm the scalp.
Oily Scalp: If your scalp gets greasy quickly, the OGX Tea Tree Mint Shampoo or WOW Skin Science Apple Cider Vinegar Shampoo will help control oil while keeping your scalp refreshed.
Dry, Flaky Scalp: For dryness or flakes, the Briogeo Scalp Revival or dpHUE Apple Cider Vinegar Hair Rinse are significant options that provide gentle moisture while cleansing the scalp.
Sensitive Scalp: If you have a sensitive scalp prone to irritation, the Aveda Pramāsana Purifying Scalp Cleanser offers a plant-based, soothing detox.
Key Ingredients to Look for in Scalp Detox Products
Understanding the ingredients in your scalp care products is essential to choosing the right one. Here’s a breakdown of some key ingredients found in scalp detox products:
Charcoal: renowned for its ability to deeply cleanse, charcoal helps remove dirt and toxins without irritating the scalp (found in Briogeo).
Tea Tree Oil: An antimicrobial and anti-inflammatory ingredient, tea tree oil helps control excess oil and reduce scalp irritation (found in OGX).
Apple Cider Vinegar: ACV balances the scalp’s pH and breaks down product buildup, leaving the scalp clean and healthy (found in dpHUE and WOW).
Peppermint: Soothes and refreshes the scalp while providing a cooling sensation (found in OGX and Briogeo).
Conclusion
To have beautiful hair, you must take care of your scalp. By trying different detox methods, whether homemade or store-bought, you can improve your scalp’s health and tackle shared problems like oiliness, dryness, and irritation. How your scalp feels and looks can be significantly improved by selecting the best products for your particular requirements. Make scalp care a regular part of your routine, and you’ll notice more vital, healthier hair over time. Remember, a happy scalp leads to happy hair![/vc_column_text][/vc_column][/vc_row][vc_row][vc_column width=”1/1″][us_cta title=”Discover Top Detox Products” color=”light” btn_label=”Explore More” btn_link=”%7B%22url%22%3A%22https%3A%2F%2Fsavenshine.com%2Ftop-scalp-detox-products-on-amazon-for-your-healthy-hair%2F%22%7D”]If you Still confused about which scalp detox products are the most effective? Check out our next blog, ‘Top Scalp Detox Products on Amazon for your Healthy Hair,’ and find the perfect product for your hair care routine![/us_cta][/vc_column][/vc_row]
Hair loss in women is more common than many realize, and it can be a challenging experience. Several factors contribute to hair thinning or baldness, and it’s essential to understand them to find the right solution. Below, we’ll explore common causes of female hair loss and introduce hair transplant surgery as a potential solution.
Common Causes of Female Hair Loss
There are several causes of hair loss in women. Here are some of the most common causes:
Hormonal Changes: Events like pregnancy, menopause, and thyroid imbalances can disrupt hair growth cycles.
Stress: High-stress levels can lead to temporary A condition called telogen effluvium is responsible for hair loss.
Genetics: In some cases, a family history of hair loss plays a role, leading to gradual thinning over time.
Medical Conditions: Certain medical issues, such as autoimmune diseases and scalp infections, can result in hair thinning or loss.
Knowing the underlying reason behind your hair loss is the first step in finding the proper treatment.
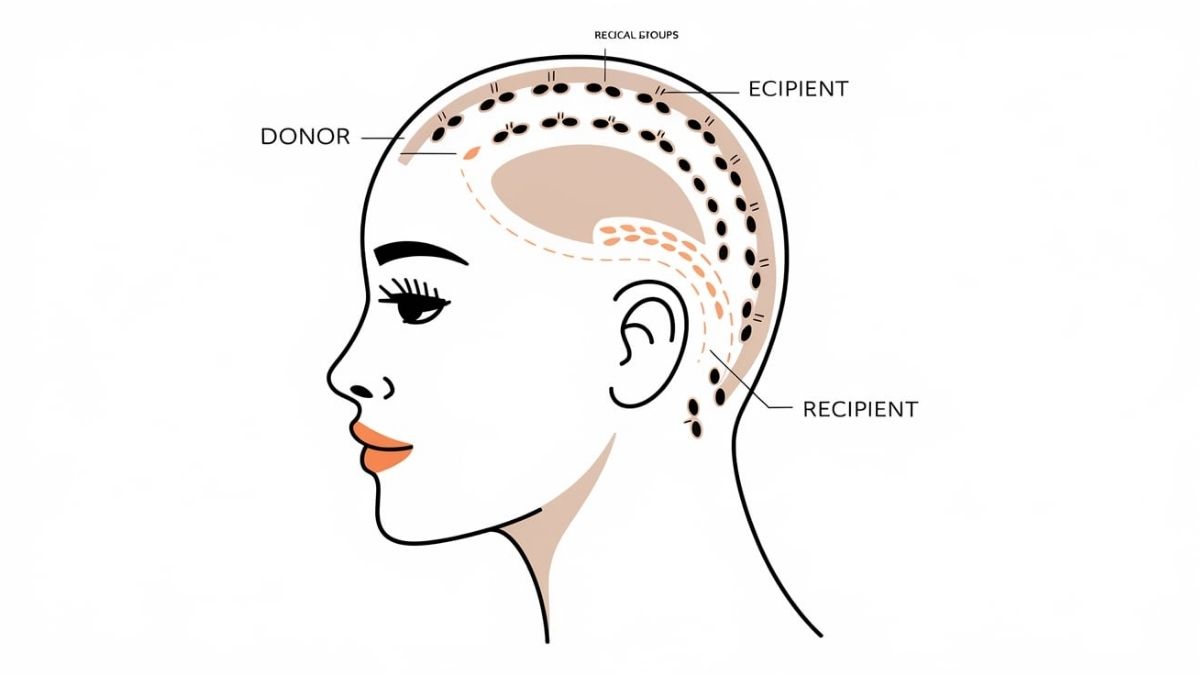
What is a Hair Transplant for Women?
A hair transplant is a kind of surgery used to restore hair to thinning or balding areas. For women experiencing significant hair loss, this solution can be life-changing. Healthy hair follicles are extracted during the procedure from areas with dense hair growth (often the back or sides of the scalp) and transferring them to regions where hair is sparse or nonexistent. This technique allows the transplanted hair to grow naturally in the new area, offering long-lasting results. While traditionally more common in men, advancements in medical technology have made hair transplants an increasingly popular option for women seeking natural-looking hair restoration.
Signs You May Consider a Hair Transplant
Not every person who is losing their hair qualifies for a hair transplant, but here are some signs that you might benefit from the procedure:
Significant Hair Thinning: If your hair has thinned significantly across your scalp, other treatments have not worked.
Hairline Receding: Hair transplants can aid in the restoration of hair to a more natural, fuller-looking hairline.
Bald Spots: If you have localized bald spots that haven’t responded to medications or treatments, a hair transplant might be an option.
Speaking with an expert can help ascertain if a hair transplant is right based on the pattern and extent of your hair loss.
Benefits of Hair Transplants for Women
If you’re considering a hair transplant, here are some of the potential benefits:
Permanent Hair Restoration: Unlike temporary solutions, a hair transplant offers permanent results with proper care.
Natural-Looking Results: The transplanted hair grows at its new spot, growing organically and merging in with your natural hair.
Boosted Confidence: Many women report improved self-esteem and renewed confidence after restoring their hair.
Hair transplants may be a permanent remedy for those seeking a fuller, natural head of hair.
Alternative Hair Restoration Options
While hair transplants offer a permanent solution, there are other options to consider if surgery isn’t right for you:
PRP Therapy: Platelet-rich plasma (PRP) therapy uses your own blood to promote hair growth.
Medication: Over-the-counter or prescription drugs, such as Minoxidil, can aid in encouraging renewal and slowing hair loss in some cases.
Lifestyle Changes: Adjusting your diet, reducing stress, and addressing underlying health issues can sometimes improve hair health.
Each method has pros and cons; the best approach depends on the individual’s needs.
[us_separator][us_cta title=”Read Now” color=”light” btn_label=”Explore Now” btn_link=”%7B%22url%22%3A%22%22%7D”]If you’re interested in learning more about how a hair transplant can help you regain your confidence and restore your hair, explore our next blog. Stay informed with tips on managing and treating hair loss effectively![/us_cta]
When it comes to attaining fitness goals, diet plays a huge role. High Protein Desserts is essential for muscle recovery, energy, and overall health, but who says you can’t enjoy a little sweetness while staying on track? High-protein desserts are here to satisfy your sweet tooth without derailing your progress. Whether craving something rich and chocolatey or light and fruity, these ten delicious high protein desserts are perfect for fueling your fitness goals.
1. Chocolate Protein Brownies
Rich, fudgy, and protein-packed, these chocolate brownies are the perfect guilt-free treat after a workout. Made with protein powder, almond flour, and dark chocolate, these brownies give you the indulgence you crave without the sugar overload. They’re simple to make and can be stored for a few days, so you always have a high-protein snack ready.
2. Greek Yogurt Parfait with Berries and Nuts
Layered with antioxidants, healthy fats, and a punch of protein, this Greek yoghurt parfait is as nutritious as it is delicious. Start with a base of Greek yoghurt, naturally in High Protein Desserts , then add fresh berries and a sprinkle of nuts for added crunch and flavour. It’s a quick, easy dessert that satisfies and fuels your body with essential nutrients.
3. Peanut Butter Protein Balls
These no-bake peanut butter protein balls are quick to make and perfect for a post-workout energy boost with High Protein Desserts. Made with ingredients like oats, peanut butter, and protein powder, these bites are both portable and filling. You can customize them by counting dark chocolate chunks, chia seeds, or shredded coconut for added texture and flavour.
4. Protein Ice Cream
You can enjoy ice cream and meet your High Protein Desserts goals! You can buy pre-made protein ice cream or make your own at home by blending protein powder with frozen bananas, berries, and almond milk. The result is a creamy, delicious dessert that gives you all the enjoyment of traditional ice cream with a high-protein twist.
5. Chia Pudding with Protein Powder
Chia pudding is already a healthy dessert, but adding protein powder becomes a powerhouse of nutrients. Mix chia grains with almond milk and your favourite protein powder, then let it sit in the fridge to thicken. Top it with fruits, nuts, or granola for a nutritious dessert perfect for any time of day.
6. Protein-Packed Cheesecake Bites
Cheesecake lovers, rejoice! These protein-packed bites give you all the creamy goodness without the guilt. You can create mini cheesecake bites rich in flavour and protein using low-fat cream cheese and protein powder. They’re easy to make and a perfect dessert to keep in the fridge for when cravings strike.
7. Almond Flour Protein Cookies
Craving cookies but don’t want the sugar crash? These almond flour protein cookies are your answer. Almond flour, combined with protein powder and a bit of honey, makes a soft, chewy cookie high in healthy fats and protein. These cookies are great as a post-workout snack or a mid-day treat.
8. Protein Mug Cake
Ready in just minutes, this protein-packed mug cake is an excellent solution for a rapid, healthy dessert. Mix the protein powder, almond flour, and a few other ingredients in a mug, microwave it for about a minute, and you have a warm, gooey dessert perfect for satisfying a sweet craving in a hurry.
9. High-Protein Chocolate Mousse
Silky, rich, and surprisingly High Protein Desserts , this chocolate mousse is a fitness-friendly dessert you’ll love. Made with Greek yoghurt, silken tofu, and high-quality cocoa powder, this mousse has a velvety texture that’s sure to please. It’s leisurely designed and can be stored in the fridge for several days.
10. Cottage Cheese and Fruit Bowl
This simple yet satisfying cottage cheese and fruit bowl is refreshing and packed with protein. Cottage cheese is a delicious source of slow-digesting protein, perfect for a nighttime snack, High Protein Desserts . Add some fresh berries, pineapple, or a drizzle of honey to elevate the flavour without sacrificing nutrition.
Conclusion:
High Protein Desserts doesn’t mean sacrificing your fitness goals; these high-protein treats ensure you can satisfy your precious tooth and fuel your body at the exact time. Whether preparing a quick snack or something more decadent, these desserts are a delicious way to boost your protein intake. Give them a try and enjoy the best of both worlds great taste and fitness success!
When achieving a youthful, radiant appearance, one color stands out as a timeless beauty secret light pink. Whether in makeup, fashion, or even home décor, this delicate hue can brighten your complexion, enhance your features, and give you a healthy, glowing look. But what about light pink? Does it make it so effective in creating a youthful vibe?
In this article, we’ll explore the magic behind light-pink, from its psychological impact to how it works with different skin tones. By the end, you’ll see why light-pink is more than just a pretty color, it’s a secret weapon for maintaining a fresh, vibrant appearance at any age.
The Psychology of Light Pink
Color plays a significant role in how we perceive ourselves and others. Light-pink is often associated with innocence, youth, and warmth. Its soft, pastel tone has a calming effect on both the wearer and the viewer, evoking feelings of kindness and serenity. Light-pink is often used in branding products that convey gentleness and care, like skincare or baby products.
From a psychological standpoint, light-pink can make you feel more relaxed and confident, which naturally translates to a more youthful appearance. You look good when you feel good; light pink subtly boosts your confidence.
Light Pink in Skincare
While we often think of light-pink in terms of fashion or makeup, it also has a place in skincare. Many beauty effects, such as serums and creams, are imbued with light-pink tones. This isn’t just a design choice—it serves a functional purpose, too.
For instance, light pink-tinted moisturizers or primers can help neutralize redness and uneven skin tone, giving your skin a smoother, more radiant appearance.
These subtle pigments instantly glow, making your skin look healthier and more vibrant.
Pink-based skincare products often contain ingredients that promote hydration and skin elasticity, essential for maintaining a youthful complexion.
Light Pink in Makeup
One of the easiest ways to harness the power of light-pink is through makeup. For several reasons, light-pink can be your go-to shade, whether you’re opting for a natural, everyday look or something more glam.
1. Blush
Adding a light-pink blush to your cheeks instantly brings life to your face. The soft hue mimics the natural flush of youthful skin, giving you a fresh, healthy appearance. Unlike harsher colors, light pink blends seamlessly into your skin, making it ideal for any occasion. For an even more youthful look, apply blush to the apples of your cheeks and incorporate upwards toward your temples.
2. Lipstick
Light pink lipstick is universally flattering and has a youthful, feminine charm. It’s perfect for creating a natural look that sweetens your lips without crushing the rest of your makeup. The subtle color adds just enough definition and can be modeled for any event, from an everyday day out to a more traditional evening event.
3. Eyeshadow
Light pink eyeshadow may not be the first choice for many, but it can do wonders for brightening your eyes. When applied lightly to the lids or the inner corners of the eyes, it gives an awake, refreshed look. Pairing it with neutral or brown tones can add depth and dimension while maintaining a soft, youthful appearance.
4. Light Pink and Skin Tones
One of the reasons light-pink works so well in beauty and fashion is that it complements a wide range of skin tones. Whether you have fair, medium, or deep skin, light-pink can enhance your natural beauty when used correctly.
Light pink offers a delicate touch for fair skin that enhances your natural complexion without overwhelming it.
Light-pink adds warmth and freshness to medium skin tones, creating a healthy glow.
Light-pink provides a beautiful contrast for darker skin tones, highlighting your features and adding a touch of softness.
The key is to find the right shade of light-pink that complements your undertones.
Cooler skin tones will benefit from light-pinks with blue undertones, while warmer skin tones will glow with peachier pinks.
Light Pink in Fashion
Beyond makeup and skincare, light-pink plays a significant role in fashion. This color is often associated with femininity and elegance but is also incredibly versatile. You can incorporate light-pink into your wardrobe in various ways, whether through accessories, clothing, or even shoes.
1. Dresses and Tops
Light pink dresses or tops can instantly elevate your look while keeping it soft and approachable. The color works well for casual and formal events, making you look polished without being too bold or loud. Whether you’re dressing for a wedding, a brunch, or a work meeting, light-pink is a versatile choice that exudes sophistication and youthfulness.
2. Accessories
If you’re hesitant to wear an entire outfit in light-pink, start with accessories. A light-pink scarf, handbag, or pair of shoes can add a touch of youthful elegance to any ensemble. It’s easy to incorporate the color into your wardrobe without committing to a head-to-toe look.
3. Outerwear
Light pink coats or jackets are perfect for adding a touch of softness to your outerwear. They keep you warm and give you a chic, youthful vibe, making even the coldest days feel slightly brighter.
Light Pink in Interior Design
Believe it or not, light pink can contribute to a youthful glow in your living space. Incorporating this color into your home décor can create a fresh, inviting, and serene environment. From throw pillows to wall paint, light-pink can make your home feel more open and bright, positively impacting your mood and overall well-being.
1.Soft Furnishings
Adding light pink through soft furnishings like cushions, blankets, or rugs is an easy way to bring warmth and comfort to any room. The color’s calming qualities make it perfect for relaxing and unwinding spaces like the bedroom or living room.
2. Accent Walls
For those looking to make a more significant impact, a light- pink accent wall can transform a room without overwhelming the space. It’s an excellent way to add character and charm while keeping the overall aesthetic light and airy.
Light Pink in Nail Art
Your nails are another area where light pink can shine. A light- pink manicure is classic clean and gives your hands a youthful appearance. Whether you prefer a simple pink polish or a more intricate design, light- pink nails are always in style and make your hands look soft and well-groomed.
Light Pink for All Ages
One of the best things about light pink is its ageless appeal. It’s not a color limited to any age group—people of all ages can enjoy its benefits. Whether in your 20s or 60s, lightpink can refresh your look and give you a natural, youthful glow.
How to Incorporate Light Pink Into Your Routine
Incorporating pink into your life doesn’t have to be overwhelming. Start small by adding key pieces to your wardrobe or beauty routine. Experiment with light-pink makeup, try a new skincare product with a pink tint or add a touch of pink to your home décor. Over time, you’ll notice how this simple color can make a big difference in how you look and feel.
Conclusion
Light pink is more than just a color. It’s a beauty and fashion secret that can help you achieve a fresh, youthful glow at any age. From makeup and skincare to fashion and home décor, this versatile hue can brighten your complexion, enhance your features, and give you a sense of vitality and confidence.
Maintaining a daily exercise routine is paramount for cultivating physical vitality, mental clarity, and enduring strength. By weaving together simple yet powerful movements, one can unlock the full health benefits, from muscle development to cardiovascular resilience.
The following 7 Exercises to Do Everyday and complementary movements form the cornerstone of an effective and sustainable daily regimen.
Engage your core and lower your hips like sitting in an invisible chair.
Keep your back straight, chest lifted, & knees aligned with your toes.
Drive through your heels to return to standing position.
Why It’s Essential:
Squats are among the best exercises for men and women. They function as a compound movement that mimics natural daily actions. They stimulate anabolic hormone production, improving overall strength and endurance.
Repetitions:
2–3 sets of 12–15 repetitions
Modification: Use resistance bands or dumbbells to increase intensity.
Bring the right elbow to the left knee while extending the opposite leg.
Switch sides in a fluid cycling motion.
Why It’s Essential:
This movement integrates rotational core engagement, optimizing oblique toning while preserving spinal health.
Repetitions:
2–3 sets of 12–15 reps per side
Modification: Slow the motion to increase control and precision.
Supporting Movements Worth Incorporating
To diversify your daily routine and prevent plateaus, incorporate the following:
Yoga: Enhances flexibility, reduces cortisol, and improves breath control.
Pull-Ups: Advanced upper-body strengthener targeting lats, biceps, and shoulders.
Walking: Promotes circulation and mental clarity—an easy, accessible daily ritual.
Swimming: Full-body low-impact cardio that improves lung capacity and muscular endurance.
Mountain Climbers: High-intensity cardio that doubles as a core-strengthening drill.
Deadlifts: Masterful compound lift that builds total-body power and spinal integrity.
Cycling: Joint-friendly cardio to build leg endurance and cardiovascular stamina.
Stair Climbing: Natural HIIT workout that strengthens glutes and hamstrings.
Strength Training: Builds lean muscle mass and supports metabolic function.
Dance: Improves rhythm, cardiovascular health, and mental wellness.
Triceps Stretch: Essential for flexibility and muscle recovery.
Quick Reference Table
Exercise
Muscles Worked
Key Benefits
Reps/Duration
Squats
Legs, glutes, core
Strengthens lower body, posture
12–15 reps, 2–3 sets
Push-Ups
Chest, arms, core
Builds upper body strength
10–12 reps, 2–3 sets
Plank
Core, back, shoulders
Enhances stability, posture
30–60 seconds
Lunges
Glutes, quads, hamstrings
Improves balance, coordination
10 reps/leg, 2–3 sets
Glute Bridges
Glutes, hamstrings
Boosts hip mobility, core stability
12–15 reps, 2–3 sets
Jumping Jacks
Full body
Enhances stamina, heart health
30–60 seconds
Bicycle Crunches
Abs, obliques, hips
Tones core, improves coordination
12–15 reps/side, 2–3 sets
Final Thoughts
Incorporating these 7 Exercises to Do Everyday into your daily routine fortifies physical and mental resilience. Whether your goal is to maintain weight, enhance flexibility, or build muscular strength, these movements offer a foundation for longevity. Make room for variety, ensure proper hydration, and allow time for recovery. The consistency of a daily regimen, combined with these foundational exercises, is the gateway to a vibrant and enduring state of health.
Cocaine, a powerful stimulant, is often used recreationally for its euphoric and stimulating effects. Despite its appeal, its use can lead to serious consequences, both in terms of health & legality. Whether you’re concerned about an upcoming drug test or just curious about how long the drug remains in your system, it’s essential to understand how cocaine is processed in the body, the various detection methods, and factors that can affect detection times.
Understanding How Cocaine Works in the Body
Cocaine is a stimulant that affects central nervous system by increasing dopamine levels, which creates feelings of intense euphoria, increased energy, and heightened alertness. It is typically used by snorting, injecting, or smoking the drug. Upon entering the bloodstream, cocaine travels to the brain quickly, producing a short-lived high, usually lasting between 15 and 30 minutes.
However, while the effects may be brief, the drug’s byproducts, or metabolites, can remain in the body much longer. Cocaine is metabolized primarily in the liver, where it breaks down into various metabolites, including benzoylecgonine. This metabolite is often the target of drug tests, as it lingers in the system longer than cocaine itself.
Detection Times: How Long Does Cocaine Stay in Your System?
Length of time that cocaine remains detectable in your body depends on the type of drug test used. Here’s a breakdown of the most common testing methods and their detection windows:
Urine Tests
Urine testing is the most common method for detecting cocaine use. Cocaine itself is usually detectable in urine for 2 to 3 days after use. However, its metabolite, benzoylecgonine, remains detectable for extended periods. For chronic users, the detection window may extend to up to 1 week or more.
Factors like metabolism, hydration, and the frequency of use can influence the detection period.
Blood Tests
Cocaine is rapidly eliminated from the bloodstream, typically becoming undetectable within 12 hours after use. Blood tests are seldom used for routine drug screening because they have a short detection window. Still, they may be employed in situations such as accidents, medical emergencies or to detect recent use.
While cocaine itself disappears from the blood quickly, its metabolites may remain in the blood for a slightly longer duration.
Saliva Tests
Saliva tests are non-invasive & can detect recent drug use. Cocaine can be detected in saliva for 1 to 2 days after consumption. These tests detect benzoylecgonine, just like urine tests. Saliva testing is often used in legal settings, roadside testing, or random workplace drug testing.
Hair Follicle Tests
Hair follicle tests provide the most extended detection window for cocaine use. Cocaine can be detected in hair for as long as 90 days after it is used.This test is ideal for detecting long-term drug use rather than recent consumption, as the drug is deposited in the hair follicles and remains traceable as the hair grows. Because hair grows approximately half an inch each month, a 1.5-inch sample can indicate drug use for about three months.
Factors Influencing Cocaine Detection Times
While the above detection windows provide a general guideline, several factors can affect how long cocaine stays in your system. These include:
Frequency of Use
Chronic users will have longer detection times compared to occasional users. The more frequently cocaine is used, the more the body accumulates metabolites, making it detectable in urine and other bodily fluids for days or even weeks after the last use.
Metabolism
Your metabolism is crucial in how quickly your body processes and eliminates cocaine. Those with faster metabolisms typically process and excrete the drug more quickly, while individuals with slower metabolisms may experience longer detection windows. Factors such as age, overall health, activity level, and liver function all influence metabolism rates.
Body Composition
Hydration levels and body composition—specifically body fat—can also impact cocaine detection. Staying hydrated helps flush out metabolites through urine, whereas dehydration may slow detoxification. Higher body fat can store cocaine metabolites, causing them to remain detectable for extended periods.
Health Conditions
Certain medical conditions, particularly those affecting the liver or kidneys, may impair the body’s ability to metabolize and excrete cocaine efficiently. This can lead to longer detection times in the system. Additionally, other medications or substances taken may interact with cocaine, potentially prolonging its presence in the body.
Why Understanding Cocaine Detection Times Matters
For individuals who use cocaine, whether occasionally or regularly, understanding how long it stays in the system is essential, especially for those who may face drug testing in employment or legal situations. Knowing this information can help avoid the consequences of failing drug test, including job loss or legal penalties.
Employment Concerns
Many industries require drug testing, particularly those in safety-sensitive positions. A positive result for cocaine, even from occasional use, can lead to the loss of employment or an inability to secure a job. Awareness of detection times can help employees make informed drug use and testing decisions.
Legal Implications
Positive drug test result can have serious legal consequences. For individuals involved in criminal cases, child custody disputes, or on probation, failing a drug test could result in fines, imprisonment, or the loss of certain rights. Understanding how long cocaine stays in the system can help individuals avoid these legal ramifications.
Health Risks
Cocaine is highly addictive & poses significant health risks. From heart attacks and strokes to mental health disorders, the dangers of using cocaine are extensive. Users may underestimate these risks, especially when mixing cocaine with other substances, such as alcohol or opioids, which can increase toxicity.
How to Support Cocaine Elimination from Your System
While there is no immediate way to “flush” cocaine from your system, specific strategies can support your body’s natural detoxification process:
Hydrate: Drinking plenty of water helps flush out cocaine metabolites through urine and supports kidney function.
Eat Nutritious Foods: Healthy diet rich in vitamins, minerals, and antioxidants can support liver function, which aids in metabolizing and eliminating cocaine.
Exercise: Regular physical activity boosts metabolism and helps burn fat, where cocaine metabolites can sometimes be stored.
Avoid Alcohol: Combining alcohol with cocaine can form a harmful substance called cocaethylene, which can stay in the body longer.
Get Adequate Rest: Sleep allows the body to recover and supports healthy metabolic function.
Avoid Additional Drug Use: Refraining from using other substances while detoxing helps your liver and kidneys focus on processing cocaine.
Conclusion
The amount of time cocaine remains detectable in your body varies based on factors such as the type of drug test, frequency of use, metabolism, and overall health. Urine tests detect cocaine for up to 3 days, while hair follicle tests can reveal usage for up to 90 days. Understanding how long cocaine stays in the system is essential for those who may face drug testing, as well as for those concerned about the health risks associated with cocaine use. Always remember that the most reliable way to eliminate cocaine from your system is to allow time to pass naturally.
When most people think of cardio, they picture running, cycling, or jumping jacks. But did you know that upper body cardio exercises can be just as practical for elevating your heart rate and improving your fitness? These exercises torch calories and build strength and endurance in your arms, shoulders, and chest. In this post, we’ll explore the top upper body cardio exercises that can help you reach your fitness goals while maintaining things new and exciting.
Why Upper Body Cardio?
Upper body cardio exercises offer a unique way to boost heart health and burn calories while focusing on the arms, shoulders, chest, and back. These workouts are ideal for diversifying your fitness routine and providing a full-body workout. They can also be especially beneficial for people with lower body injuries or limitations, allowing them to maintain cardiovascular fitness without straining their legs.
Incorporating upper body cardio into your workout routine offers several benefits:
Heart Health: These exercises challenge your cardiovascular system, helping to enhance circulation and lower the risk of heart disease.
Burn More Calories: By engaging muscles in your upper body, you increase calorie burn, leading to faster fat loss.
Balanced Strength: Strengthening your upper body helps maintain a balanced physique and improve overall functional fitness.
Best Upper Body Cardio Exercises to Try
Speed Punching
Speed punching is a great way to elevate your heart rate while working your shoulders, arms, and core.
How to do it: Stand with your feet shoulder-width apart. Throw rapid punches in front of you, alternating arms. Keep your core engaged and maintain speed.
Duration: Perform for 30-60 seconds, rest for 30 seconds, and repeat for 3-5 rounds.
Battle Ropes
Battle ropes are an explosive way to pump your heart and engage your upper body.
How to do it: Stand with your feet shoulder-width apart and grip the ropes firmly. Alternating arms slam the ropes onto the ground with as much force as possible.
Duration: Go all out for 20-30 seconds, rest for 30-45 seconds, and complete 4-6 rounds.
Mountain Climbers (Arms Focus)
Mountain climbers are traditionally known for their leg involvement, but when done with an emphasis on the arms, they give a great upper body workout.
How to do it: Get into a plank position with your hands shoulder-width apart. Drive one knee toward your chest, alternating legs quickly. Focus on stabilizing your upper body and shoulders.
Duration: Perform for 30-60 seconds, rest for 30 seconds, and repeat for 3-4 rounds.
Jump Rope (Upper Body Engagement)
While jump rope mainly targets the legs, focusing on your arm movements can turn this into an upper body cardio exercise.
How to do it: Grip the handles firmly, engaging your forearms, shoulders, and upper arms. Swing the rope with controlled but rapid movements.
Duration: Skip for 30-60 seconds, rest for 30 seconds, and repeat for 4-6 rounds.
Rowing Machine (Upper Body Focus)
The rowing machine is often overlooked as a cardio tool for the upper body. When done correctly, it provides an intense workout for your arms, shoulders, and back.
How to do it: Set the rowing machine resistance to moderate. Focus on pulling with your upper body rather than relying solely on your legs.
Duration: Row for 500 meters at a fast pace, rest for 60-90 seconds, and repeat for 3-5 rounds.
Tips for Maximizing Your Upper Body Cardio Workouts
Warm-Up Properly:Always start with 5-10 minutes of dynamic stretching or light cardio to prepare your muscles.
Keep Good Form:Speed is essential in cardio; maintaining proper form ensures you target the right muscles and avoid injury.
Progress Gradually: Start with shorter intervals and fewer rounds, then increase the intensity and duration as you build stamina.
Conclusion
Upper body cardio exercises are an excellent way to diversify your fitness routine and ensure you work for all muscle groups while improving heart health. Whether you’re speed punching, mastering the rowing machine, or slamming battle ropes, these exercises can help you unlock your full fitness potential.
When we think of health, our minds often jump to physical well-being. We envision regular exercise, eating healthy, and avoiding harmful habits. However, wellness is a much more holistic concept. Proper health encompasses several key dimensions to create a balanced and fulfilling life. These dimensions include physical, mental, emotional, social, spiritual, and environmental health, all interconnected and contribute to overall wellness.
In this blog, we will explore how each component of health relates to wellness and why maintaining balance across these areas is crucial for living a healthier and more fulfilling life.
Understanding the Components of Health and Wellness
Physical Health
Physical health is often the first thing that comes to mind when discussing wellness. It requires taking care of your body through regular exercise, good nutrition, adequate sleep, & avoiding harmful behaviors similar as smoking or excessive alcohol consumption. Maintaining physical health improves your body’s function and supports other aspects of wellness.
For example, regular physical activity strengthens muscles, improves cardiovascular health, and enhances flexibility. It also promotes mental clarity & emotional stability by reducing stress and anxiety. On other hand, poor physical health can negatively affect mood, cognitive function, and social interactions, creating a ripple effect across different dimensions of health.
Key Aspects of Physical Health:
Regular exercise and physical activity
A balanced, nutritious diet
Adequate sleep and rest
Preventive care, including regular check-ups
Mental Health
Mental health focuses on our cognitive functioning, emotional regulation, and the way we process information. It is strongly linked to physical health because the mind and body are closely intertwined. Stress and anxiety can physically manifest as headaches, stomach problems, or high blood pressure. Conversely, maintaining a healthy body can lead to improved mental clarity and better cognitive function.
Mental health influences emotional stability and decision-making, affecting our overall well-being. By nurturing mental health, we can build resilience, enhance coping skills, and create positive interactions in our social and personal lives.
Key Strategies for Mental Health:
Stress management through mindfulness or relaxation techniques
Building Resilience Through Positive Thinking
Seeking professional help when needed (therapy, counseling)
Emotional Health
Emotional health involves understanding, managing, and expressing our emotions healthily and productively. This includes dealing with positive and negative emotions like joy, sadness, anger, and empathy. Emotional well-being is crucial for resilience, enabling us to cope with life’s challenges and build strong relationships.
Our emotional health can significantly impact our physical well-being. For instance, chronic emotional distress can weaken immune system, making us more susceptible to illness. On the other hand, positive emotions like gratitude and love can lower stress levels, improve mood, and enhance immune function.
Tips for Enhancing Emotional Well-being:
Express your emotions in healthy ways (e.g., journaling or talking to a friend)
Build emotional resilience by practicing gratitude or seeking therapy
Maintain a positive mindset & focus on the present moment
Social Health
Humans are inherently social creatures, and our social connections are crucial to our overall health. Social health involves communicating effectively, building and maintaining meaningful relationships, and engaging with a community. A strong social network provides emotional support, reduces stress, and extends your lifespan.
When emotional or mental health suffers, our social interactions may become strained, leading to isolation or conflict. Conversely, strong social bonds promote emotional and mental well-being, creating a positive feedback loop supporting all health aspects.
Ways to Foster Social Health:
Build strong, supportive relationships with family & friends
Engage in your community through volunteering or social groups
Improve communication and conflict resolution skills
Spiritual Health
Spiritual health is about finding purpose, meaning, and connection in life through religion, meditation, nature, or personal values. It doesn’t necessarily mean being religious; it’s more about nurturing your soul and connecting to something larger than yourself. Spirituality provides stability and peace, especially in times of challenge, and helps promote emotional and mental well-being.
Having a sense of purpose and aligning your actions with your values can improve motivation, clarity, and well-being. When we feel spiritually fulfilled, we are more likely to have healthy relationships and engage in practices that benefit our physical and emotional health.
Spiritual Practices for Wellness:
Meditation or mindfulness practices
Reflecting on personal values and beliefs
Engaging in activities that promote inner peace (e.g., spending time in nature, volunteer work)
Environmental Health
Environmental health focuses on the influence of our surroundings on our well-being. Clean air, safe drinking water, & a healthy environment are essential for physical health. However, environmental health goes beyond the physical and includes mental and emotional well-being. A cluttered, chaotic environment can increase stress, while a peaceful, organized space can promote relaxation and clarity.
Taking care of your environment through recycling, reducing pollution, or simply keeping your living space tidy contributes to both physical and mental wellness.
Aspects of Environmental Health:
Clean air and water
Safe, healthy living and working spaces
Access to green spaces or nature
The Interconnectedness of Health and Wellness
Each component of health is interlinked, creating a complex web of well-being. When one area suffers, it often impacts others. For example, neglecting physical health can contribute to mental health problems like anxiety or depression. Similarly, emotional struggles can strain social relationships, creating a cycle of stress and isolation. Achieving true wellness requires maintaining balance and nurturing each of these dimensions of health.
How to Maintain a Balanced State of Wellness
Establish a Regular Exercise Routine: Just a 30-minute walk a day can boost physical health and reduce stress.
Prioritize Mental Health: Practice mindfulness and meditation or seek support when needed.
Build Emotional Resilience: Journaling or therapy can help you process and manage emotions effectively.
Foster Strong Relationships: Make time for family, friends, and community, and communicate openly.
Cultivate Spiritual Practices: Reflect on your purpose and engage in activities that bring peace and clarity.
Create a Healthy Environment: Keep your surroundings clean, reduce your environmental footprint, and spend time outdoors.
Conclusion
Wellness encompasses more than simply the absence of illness. It is an ongoing process of growth and transformation in multiple areas of life. By nurturing each component of health—physical, mental, emotional, social, spiritual, and environmental—we create a balanced foundation for a fulfilling and vibrant life. Striving for balance in these areas will help us achieve true wellness and live our lives to the fullest.
By prioritizing holistic health, we set ourselves toward a healthier, more connected, and meaningful life. Embrace each aspect of wellness, and watch how it transforms your life from the inside out.
[vc_row][vc_column][vc_column_text]There’s nothing quite like the taste of fresh, homemade French bread – the crispy golden crust, soft fluffy interior, and that irresistible aroma that fills your kitchen. While French bread (commonly known as a baguette) is a staple in France, you don’t have to be a professional baker or travel to France to enjoy a delicious loaf. With the right technique and ingredients, you can bake authentic, bakery-quality French bread at home.
In this article, we’ll walk you through an easy homemade French bread recipe. We’ll cover everything from selecting ingredients to mastering the kneading process, shaping the dough, and achieving that perfect golden crust. Whether you’re new to baking or a seasoned pro, this guide will help you bake the best French bread with ease.
Introduction to French Bread
French bread, especially the baguette, has been a cherished part of French culture for centuries. Renowned for its crunchy crust and elongated form, and soft interior, French bread is often used in everything from sandwiches to dipping into soups and sauces. This bread’s simplicity is what makes it so beautiful – it’s made from basic ingredients like flour, water, yeast, and salt, yet yields such rich flavor and texture.
While French bread may seem intimidating to make, the process is actually quite simple. By following this easy French bread recipe, you’ll be able to bake your own loaves with confidence, and enjoy the satisfaction of creating this iconic bread from scratch.
Ingredients for Homemade French Bread
To create authentic French bread, you’ll only need a handful of ingredients. However, the quality and balance of these ingredients have an important effect on the final result. Here’s what you’ll need:
Begin by activating your yeast. Mix the sugar, yeast, and warm water in a small bowl. Stir it gently and let the mixture sit for about 5–10 minutes. You’ll know the yeast is activated when it becomes frothy and bubbly on the surface. If it doesn’t foam up, your yeast may have expired, and you’ll need to start with fresh yeast.
Mix the Dough
Pour in the yeast mixture slowly, stirring with a spoon or on low speed in a mixer. Slowly pour in the yeast mixture and stir with a spoon or use the mixer on low speed. Add the olive oil if you’re using it, which will give the bread a slightly richer flavor. Continue mixing until a dough forms.
Knead the Dough
Kneading is essential for developing gluten, which gives the bread its structure and chewiness. If you’re kneading by hand, turn the dough onto a lightly floured surface and knead for about 8–10 minutes. The dough should become smooth, elastic, and slightly tacky. When utilizing a stand mixer equipped with a dough hook, knead on medium speed for 5–7 minutes.
Let the Dough Rise
After kneading, roll the dough into a ball and put it in a bowl that has been lightly oiled. Cover the bowl with a clean kitchen towel and let the dough rise for one to one and a half hours, or until doubled in size, in a warm location.
Shape the Dough
After the dough has risen, punch it down to release any air bubbles. Turn the dough onto a floured surface and divide it into two equal portions (for two baguettes). Shape each portion into a long, baguette-like loaf. You can use a baguette pan to help maintain the shape, or place them on a baking sheet.
Second Rise
Once shaped, cover the loaves again with a towel and let them rise for another 30–40 minutes until they puff up slightly.
Preheat the Oven
While the loaves are undergoing their second rise, preheat your oven to 450°F (230°C). To achieve a bakery-style crust, place an empty metal tray or cast-iron skillet at the bottom of the oven. This will be used to create steam.
Score the Loaves
Before baking, use a sharp knife or bread lame to make 3–4 diagonal slashes on the top of each loaf. This allows the bread to expand properly in the oven.
Bake the Bread
Arrange the loaves on the middle rack of the oven. Immediately pour about 1 cup of water into the hot tray or skillet at the bottom of the oven. The steam will contribute to a crust that is crunchy. For 20 to 25 minutes, bake, or until the loaves are hollow when tapped on the bottom and have a golden brown color.
Cool and Enjoy
After taking the bread out of the oven, let it cool for at least 15 minutes before slicing. Enjoy your homemade French bread with butter, jam, or as a side to any meal!
Tips for Perfecting Your French Bread
Even though this is an easy French bread recipe, a few tips can help you achieve an even better result:
Use warm water: Water that’s too hot can kill the yeast, while cold water won’t activate it properly. Aim for water that’s around 110°F (45°C).
Don’t over-knead: Knead the dough just until it’s smooth and elastic. Over-kneading can make the bread too dense.
Create steam: The steam created by pouring water into a hot tray helps the bread form a crispy, crackly crust – a hallmark of good French bread.
Slash the dough properly: Scoring the dough before baking not only looks professional, but it also helps the bread expand evenly in the oven.
Variations of French Bread
While the traditional French bread recipe is delicious on its own, you can also experiment with variations:
Garlic French Bread: Add garlic and herbs to the dough for a flavorful twist.
Whole Wheat French Bread: Substitute half the flour with whole wheat flour for a more wholesome version.
Stuffed French Bread: Stuff the loaf with cheese or deli meats before baking for a savory snack.
French bread is incredibly versatile and pairs well with a variety of dishes:
Appetizer: Serve warm slices with olive oil and balsamic vinegar for dipping.
Soup or Stew: Use it to soak up the broth in your favorite soup or stew.
Sandwiches: Slice the bread lengthwise for a delicious sandwich base.
Toast: Make French toast or crostini with leftover slices.
Conclusion
French bread baking at home can be a rewarding and surprisingly straightforward process. With just a few basic ingredients and some simple techniques, you can create a loaf that rivals anything found in a bakery. This easy homemade French bread recipe ensures that even novice bakers can achieve a crispy golden crust and soft, fluffy interior, perfect for any meal. The key is patience, proper kneading, and understanding the importance of steps like creating steam in the oven, which helps to produce that signature crunchy crust.
Whether you’re making bread for a family dinner, a weekend brunch, or simply for the joy of baking, mastering this French bread recipe will open up a world of possibilities in your kitchen. Not only will you have the satisfaction of creating delicious, authentic bread, but you’ll also be able to experiment with different flavors, shapes, and uses. From savory sandwiches to dipping slices into rich soups, this recipe provides a versatile base that will quickly become a household favorite. So take your time, enjoy the process, and relish the reward of fresh, warm French bread made from scratch.[/vc_column_text][/vc_column][/vc_row][vc_row][vc_column width=”1/1″][us_separator size=”small”][us_text text=”Frequently Asked Questions (FAQs)” link=”%7B%22url%22%3A%22%22%7D” tag=”h2″][vc_tta_accordion][vc_tta_section title=”What is the best flour to use for French bread?” tab_link=”%7B%22url%22%3A%22%22%7D”][vc_column_text]All-purpose flour works well, but bread flour can be used for a chewier texture and better structure due to its higher protein content.[/vc_column_text][/vc_tta_section][vc_tta_section title=”How do I get a crispy crust on my French bread?” tab_link=”%7B%22url%22%3A%22%22%7D”][vc_column_text]To achieve a crispy crust, bake the bread with steam in the oven. You can create steam by placing a pan of water on the lower rack or misting the oven walls with water before baking.[/vc_column_text][/vc_tta_section][vc_tta_section title=”Can I make French bread without a stand mixer?” tab_link=”%7B%22url%22%3A%22%22%7D”][vc_column_text]Yes, French bread can be made entirely by hand. Kneading the dough by hand will take about 8-10 minutes until it’s smooth and elastic.[/vc_column_text][/vc_tta_section][vc_tta_section title=”How long does homemade French bread stay fresh?” tab_link=”%7B%22url%22%3A%22%22%7D”][vc_column_text]French bread is best eaten fresh on the day it’s baked, but it can be stored in a paper bag for 1-2 days. For longer storage, wrap and freeze it.[/vc_column_text][/vc_tta_section][vc_tta_section title=”Can I add flavorings or ingredients to this French bread recipe?” tab_link=”%7B%22url%22%3A%22%22%7D”][vc_column_text]Yes, you can customize the recipe by adding ingredients like garlic, herbs, or even cheese for a flavorful twist on the classic French bread.[/vc_column_text][/vc_tta_section][vc_tta_section title=”Section”][/vc_tta_section][/vc_tta_accordion][/vc_column][/vc_row]
Adderall is a pharmaceutical medication commonly used to treat Attention Deficit Hyperactivity Disorder and narcolepsy. It’s a stimulant composed of amphetamine salts that affect the brain’s neurotransmitters to improve focus, attention, and impulse control. Despite its therapeutic benefits, Adderall is also a substance that can be misused, leading to addiction and various health issues. One of the critical concerns for users, both prescribed and recreational, is how long dose Adderall stays in the system. In this article, we’ll discuss the factors affecting Adde,rall’s duration in the body, detection windows in various tests, and how it metabolizes.
What is Adderall?
Adderall combines two active ingredients amphetamine and dextroamphetamine. These ingredients work by increasing dopamine and norepinephrine levels in the brain. Available in immediate-release (IR) and extended-release (XR) formulations, Adderall is prescribed in various doses depending on the patient’s needs. Immediate-release versions take effect quickly but wear off faster, while extended-release forms release the medication gradually throughout the day.
How Adderall is Metabolized
Once taken, Adderall is interested in the gastrointestinal tract, enters the bloodstream, and then travels to the brain. The liver metabolizes the drug, converting it into several metabolites excreted primarily through urine.
The half-life of Adderall is the time it takes for half of the drug to be eliminated from the bloodstream. For immediate-release Adderall, the half-life is about 9 to 14 hours. The extended-release version’s half-life can extend up to 15 to 18 hours.
How Long Does Adderall Stay in the System?
Adderall’s duration in your system depends on several factors, including dosage, frequency of use, metabolism, and age. The drug is detectable in various parts of the body for different lengths of time:
Blood: Adderall can typically be detected within hours after ingestion and may remain detectable for up to 2–3 days after use.
Urine: In urine, Adderall can be detected for approximately 1–2 days after use. In some cases, it may be detectable for longer, especially in heavy or frequent users.
Saliva: Saliva testing can detect Adderall for a shorter window, usually within 24–48 hours after use.
Hair: Like many drugs, Adderall can be found in hair follicles for up to three months after the last dose. However, hair tests are not commonly used to detect Adderall.
Factors Influencing How Long Adderall Stays in Your System
Several factors can affect how long Adderall remains in the body:
Dosage and Frequency: Higher doses and regular use will naturally increase the drug’s duration in the system.
Metabolism: People with faster metabolisms will clear Adderall more quickly. Metabolism is influenced by age, weight, and genetics.
PH Levels: Your body’s urine pH can impact how quickly Adderall is excreted. Alkaline urine may prolong the presence of Adderall, while acidic urine speeds up excretion.
Liver and Kidney Function: Since Adderall is processed by the liver and excreted by the kidneys, any impairment in these organs can delay the drug’s elimination.
Age: Older adults may metabolize Adderall more slowly than younger people due to changes in liver function with age.
Adderall Detection in Drug Tests
Drug tests may be required in various contexts, from employment to legal situations, and can test for the presence of Adderall through different methods:
Urine Tests: The most common drug test for amphetamines. Adderall can be detected in urine for 1 to 4 days after use, depending on the user’s metabolism, dosage, and how frequently it was taken.
Blood Tests: Blood tests are slightly familiar but may be used to detect Adderall for up to 24 hours after the last dose.
Saliva Tests: Adderall can be found in saliva for about 48 hours.
Hair Tests: While not common, hair follicle tests can detect amphetamines up to 90 days behind the previous use.
How to Eliminate Adderall from Your System Faster
If you need to clear Adderall from your body more quickly, the only practical way is to stop taking the medication and allow your body to metabolize and eliminate it naturally. Here are a few tips to speed up the process:
Hydration: Drinking water helps your kidneys flush out toxins more efficiently. While it won’t drastically reduce the detection time, staying hydrated can support overall metabolism.
Exercise: Physical activity increases metabolism, helping to speed up the elimination process. However, this should be done carefully if you’re experiencing any side effects from Adderall.
PH Balance: As mentioned earlier, acidic urine can help flush Adderall from your system faster. Consuming vitamin C or cranberry juice may help acidify urine.
Healthy Diet: Eating a nutritious, balanced diet supports liver and kidney health, which can improve the elimination of Adderall and other substances from the body.
Risks of Misuse and Overuse
While Adderall is effective for treating ADHD and narcolepsy, misuse can lead to a range of adverse side effects. Taking Adderall without a prescription, using it to enhance academic or work performance, or taking higher doses than prescribed can result in:
Insomnia
Anxiety
Heart palpitations
Increased blood pressure
Dependence and addiction
Prolonged misuse can lead to more severe health outcomes, including cardiovascular issues and mental health issues like paranoia or hallucinations.
Conclusion
Adderall stays in the system for varying lengths depending on the formulation, dosage, and individual factors such as metabolism and urine pH. While urine tests can catch the pill for 1 to 4 days, blood and saliva tests have shorter detection windows, and hair tests can show traces for up to 3 months. If you are taking Adderall as prescribed, it’s essential to follow your doctor’s guidance and discuss any concerns about its duration in your system. Misusing Adderall can result in serious health risks, including dependence and addiction.
For those required to take a drug test, knowing how long Adderall stays in the body is crucial. Always ensure that any use of Adderall is within legal and medical guidelines.

 A hair transplant is a kind of surgery used to restore hair to thinning or balding areas. For women experiencing significant hair loss, this solution can be life-changing. Healthy hair follicles are extracted during the procedure from areas with dense hair growth (often the back or sides of the scalp) and transferring them to regions where hair is sparse or nonexistent. This technique allows the transplanted hair to grow naturally in the new area, offering long-lasting results. While traditionally more common in men, advancements in medical technology have made hair transplants an increasingly popular option for women seeking natural-looking hair restoration.
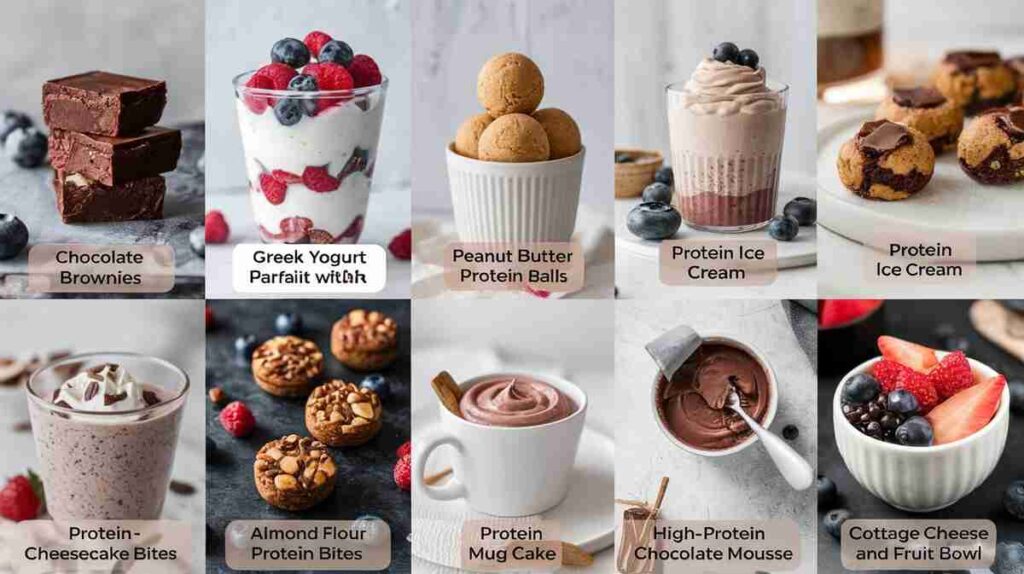
 2. Push-Ups