Papas fritas, or French fries as they are known in many parts of the world, are a universally loved snack that transcends cultures and cuisines. People of all ages enjoy these golden, crispy potato strips, whether as a side dish to a hearty meal or as a snack. The simplicity of papas fritas belies their widespread appeal, making them a staple in homes and restaurants. They can be paired with various dishes, including burgers, steaks, and sandwiches, and even enjoyed with dipping sauces like ketchup, mayonnaise, or aioli.
The Origin of Papas Fritas
The history of Papas Fritas is rich and somewhat contested. The dish is often linked to Belgium, where it’s said that villagers fried potatoes in the late 17th century as a substitute for fish during winter months when rivers were frozen. However, France also claims the invention of the fry, particularly with the term “French fries” emerging in the United States, possibly due to the popularity of French cooking at the time. Whether Belgian or French, papas fritas have traveled far beyond Europe to become a beloved snack globally.
Papas Fritas Recipe
Creating the perfect papas fritas at home requires just a few simple ingredients & basic steps, but attention to detail is critical to achieving that ideal crispiness and flavor.
Ingredients:
Potatoes: Russet potatoes are the greatest option for papas fritas because of their high starch content, which aids in their beautiful crisping. Nevertheless, if another variety appeals to you, feel free to try it.
Oil for Frying: Select an oil with a high smoke point, like vegetable oil, canola oil, or peanut oil. This ensures that the fries cook evenly without burning.
Salt: Simple table salt is commonly used, but you can also try sea salt or flavored salts for a different taste.
Steps:
Preparation: Peel the potatoes (optional, if you prefer a more rustic fry with the skin on). Cut the potatoes into thin, even strips. The size of the fries can vary but aim for uniformity to ensure they cook evenly.
Soaking: Place the potato strips in a bowl of cold water and soak for at least 30 minutes. This helps remove excess starch & prevents the fries from sticking together.
Drying: Drain the water and thoroughly pat the potato strips dry with paper towels. Excess moisture can reason the oil to splatter and prevent crispiness.
Frying: Preheat the oil in a big saucepan with a heavy bottom or deep fryer to approximately 350°F (175°C). Small batches of potatoes should be fried to prevent crowding. Each batch should be fried for four to five minutes, or until crispy and golden brown. Using a slotted spoon, remove and drain onto a plate covered with paper towels.
Seasoning: Immediately after frying, sprinkle with salt while the fries are still hot. You can also experiment with other spices like garlic powder, paprika, or Parmesan cheese.
Papas Fritas Calories and Nutritional Value
Nutrient
100g Serving
Calories
300-350 kcal
Fats
15-20 g
Carbohydrates
30-35 g
Proteins
3-4 g
Fiber
Pequeña cantidad
Sodium
200-300 mg
While papas fritas are a tasty treat, their high calorie and fat content means they should be consumed in moderation. Choosing healthier cooking methods, such as baking instead of frying, and controlling portion sizes can help manage their impact on your diet.
One of the best things about papas fritas is their versatility. Here are some delicious ways to elevate your fries:
Cheese Fries: Melt cheddar, mozzarella, or a blend of cheeses over your fries. Add bacon bits, sour cream, and chives for a loaded version.
Chili Fries: Top your fries with homemade chili and shredded cheese for a hearty meal.
Garlic and Herb Fries: Toss hot fries with minced garlic, fresh herbs like parsley or rosemary, and a drizzle of olive oil.
Sweet Potato Fries: Substitute sweet potatoes for a slightly sweet flavor. Pair with cinnamon sugar for a dessert-like treat or chili powder for a spicy kick.
Spicy Fries: Add heat with cayenne pepper or red pepper flakes. Serve with a spicy slanting sauce such as Sriracha mayo.
Curly Fries: Use a spiralizer to make curly fries. Season with a mix of spices before frying for a unique flavor.
Conclusion
Papas fritas are more than just a simple snack; they are a culinary canvas that can be modified to suit any taste or occasion. Whether you enjoy them plain with a sprinkle of salt or loaded with toppings like cheese and chili, papas fritas offer endless possibilities for enjoyment. Making them at home is easy and allows you to customize the fries to your liking, ensuring they are always perfectly cooked. The next time you’re craving something crispy, golden, and utterly satisfying, try making your papas fritas and experience the joy of this classic dish.
Frequently Asked Questions (FAQ)
What are papa fritas?
Papas fritas are French fries made by deep-frying potato strips until crispy and golden. They are a popular snack or side dish enjoyed globally.
Are papas fritas chips or fries?
Papas fritas are fries, not chips. They are made by deep-frying sliced potatoes, while chips are thin, crisp slices often baked or fried.
What language is papas fritas?
“Papas fritas” is Spanish for “French fries.” The term translates directly to “fried potatoes” in English.
Why are potatoes called papas?
In Spanish, “papas” is the term for potatoes, derived from the Quechua word “papa.” This term was adopted into Spanish due to the influence of indigenous cultures in the Andes.
Chipotle’s Corn Salsa is one of the most beloved burritos, tacos, and bowls toppings. The ideal balance of sweetness, heat, and tang can elevate any dish, making it a must-have addition to your culinary repertoire. But why not recreate this flavorful salsa right in your kitchen? With simple ingredients & easy-to-follow steps, you can enjoy Chipotle Corn Salsa Recipe from the comfort of your home. Here’s how you can make it!
Why Make Chipotle Corn Salsa at Home?
Before we dive into the recipe, let’s explore why you might want to make Chipotle Corn Salsa at home:
Customization: You can adjust the spice level, lime juice, and seasonings to match your taste preferences.
Freshness: Homemade salsa uses fresh ingredients, offering a burst of flavour that store-bought versions can’t match.
Versatility: This salsa works wonders on tacos, burritos, grilled meats, salads, and even as a snack with tortilla chips.
By making Chipotle Corn Salsa yourself, you’ll satisfy your cravings and add a unique, fresh touch to any meal.
Ingredients You’ll Need
The beauty of Chipotle Corn Salsa lies in its simplicity. Here’s what you’ll need:
Main Ingredients
2 cups of corn (fresh or thawed frozen)
1/4 cup red onion, finely diced
1 jalapeño, seeded and finely chopped
1/2 poblano pepper, roasted, peeled, and chopped
1/4 cup fresh cilantro, finely chopped
1/4 cup lime juice (freshly squeezed)
Salt to taste
Optional Ingredients
Pinch of cumin for a warm, earthy flavour
Splash of vinegar for extra tanginess
Step 1: Preparing the Corn
The first step in making your Chipotle Corn Salsa is preparing the corn. If you’re using fresh corn, cook it first. Boil the ears of corn in salted water for about 5 minutes or until tender. Once cooked, allow them to cool before cutting the kernels off the cob. If you’re using frozen corn, thaw it and pat it dry to remove excess moisture.
Tip: For an extra layer of flavour, grill the corn after boiling or broil it in the oven until the kernels are slightly charred.
Step 2: Roasting the Poblano Pepper
To capture the authentic flavour of Chipotle’s salsa, roasting the poblano pepper is essential. Here’s how:
Roast poblano pepper over an open flame (on a gas stove) or under broiler. Turn the pepper occasionally until the skin is charred and blistered.
After roasting, place the pepper in a bowl & cover it with plastic wrap it in plastic bag. Let it steam for about 10 minutes to loosen the skin.
Peel the charred skin off the pepper (it should come off quickly). Remove the seeds & finely chop the pepper.
Step 3: Preparing the Other Ingredients
You can prepare the remaining ingredients while the corn is cooling and the poblano is steaming.
Red onion: Dice it finely. If the raw onion flavour is too strong for you, soak the diced onion in cold water for 10 minutes, then drain.
Jalapeño: Cut it in half lengthwise, remove seeds if you prefer a milder salsa, then finely chop it.
Cilantro: Roughly chop the cilantro leaves, discarding the stems as they can be bitter.
Step 4: Combining the Ingredients
Once all the ingredients are prepared, it’s time to mix them. Combine the corn, roasted poblano pepper, jalapeño, red onion, and cilantro in a large bowl. Add lime juice & salt to taste, then stir everything together until evenly mixed.
Optional: If you like extra flavour, consider adding a pinch of cumin or a splash of vinegar for a tangier, more complex salsa.
Step 5: Let the Salsa Rest
For the best flavour, let the salsa rest in the fridge for at least 30 minutes. This allows ingredients to meld together and develop a richer flavour. You can also prepare this salsa the day before for an even more intense flavour!
Storage:The salsa can be stored in an airtight container in the fridge for up to three days. However, the cilantro may lose its vibrant green colour after a day or two, so it’s best enjoyed fresh.
Serving Suggestions
Now that your Chipotle Corn Salsa is ready, it’s time to enjoy it! Here are a few ideas on how to serve it:
Tacos and Burritos: Whether you’re making chicken, beef, or vegetarian tacos, this salsa adds a refreshing, zesty kick.
Burrito Bowls: Top your rice, beans, and protein with this salsa for flavour and texture.
Grilled Meats: Pair this salsa with chicken, steak, or fish. The sweet corn complements the smoky flavours of the meat perfectly.
Salads: Add a scoop of salsa to your salad for extra crunch and flavour. It works exceptionally well with a Mexican-inspired salad.
Chips and Dip: Enjoy it as a snack with tortilla chips for a popular appetizer or party dip.
Customizing Your Chipotle Corn Salsa
One of the best things about this recipe is how easily it can be customized. Here are some ideas for tailoring the salsa to your preferences:
Adjust the spice level: If you love heat, leave the seeds in the jalapeño or add an extra one. For a milder salsa, omit the seeds or reduce the amount of jalapeño.
Add more vegetables: For a heartier salsa, add diced tomatoes, bell peppers, or avocado.
Experiment with herbs: While cilantro is traditional, you can try parsley or basil for a different flavour profile.
Sweeten it up: If you prefer a sweeter salsa, add a little honey or sugar, especially if you’re using less sweet corn.
Conclusion
This homemade Chipotle Corn Salsa is easy to make, versatile, and flavoured. Whether you’re using it as a topping for tacos, a chip dip, or a side dish for grilled meats, it adds a fresh, tangy kick to any meal. Best of all, by making it at home, you can adjust ingredients to your liking, ensuring that your salsa is just as you want. So, gather your ingredients & prepare to enjoy this delicious salsa in no time!
[vc_row][vc_column][vc_column_text]Chipotle sauce is a culinary gem, offering a smoky, spicy kick that transforms ordinary dishes into extraordinary ones. With roots deep in Mexican cuisine, this versatile sauce has gained global popularity, reaching kitchens and restaurants worldwide. This detailed blog post will explore the origins of chipotle sauce, its diverse applications, and share a distinctive recipe for you to try at home.
What is Chipotle Sauce?
Chipotle sauce is a smoky, creamy, slightly spicy condiment made primarily from chipotle peppers. These peppers are ripened jalapeños that have been dried and smoked, giving them their characteristic flavor. The sauce typically includes a base of mayonnaise, sour cream, or Greek yogurt blended with chipotle peppers in adobo sauce, garlic, lime juice, and various seasonings.
The sauce’s flavor profile is rich and complex. It combines the smoky heat of the chipotle pepper with the tanginess of lime and the creaminess of the dairy base. It’s versatile for a variety of dishes, adding depth and a hint of heat without overpowering the other flavors.
The Origins of Chipotle Sauce
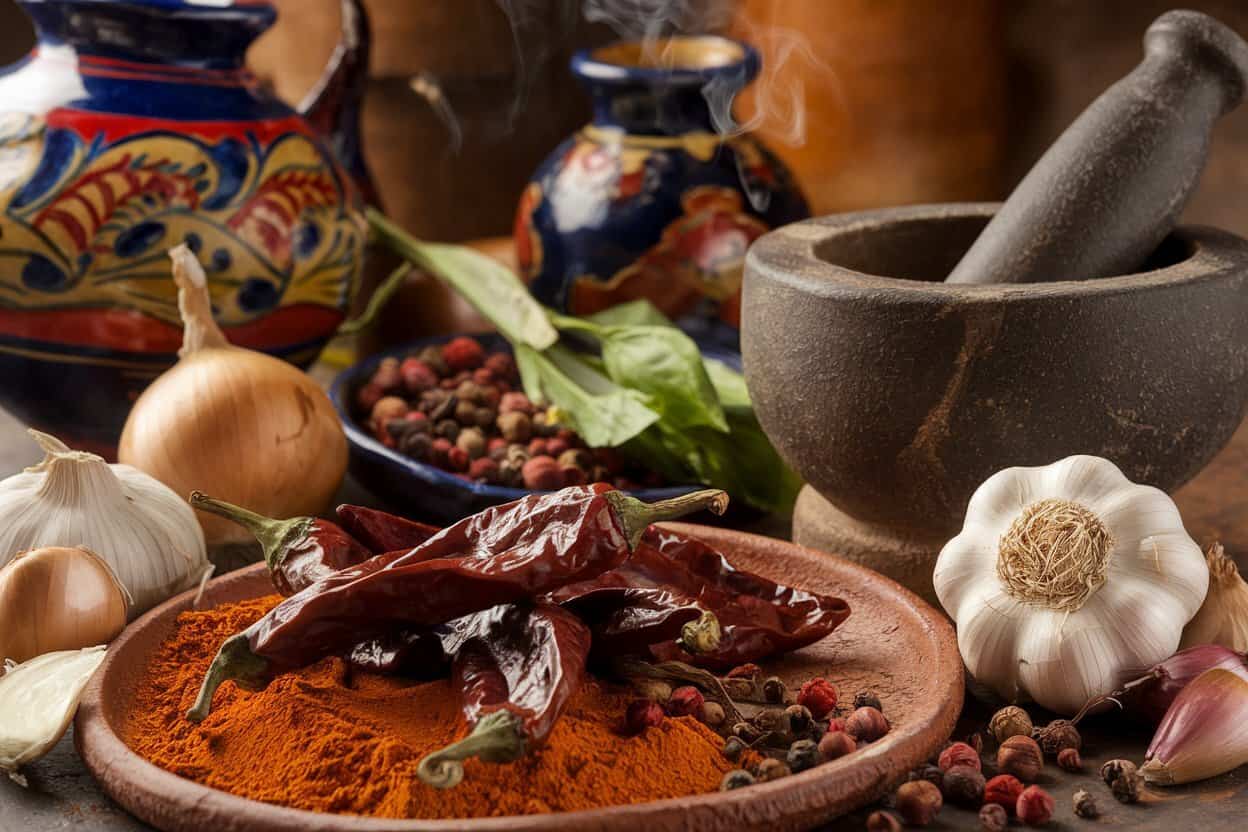
Traditional spices and ingredients used to create chipotle sauce, including dried red chilies, garlic, and a mortar and pestle, showcasing the rich origins of this flavorful condiment.
The History of Chipotle Peppers
To understand chipotle sauce, it’s essential to explore the origins of its star ingredient: the chipotle pepper. The word “chipotle” is derived from the Nahuatl word “chīlpoctli,” meaning “smoked chili.” Smoking jalapeños to create chipotle peppers dates back to ancient Mesoamerica, particularly among the Aztecs, who used this method to preserve their chili harvests.
Smoking the jalapeños extended their shelf life and imparted a unique smoky flavor that became integral to various Mexican dishes. Chipotle peppers have since become a staple in Mexican cuisine, utilized in a variety of dishes from salsas to stews.
The Evolution of Chipotle Sauce
While chipotle peppers have been used in Mexican cooking for centuries, chipotle sauce is a more recent creation as we know it today. The sauce likely evolved as chefs and home cooks sought ways to incorporate the bold flavor of chipotle peppers into a creamy, versatile condiment. By blending the smoky heat of chipotles with creamy elements like mayonnaise or sour cream, they created a sauce that could be easily drizzled, spread or dipped into a wide range of dishes.
Chipotle sauce gained popularity in the United States in the late 20th century, particularly with the rise of Tex-Mex cuisine. Today, it’s a beloved condiment in Mexican and American kitchens, celebrated for its ability to add depth and flavor to countless recipes.
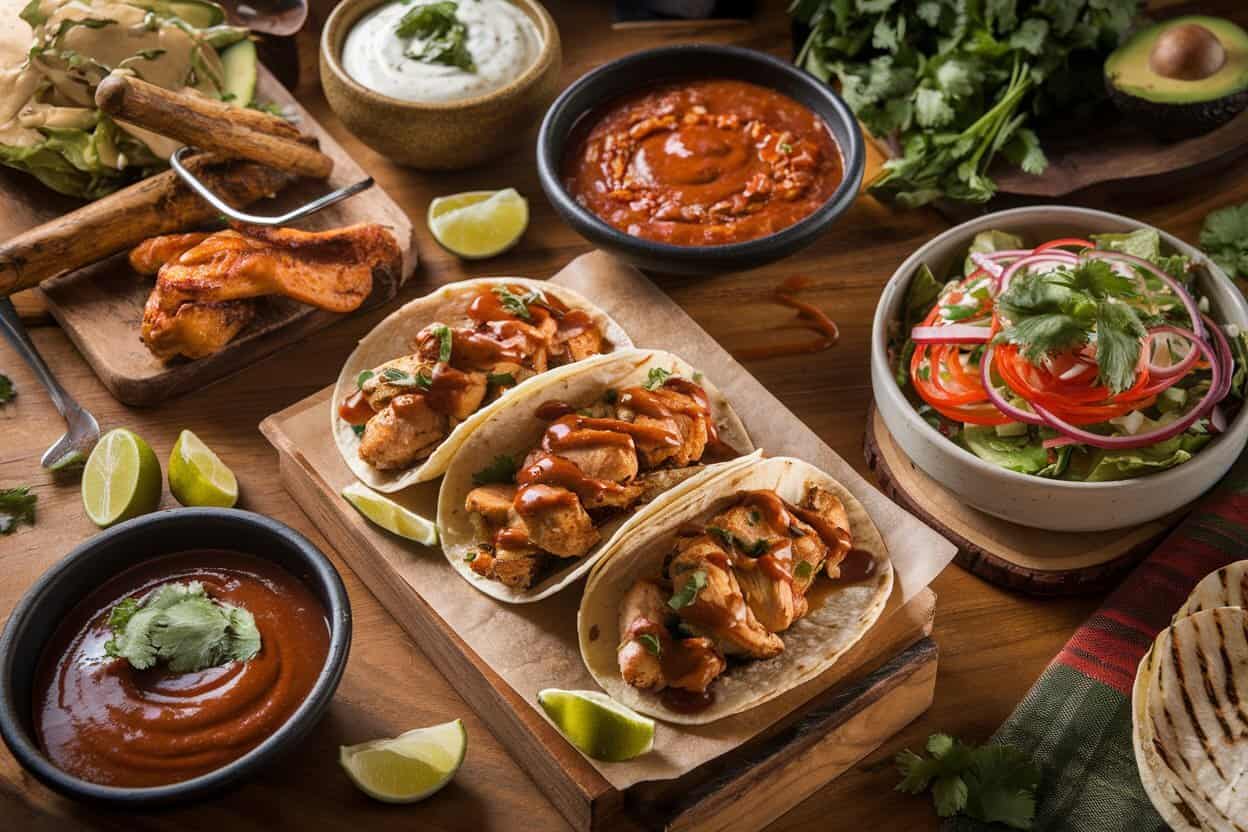
A tempting Mexican feast with chicken tacos, chipotle sauce, and fresh garnishes, showcasing the versatility of chipotle sauce in various dishes.
One of the reasons chipotle sauce has become so popular is its versatility. It can be used in various ways, making it a staple in home kitchens and professional restaurants. Here are some of the most common uses for chipotle sauce:
Tacos and Burritos
Chipotle sauce is a natural fit for Mexican dishes like tacos and burritos. Its smoky flavor complements the richness of meats like beef, pork, and chicken, while its creamy texture adds a luxurious mouthfeel. Drizzle it over your favorite taco fillings or spread it inside a burrito for an extra layer of flavor.
Sandwiches and Burgers
Are you looking to elevate your sandwich or burger game? Chipotle sauce is the answer. Spread it on a bun for a smoky, spicy kick that complements grilled meats perfectly, vegetables, or even a veggie burger. Its creamy texture also helps keep the sandwich moist, making each bite more satisfying.
Salad Dressing
Chipotle sauce can be thinned out with olive oil or vinegar to create a unique salad dressing. Its bold flavor adds a new dimension to salads, particularly those with hearty ingredients like black beans, corn, and avocado. A chipotle-infused dressing can transform a simple salad into a memorable dish.
Dipping Sauce
Whether serving fries, chicken tenders, or vegetables, chipotle sauce makes an excellent dipping sauce. Its smoky heat adds excitement to otherwise plain sides, making it a favorite at parties and casual gatherings. Mix it with other sauces, like ketchup or ranch, for a custom dip that suits your taste.
Marinade
Chipotle sauce can double as a marinade, especially for grilled meats and vegetables. The acidity from the lime juice helps tenderize the meat, while the chipotle peppers infuse it with a smoky flavor. Marinate chicken, pork, or beef in chipotle sauce before grilling for a dish that’s bursting with flavor.
Pasta Sauce
For a unique twist on pasta, try using chipotle sauce as a base. Its creamy texture makes it a great alternative to traditional tomato or Alfredo sauces, and its smoky flavor pairs well with grilled chicken, shrimp, or roasted vegetables. Finish it off with grated cheese and fresh herbs for a balanced meal.
Eggs and Breakfast Dishes
Chipotle sauce isn’t just for lunch and dinner; it can also enhance your breakfast. Drizzle it over scrambled eggs, add it to a breakfast burrito, or mix it into your avocado toast for a spicy start to your day—the smoky heat of the sauce pairs particularly well with eggs and breakfast meats like bacon or sausage.
Seafood
Chipotle sauce complements the delicate flavors of seafood, adding just the right amount of heat and smokiness. Enjoy it with grilled shrimp, fish tacos, or as a dipping sauce for crab cakes. The acidity in the sauce also helps balance the richness of the seafood, making it a well-rounded addition to your dish.
A Unique Chipotle Sauce Recipe
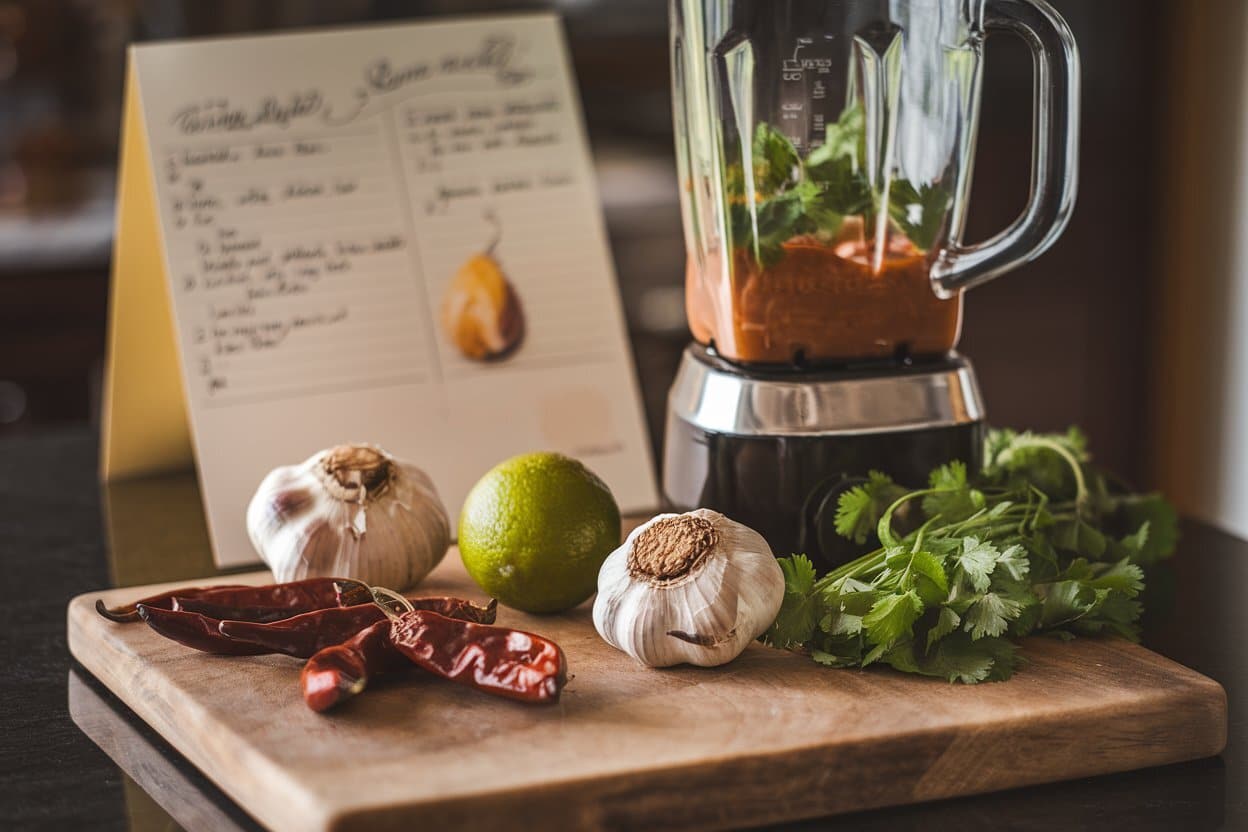
Preparing a flavorful chipotle sauce with fresh ingredients—garlic, lime, dried chilies, and cilantro—using a blender.
Now that you know the many uses of chipotle sauce, it’s time to try making your own. This recipe provides a distinct twist on traditional chipotle sauce, incorporating unexpected ingredients for added depth and flavor.
Ingredients
1 cup of mayonnaise (or Greek yogurt for a lighter alternative
2-3 chipotle peppers in adobo sauce (more for extra heat)
One tablespoon adobo sauce (from the can)
Two cloves garlic, minced
One tablespoon of lime juice
One teaspoon of honey (optional, for a touch of sweetness)
½ teaspoon smoked paprika (for extra smokiness)
Salt and pepper to taste
Instructions
Prepare the Chipotle Peppers: Start by removing the seeds from the Chipotle peppers if you prefer a milder sauce. Chop the peppers finely.
Combine the ingredients: Using a blender or food processor, combine the mayonnaise (or Greek yogurt), chipotle peppers, adobo sauce, minced garlic, lime juice, honey, and smoked paprika. Blend until smooth.
Adjust Seasoning: Sample the sauce and adjust with salt and pepper as needed. You can add a little water or more lime juice if you prefer a thinner sauce.
Refrigerate: For best results, refrigerate the sauce for at least 30 minutes before serving. This allows the flavors to meld together.
Serve: Use the chipotle sauce as a dip, spread, or topping for your favorite dishes. It can be stored in an airtight container in the refrigerator for up to a week.
Tips for Customizing Your Chipotle Sauce
Add Extra Heat: Add more chipotle peppers or a pinch of cayenne pepper if you like extra spicy sauce.
Make It Sweeter: For a sweeter sauce, increase the amount of honey or add a bit of maple syrup.
Go Dairy Free: For a dairy-free version, use vegan mayonnaise or substitute with cashew cream.
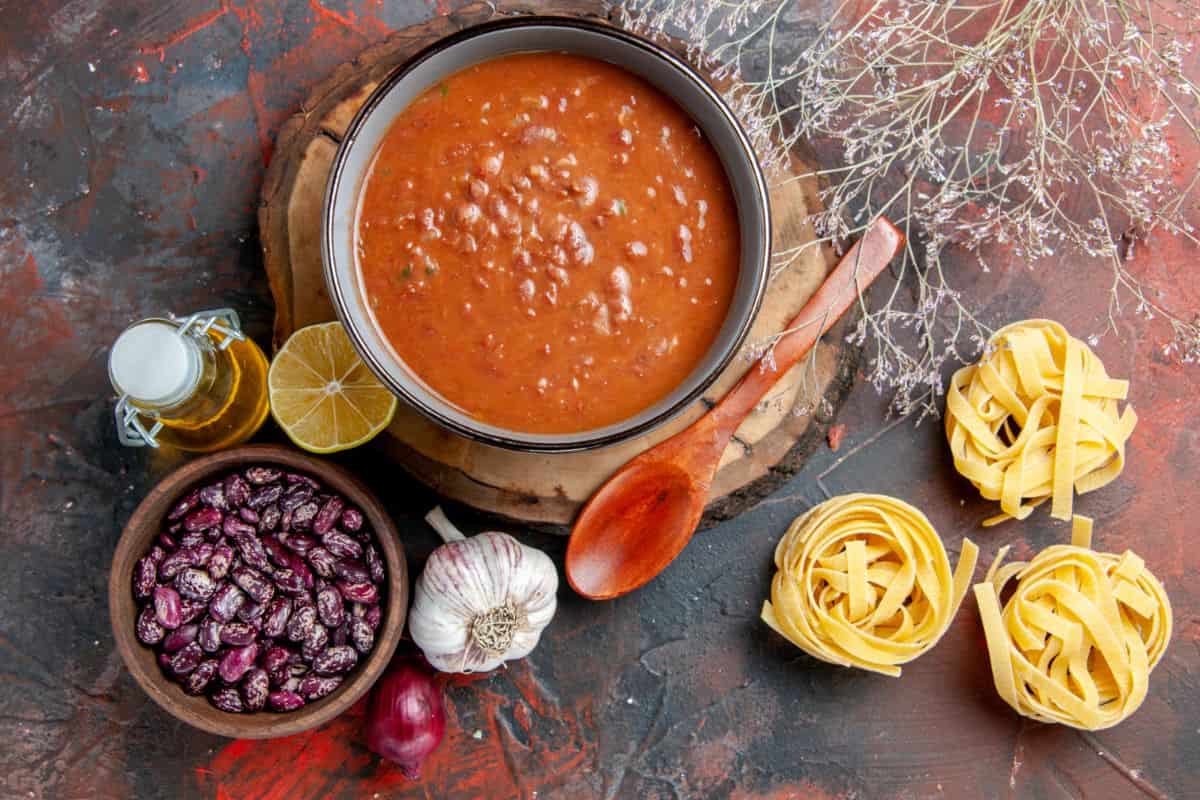
A delicious tomato bean soup served with fresh ingredients like garlic, dried beans, olive oil, and uncooked pasta—perfect for a comforting meal.
Beyond its flavor, chipotle sauce offers several health benefits thanks to its ingredients. Chipotle peppers, the highlight of the sauce, are high in vitamins A and C, both of which are potent antioxidants that support immune health and preserve skin integrity. They also contain capsaicin, the compound that gives them their heat, which has been associated with numerous health benefits, such as pain relief, enhanced metabolism, and potential cancer prevention.
The lime juice in chipotle sauce adds a dose of vitamin C and helps aid digestion, while garlic is known for its anti-inflammatory and immune-boosting properties. If you choose to use Greek yogurt as the base, you’ll also benefit from probiotics, which support gut health.
Chipotle Sauce in Global Cuisine
While chipotle sauce is rooted in Mexican cuisine, its popularity has spread across the globe. In the United States, it’s a common ingredient in Tex-Mex dishes, while in Europe, it’s often used in fusion cuisine, blending traditional European flavors with the smoky heat of chipotle. In Asia, chefs have started incorporating chipotle sauce into dishes like sushi and stir-fries, adding a smoky, spicy element that complements the bold flavors of the region’s cuisine.
This global appeal is a testament to Chipotle sauce’s versatility and the universal love for its unique flavor profile.
Conclusion
Chipotle sauce is more than just a condiment; it’s a flavor powerhouse that can transform any dish. Chipotle sauce has earned its place in kitchens worldwide, from its ancient roots in Mexican cuisine to its modern-day global appeal. Chipotle sauce offers endless possibilities, whether you’re looking to spice up your tacos, add depth to your pasta, or create a new favorite sandwich spread.
You can modify the flavor to suit your taste preferences and dietary preferences by making your own chipotle sauce at home. Plus, you’ll have a versatile sauce that can elevate any meal, from breakfast to dinner.[/vc_column_text][/vc_column][/vc_row][vc_row][vc_column width=”1/1″][us_separator size=”small”][us_text text=”Frequently Asked Question (FAQ)” link=”%7B%22url%22%3A%22%22%7D” tag=”h2″][vc_tta_accordion][vc_tta_section title=”What is chipotle sauce?” tab_link=”%7B%22url%22%3A%22%22%7D”][vc_column_text]Chipotle sauce is a creamy and flavorful condiment made from smoked and dried jalapeño peppers (chipotle), combined with ingredients like garlic, vinegar, and spices. It has a rich, smoky, and slightly spicy taste.[/vc_column_text][/vc_tta_section][vc_tta_section title=”Where does chipotle sauce originate?” tab_link=”%7B%22url%22%3A%22%22%7D”][vc_column_text]Chipotle sauce originates from Mexico, where chipotle peppers have been used in traditional cooking for centuries. The sauce itself is a modern adaptation that blends the smoky flavor of chipotle peppers with other ingredients to create a versatile condiment.[/vc_column_text][/vc_tta_section][vc_tta_section title=”How can I use chipotle sauce in cooking?” tab_link=”%7B%22url%22%3A%22%22%7D”][vc_column_text]Chipotle sauce can be used in a variety of ways, including as a marinade for meats, a topping for tacos and sandwiches, a dip for chips and vegetables, or a flavor enhancer in soups, stews, and salads.[/vc_column_text][/vc_tta_section][vc_tta_section title=”What are the health benefits of chipotle sauce?” tab_link=”%7B%22url%22%3A%22%22%7D”][vc_column_text]Chipotle sauce can offer health benefits such as providing antioxidants from the peppers, boosting metabolism due to its spicy components, and adding flavor without the need for excessive salt or sugar. However, it’s important to consume it in moderation.[/vc_column_text][/vc_tta_section][vc_tta_section title=”Can I make chipotle sauce at home?” tab_link=”%7B%22url%22%3A%22%22%7D”][vc_column_text]Yes, you can easily make chipotle sauce at home by blending ingredients like chipotle peppers in adobo sauce, garlic, lime juice, mayonnaise or yogurt, and spices. Adjust the recipe to your taste preference for spiciness and creaminess.[/vc_column_text][/vc_tta_section][vc_tta_section title=”What dishes pair well with chipotle sauce?” tab_link=”%7B%22url%22%3A%22%22%7D”][vc_column_text]Chipotle sauce pairs well with dishes like grilled meats, fish tacos, roasted vegetables, sandwiches, burgers, and even as a dressing for salads. Its smoky and spicy flavor complements a wide range of foods.[/vc_column_text][/vc_tta_section][/vc_tta_accordion][/vc_column][/vc_row]
[vc_row][vc_column][vc_column_text]Puff pastry shells are versatile and elegant components in both sweet and savoury dishes. Their flaky, airy texture and buttery flavour make them a favourite choice for a wide range of culinary creations. This guide delves into the intricacies of puff pastry shells, covering everything from their history and preparation to creative uses and recipes.
History of Puff Pastry
Puff pastry, also known as pâte feuilletée, has a rich history that dates back to the 17th century. Its origins are often attributed to the French chef Sylvain Claudius, who is said to have developed the technique while working in the kitchen of King Louis XIV. The process of making puff pastry involves creating a dough that is layered with butter and folded repeatedly to create a light, flaky texture.
Traditionally, the puff pastry was a labour-intensive process requiring meticulous folding and rolling. However, modern conveniences have made it easier to achieve the same results, with pre-made puff pastry now widely available in supermarkets.
Types OF Puff Pastry
Classic Puff Pastry
Classic puff pastry, also known as pâte feuilletée, is renowned for its intricate, layered structure. The preparation involves layering butter between sheets of dough, which are then repeatedly folded and rolled out. This process, known as lamination, creates numerous thin layers that puff up during baking. The result is a pastry with a light, airy texture and a delicate, crisp crunch. Classic puff pastry is used in a variety of dishes, from elegant pastries and tarts to savoury appetizers and pies. Its traditional preparation requires time and precision, making it a staple for professional bakers and those looking for a high-quality result.
Rough Puff Pastry
Rough puff pastry is a quicker and more straightforward version of the classic puff pastry. Instead of meticulously folding and rolling layers of butter into the dough, rough puff pastry involves a coarser method where chunks of butter are mixed into the flour. The dough is then folded and rolled out a few times, but less extensively than in classic puff pastry. The result is a pastry with a slightly less refined texture but still light and flaky. Rough puff pastry is ideal for home bakers who want the taste and texture of puff pastry without the extensive preparation time.
Quick Puff Pastry
Quick puff pastry simplifies the process even further by reducing the number of layers and folds. This type of puff pastry often combines the butter and flour more thoroughly and requires fewer turns and folds compared to classic and rough puff pastries. While it lacks some of the delicate flakiness of traditional puff pastry, quick puff pastry offers a faster preparation time. It is suitable for casual baking or when time is limited. It’s a great choice for simple recipes that still require a light, buttery pastry base.
Invert Puff Pastry
Invert puff pastry, also known as inverse puff pastry, involves a reversed method where the butter is enclosed within the dough rather than the dough being wrapped around the butter. In this technique, the dough is rolled out, and then butter is added, followed by more rolling and folding. This method creates a denser pastry with a slightly different texture compared to classic puff pastry. Invert puff pastry can be used in various baked goods, though it may achieve a different level of flakiness than the traditional method. It is often used in recipes where a slightly more substantial texture is desired.
Understanding Puff Pastry Shells
Puff pastry shells are made from the same dough used to create puff pastry, but they are shaped and baked in a specific way to form a hollow shell. These shells are perfect for filling with a variety of sweet or savoury ingredients. The process of making puff pastry shells involves several key steps.
To start, the dough is prepared by layering butter between sheets of dough and folding it multiple times. This process creates thin layers of dough separated by butter, which puffs up when baked. The next step involves shaping the shells. The dough is rolled out and cut into desired shapes, such as circles or more elaborate forms, using moulds. Some recipes suggest using a large circle of dough and cutting out smaller circles to create a layered effect.
Baking the shaped dough requires careful attention. The shells are baked at a high temperature to ensure they puff up properly. It is important to monitor the shells closely to avoid overbaking or burning. Once baked, the shells should be allowed to cool before being filled with any ingredients. This prevents the filling from melting or becoming too soggy.
Ingredients for Puff Pastry Shells
To prepare puff pastry shells, you will need the following ingredients:
Puff Pastry Dough: This can be store-bought or homemade. The dough should be kept cold to ensure a flaky texture.
Flour: For dusting the work surface to avoid sticking while rolling out the dough.
Egg Wash: Made by thrashing one egg with a tablespoon of water, used to give the shells a golden, shiny finish.
Salt and Pepper: Optional for seasoning savoury shells.
Techniques for Perfect Puff Pastry Shells
Mastering the technique of making puff pastry shells requires precision and attention to detail. Here are some essential methods to ensure your shells turn out perfectly:
Chilling the Dough: Keeping the dough cold is crucial for achieving a flaky texture. The butter should remain solid, which helps create the layers. Chill the dough in the refrigerator for at least 30 minutes before rolling it out.
Rolling the Dough: Roll out the dough on a lightly floured surface to avoid sticking. Aim for a richness of about 1/8 inch. If the dough becomes too soft or sticky, return it to the refrigerator to chill before continuing.
Cutting the Shapes: Use a sharp cutter or knife to cut the dough into the wanted shapes. For uniform shells, use a round cutter or mould. For more intricate shapes, you can use specialized moulds or freehand designs.
Egg Wash Application: Brush the tops of the dough shapes with egg wash to give them a golden, shiny finish. The egg wash also helps the dough brown evenly during baking.
Baking: Bake the shells in a preheated oven at a high temperature, typically around 375°F (190°C). This ensures that the dough puffs up properly. Avoid opening the oven door Often, as this can cause the shells to collapse.
Cooling: Allow the baked shells to cool completely on a wire rack before filling. This prevents the filling from becoming too soggy and maintains the crispness of the pastry.
Preparing Puff Pastry Shells
To begin preparing puff pastry shells, first preheat your oven to 375°F (190°C) and line a baking sheet with parchment paper to prevent sticking. On a surface dusted a little bit, roll out the puff pastry dough to about 1/8-inch thickness. If you are using store-bought dough, it may already be rolled out to the appropriate thickness.
Cut out circles of dough use round cutter or a knife. For a more intricate shape, you can use a shell mould or create free-form shapes. Place the cut-out dough circles on the ready baking sheet, comb the tops with egg wash to achieve a golden, shiny finish, and, if desired, season with salt and pepper for savoury shells.
Bake the dough in the preheated oven for 12 to 15 minutes or until the shells are puffed and golden brown. Keep an eye on them to ensure they do not burn. Once baked, allow the shells to cool on a wire rack before filling.
Creative Uses for Puff Pastry Shells
Puff pastry shells can be used in a variety of dishes, both sweet and savoury. For sweet applications, consider filling baked puff pastry shells with a mixture of pastry cream and fresh fruits like berries, kiwi, or mango. A glaze can be added for extra shine. Another idea is to pipe chocolate mousse or ganache into the shells for a rich treat, garnishing with powdered sugar or chocolate shavings. For a custard-filled option, use vanilla custard or crème pâtissière and sprinkle with nutmeg or cinnamon.
In savory applications, puff pastry shells can be filled with sautéed mushrooms, garlic, and herbs to create delightful appetizers. Another option is to use the shells as a base for mini chicken pot pies, filled with a creamy chicken & vegetable mixture and topped with cheese. Spinach and feta bites can be made by combining spinach, feta cheese, and herbs. Additionally, smoked salmon & cream cheese can be used to create an elegant hors d’oeuvre.
Nutrition Facts of Puff Pastry Shells
Puff pastry shells, while delicious, are typically high in calories, fat, and sodium. Here are the approximate nutrition facts for one puff pastry shell (based on a standard size of about 2 inches in diameter):
Calories: 150-200 kcal
Total Fat: 10-14 grams
Saturated Fat: 6-8 grams
Cholesterol: 30-50 mg
Sodium: 150-200 mg
Total Carbohydrates: 15-20 grams
Dietary Fiber: 0-1 gram
Sugars: 1-5 grams
Protein: 2-3 grams
These values can vary based on the brand & specific recipe used. Puff pastry is rich in butter, which contributes to its high fat and calorie content. For those monitoring their dietary intake, it is important to consume puff pastry shells in moderation and balance them with other nutrient-dense foods.
Serving Puff Pastry Shells
Puff pastry shells are highly versatile and can be served in numerous ways. For a sophisticated appetizer, serve savoury-filled shells with crisp white wine or champagne. They can also be plated with a light salad featuring ingredients such as mixed greens, cherry tomatoes, and a citrus vinaigrette to balance the richness of the pastry.
For a dessert presentation, puff pastry shells can be dusted with powdered sugar & served with fresh fruit or a dollop of whipped cream. To create an elegant dessert platter, pair the filled shells with small scoops of sorbet or gelato. When serving puff pastry shells as part of a larger meal or gathering, consider arranging them on a tiered serving stand or platter to showcase their delicate appearance.
Tips for Perfect Puff Pastry Shells
For the best results, keep your puff pastry dough and butter as cold as possible. This helps create the flaky texture. Handle the dough as little as possible to avoid it becoming tough. The less you handle it, the flakier the final product will be. Bake at a high temperature to make sure the pastry puffs up properly, as lower temperatures may result in dense or flat shells. If the shells become soggy after filling, consider baking them for a few extra minutes or using a thicker filling that won’t cause excess moisture.
Troubleshooting Common Issues
If your shells are not puffing up, it might be due to a low oven temperature or overworked dough. Ensure your oven is appropriately preheated and avoid overworking the dough. In case the shells become soggy after filling, bake them for a few more minutes or use a thicker filling. To prevent burnt tops, keep an eye on the shells during baking and cover them with aluminium foil if they brown too quickly.
Storing Puff Pastry Shells
Puff pastry shells are best enjoyed fresh, but they can be stored for later use. Store cooled puff pastry shells in an airtight container at room temperature for up to two days. For longer storage, you can freeze the shells. To freeze, place the cooled shells in a one layer in a freezer-safe bag or container. They can be frozen for up to one month. To reheat, place the shells in a preheated oven at 350°F (175°C) for about 5 to 10 minutes until warmed through and crispy.
Conclusion
Puff pastry shells are versatile and elegant additions to sweet and savoury dishes. With their flaky texture and buttery flavour, they serve as an outstanding foundation for a variety of fillings. By following the tips and techniques described in this guide, you can master the art of making puff pastry shells and elevate your culinary creations. Whether you’re preparing a sophisticated dessert or a savoury appetizer, puff pastry shells are sure to impress and delight.[/vc_column_text][/vc_column][/vc_row][vc_row][vc_column width=”1/1″][us_separator][vc_column_text]
Frequently Asked Questions (FAQ)
[/vc_column_text][us_separator][vc_tta_accordion title_size=”1.2rem” title_tag=”h3″][vc_tta_section title=”Do you thaw puff pastry shells before baking?” tab_link=”%7B%22url%22%3A%22%22%7D”][vc_column_text]
Yes, you should thaw puff pastry shells before baking to ensure they bake evenly and puff up properly.
[/vc_column_text][/vc_tta_section][vc_tta_section title=”Can I roll out puff pastry shells?” tab_link=”%7B%22url%22%3A%22%22%7D”][vc_column_text]
No, rolling out puff pastry shells is not recommended. They are meant to be used as-is or shaped into desired forms without rolling, to maintain their delicate, flaky texture.
[/vc_column_text][/vc_tta_section][vc_tta_section title=”How big are puff pastry shells?” tab_link=”%7B%22url%22%3A%22%22%7D”][vc_column_text]
Puff pastry shells typically range from 2 to 4 inches in diameter, but they can be made larger or smaller depending on the recipe and intended use.
[/vc_column_text][/vc_tta_section][vc_tta_section title=”What is the secret to baking puff pastry?” tab_link=”%7B%22url%22%3A%22%22%7D”][vc_column_text]
The secret to baking puff pastry is to keep the dough cold and avoid overworking it. This ensures that the layers of butter remain intact, creating a flaky, airy texture during baking.
[vc_row][vc_column][vc_column_text]In today’s fast-paced world, keeping up with a healthy diet can be difficult. Whether you’re recovering from an illness, aiming to lose weight, or simply looking to give your digestive system a break, a liquid diet can be a fantastic solution. This type of diet typically consists of easily digestible foods that are in liquid form. The best part is you can prepare these delicious and nutritious liquid diet recipes right at home.
In this article, we’ll dive into ten of the best liquid diet recipes that you can easily whip up in your kitchen. These recipes are not only packed with essential nutrients but also flavorful and satisfying, making them perfect for anyone in the United States seeking to maintain a healthy lifestyle without sacrificing taste.
Why Choose a Liquid Diet?
A liquid diet can be beneficial for various reasons. It is often recommended for people who have difficulty chewing or swallowing, are recovering from surgery, or need to rest their digestive system. Additionally, liquid diets are commonly used for weight loss, detoxification, and maintaining hydration.
Liquid diet recipes are flexible and can be customized to suit individual nutritional requirements. Whether you need a high-protein option for muscle recovery or a low-calorie choice for weight loss, the following recipes can be customized to suit your goals.
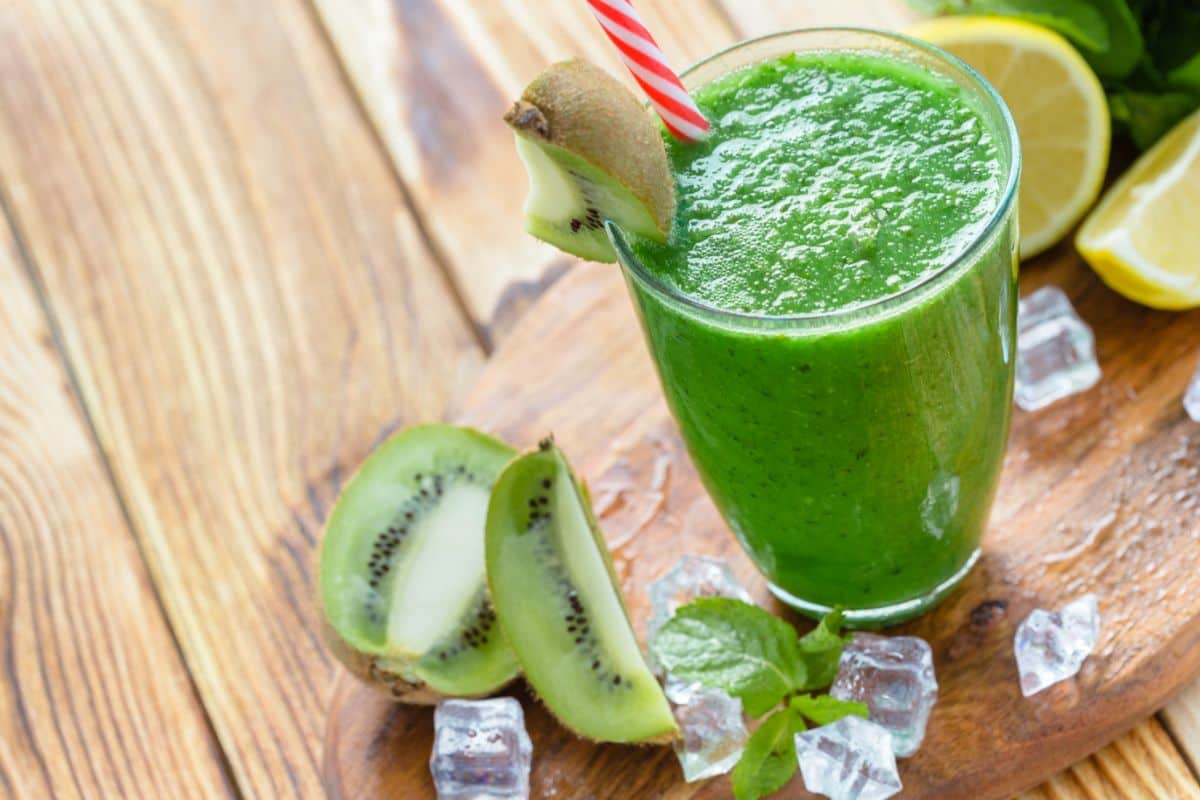
A perfect blend of nutrient-rich greens like spinach and kale, this classic green smoothie is not only delicious but also an excellent way to kick-start your day with essential vitamins and minerals. It’s easy to make and packed with energy-boosting ingredients.
Ingredients
1 cup spinach
1/2 cup kale
1 banana
1/2 cup Greek yogurt
1/2 cup water
1 tablespoon honey (optional)
Instructions
In a blender, combine spinach, kale, banana, and Greek yogurt.
Add water and blend until smooth.
Sweeten with honey if desired and enjoy!
Nutritional Benefits
This green smoothie is rich in vitamins A, C, and K, as well as iron and fiber. The combination of leafy greens with the creaminess of Greek yogurt provides a balanced and filling liquid diet recipe perfect for breakfast or a midday snack.
This simple yet flavorful vegetable broth is a comforting and nourishing liquid diet option. Made with fresh vegetables and aromatic herbs, it’s perfect for those times when you need something light yet satisfying.
Ingredients
2 carrots, chopped
2 celery stalks, chopped
1 onion, chopped
2 garlic cloves, minced
1 bay leaf
1 teaspoon peppercorns
8 cups water
Instructions
Combine all ingredients in a large pot.
Bring to a boil, then reduce to a simmer for 45 minutes.
Strain the broth and discard the solids.
Enjoy warm as a nourishing and light meal.
Nutritional Benefits
This vegetable broth is low in calories but packed with essential minerals like potassium, magnesium, and calcium. It’s an excellent choice for staying hydrated and keeping your sodium levels in check, especially when following a liquid diet.
Indulge in the rich taste of chocolate while getting a boost of protein with this smoothie. It’s ideal for post-workout recovery or whenever you need a filling and nutritious treat that doesn’t compromise on taste.
Ingredients
1 scoop chocolate protein powder
1 cup almond milk
1 tablespoon peanut butter
1 banana
1/2 cup ice
Instructions
Add all ingredients to a blender.
Blend until smooth and creamy.
Serve immediately.
Nutritional Benefits
This smoothie is perfect for those needing a protein boost. With the combination of protein powder, peanut butter, and banana, this liquid diet recipe provides sustained energy and aids in muscle recovery, making it ideal for post-workout consumption.
This classic tomato basil soup is a comforting favorite, combining the tangy sweetness of ripe tomatoes with the fresh aroma of basil. It’s a heartwarming option that’s perfect for lunch or dinner, offering a healthy dose of antioxidants.
Ingredients
6 large tomatoes, chopped
1 onion, chopped
2 garlic cloves, minced
2 cups vegetable broth
1/4 cup fresh basil leaves
1 tablespoon olive oil
Instructions
In a large pot, sauté onion and garlic in olive oil until soft.
Add tomatoes and vegetable broth, and bring to a simmer.
Cook for 20 minutes, then blend with basil leaves until smooth.
Serve hot.
Nutritional Benefits
Tomato basil soup is rich in antioxidants, particularly lycopene, which is known for its cancer-fighting properties. This liquid diet recipe is also low in calories and high in vitamins A and C, making it a healthy option for lunch or dinner.
Bursting with the vibrant flavors of mixed berries, this smoothie is not only refreshing but also loaded with antioxidants and fiber. It’s a sweet and satisfying way to enjoy a nutritious meal on the go.
Ingredients
1/2 cup strawberries
1/2 cup blueberries
1/2 cup raspberries
1 cup plain yogurt
1/2 cup orange juice
Instructions
Combine all ingredients in a blender.
Blend until smooth and thick.
Pour into a glass and enjoy immediately.
Nutritional Benefits
Berries are loaded with antioxidants and fiber, making this smoothie a nutritious choice. The yogurt adds a good dose of probiotics, which support digestive health, while the orange juice provides a boost of vitamin C.
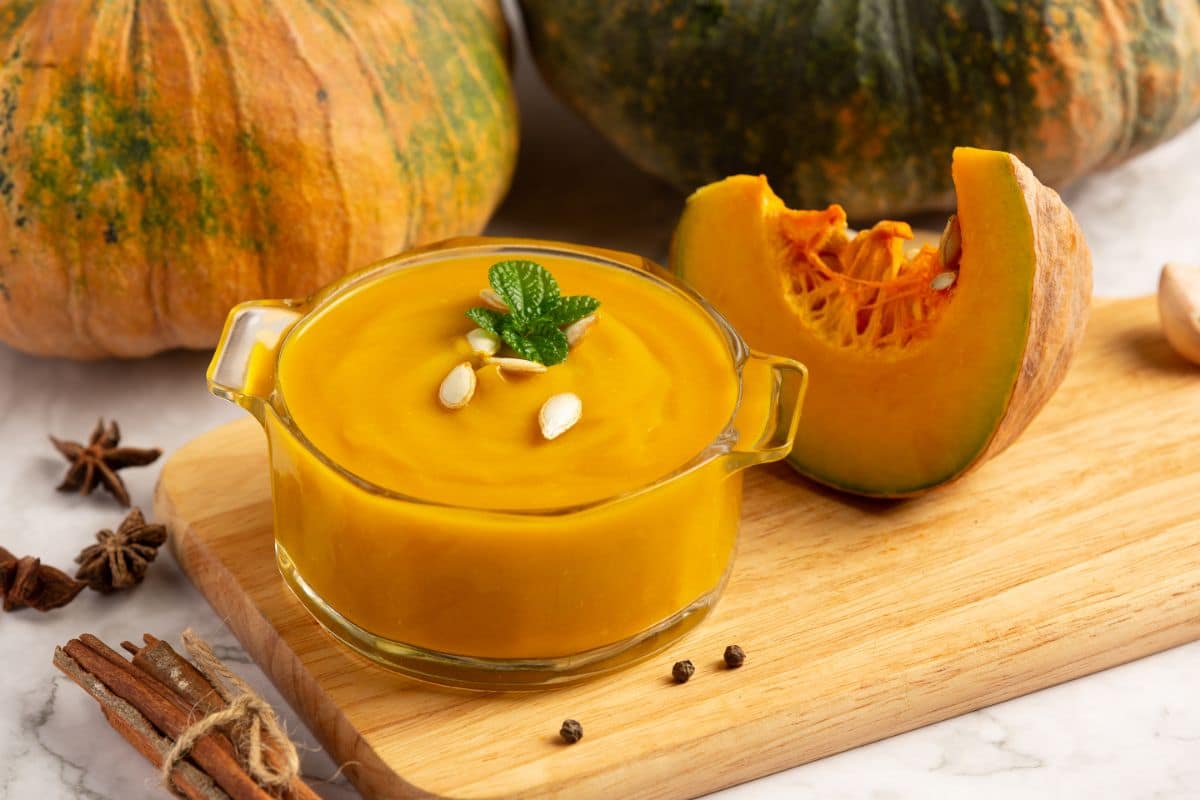
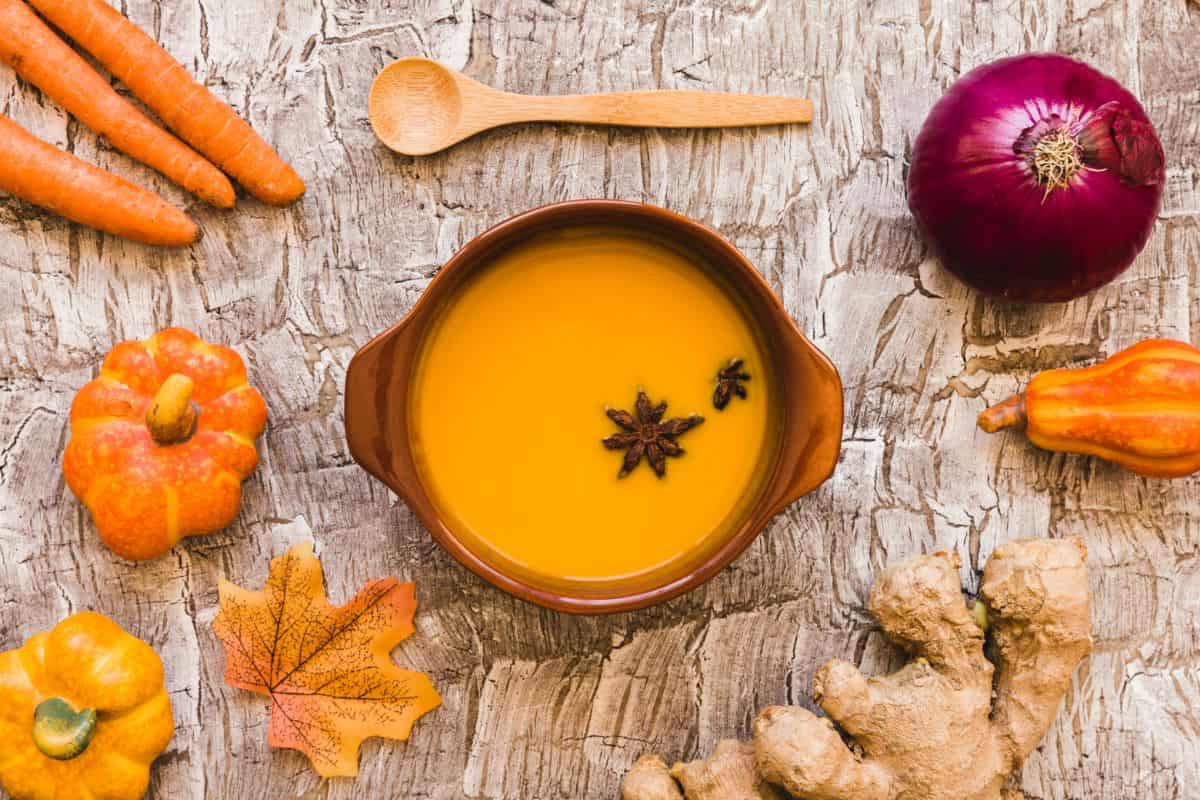
Rich and velvety, this creamy pumpkin soup is a fall favorite that’s both comforting and nutritious. Made with pumpkin puree and a hint of coconut milk, it’s a delightful way to warm up on cooler days.
Ingredients
2 cups pumpkin puree
1 onion, chopped
2 garlic cloves, minced
2 cups chicken or vegetable broth
1/2 cup coconut milk
1 teaspoon cinnamon
Instructions
Sauté onion and garlic in a pot until fragrant.
Add pumpkin puree and broth, and bring to a simmer.
Stir in coconut milk and cinnamon.
Blend until smooth and serve warm.
Nutritional Benefits
This pumpkin soup is creamy without being heavy, thanks to the coconut milk. It’s rich in vitamin A, which supports eye health, and the cinnamon adds a warming touch that’s perfect for fall or winter meals.
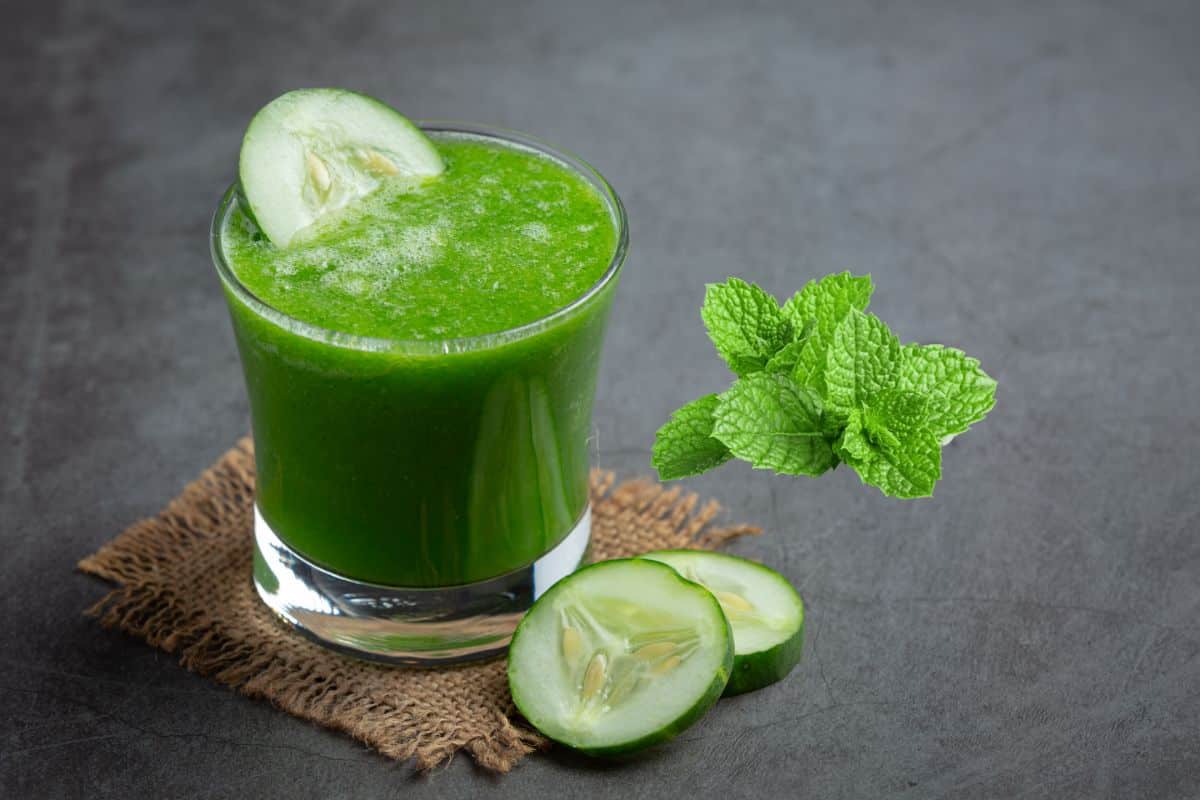
This cool and refreshing cucumber mint smoothie is perfect for hydration and detoxification. With its light and crisp flavors, it’s a great way to stay refreshed and energized throughout the day.
Ingredients
1 cucumber, peeled and chopped
1/2 cup mint leaves
1/2 cup Greek yogurt
1 tablespoon lemon juice
1/2 cup water
Instructions
Blend cucumber, mint leaves, Greek yogurt, lemon juice, and water until smooth.
Serve chilled.
Nutritional Benefits
This refreshing smoothie is hydrating and low in calories, making it an excellent choice for weight loss or detoxification. The cucumber is high in water content, while mint aids digestion and adds a burst of flavor.
Packed with the natural sweetness of carrots and the warming spice of ginger, this soup is a soothing and nourishing option. It’s great for boosting immunity and supporting digestive health, making it an ideal choice during cold and flu season.
Ingredients
4 large carrots, chopped
1 onion, chopped
2 garlic cloves, minced
1 tablespoon grated ginger
4 cups vegetable broth
1 tablespoon olive oil
Instructions
Sauté onion, garlic, and ginger in olive oil until fragrant.
Add carrots and vegetable broth, then bring the mixture to a boil.
Reduce the heat and let it simmer until the carrots are tender.
Blend until smooth and serve hot.
Nutritional Benefits
Carrot ginger soup is rich in beta-carotene, which supports immune function and skin health. The ginger adds anti-inflammatory benefits, making this a comforting liquid diet recipe for cold and flu season.
Creamy avocado and nutrient-dense spinach come together in this smoothie to create a satisfying and healthy liquid meal. It’s rich in healthy fats, vitamins, and minerals, providing a powerful nutritional punch.
Ingredients
1/2 avocado
1 cup spinach
1/2 banana
1 cup almond milk
1 tablespoon chia seeds
Instructions
Blend all ingredients until smooth.
Pour into a glass and enjoy immediately.
Nutritional Benefits
This smoothie is packed with healthy fats from avocado and chia seeds, which promote heart health and keep you feeling full longer. Spinach adds a boost of iron and fiber, making this a nutrient-dense option for any time of day.
Miso soup is a traditional Japanese dish known for its umami flavor and probiotic benefits. Made with miso paste, tofu, and green onions, it’s a light and nourishing soup that’s perfect for supporting gut health.
Ingredients
4 cups water
1/4 cup miso paste
1 cup tofu, cubed
1/2 cup green onions, chopped
1/4 cup seaweed (optional)
Instructions
Bring water to a boil, then reduce heat.
Stir in miso paste until dissolved.
Add tofu and green onions, and cook for a few minutes.
Serve warm with optional seaweed.
Nutritional Benefits
Miso soup is rich in probiotics, which support gut health. It’s also a good source of protein from the tofu and contains important vitamins and minerals from the miso paste, making it a nourishing and light liquid diet recipe.
Conclusion
Incorporating these liquid diet recipes into your daily routine can provide numerous health benefits, from improved digestion to weight management. Whether you’re looking for a quick and easy meal replacement or a nutritious snack, these recipes are not only delicious but also simple to prepare at home. By using fresh, wholesome ingredients, you can ensure that your liquid diet is as tasty as it is healthy.
So, the next time you’re considering a liquid diet, try out these recipes to enjoy the perfect balance of flavor and nutrition right from your kitchen. Whether you’re blending up a smoothie or simmering a soup, these liquid diet recipes will keep you satisfied and energized throughout the day.[/vc_column_text][/vc_column][/vc_row][vc_row][vc_column width=”1/1″][us_separator size=”small”][us_text text=”Frequently Asked Questions ( FAQs )” link=”%7B%22url%22%3A%22%22%7D” tag=”h2″][/vc_column][/vc_row][vc_row][vc_column width=”1/1″][vc_tta_accordion][vc_tta_section title=”What are the key benefits of a liquid diet?” tab_link=”%7B%22url%22%3A%22%22%7D”][vc_column_text]A liquid diet can aid in weight loss, detoxification, and improve digestive health. It’s also useful for people recovering from surgery or dealing with certain medical conditions. The diet is rich in nutrients and hydration, supporting overall well-being.[/vc_column_text][/vc_tta_section][vc_tta_section title=”Can I include smoothies in a liquid diet?” tab_link=”%7B%22url%22%3A%22%22%7D”][vc_column_text]Yes, smoothies are a great option for a liquid diet. They can be made with fruits, vegetables, yogurt, and protein powders, offering a balanced mix of nutrients while being easy to digest.[/vc_column_text][/vc_tta_section][vc_tta_section title=”How can I ensure I’m getting enough protein on a liquid diet?” tab_link=”%7B%22url%22%3A%22%22%7D”][vc_column_text]To maintain adequate protein intake, incorporate protein-rich liquids like bone broth, protein shakes, Greek yogurt-based smoothies, or add protein powders to your soups and beverages.[/vc_column_text][/vc_tta_section][vc_tta_section title=”Are there any risks associated with a liquid diet?” tab_link=”%7B%22url%22%3A%22%22%7D”][vc_column_text]While beneficial for short-term use, prolonged liquid diets may lead to nutrient deficiencies or muscle loss if not properly balanced. It’s important to consult a healthcare provider before starting a liquid diet, especially if you have underlying health conditions.[/vc_column_text][/vc_tta_section][vc_tta_section title=”What are some easy liquid diet recipes I can prepare at home?” tab_link=”%7B%22url%22%3A%22%22%7D”][vc_column_text]Some easy and nutritious liquid diet recipes include blended vegetable soups, fruit and vegetable smoothies, bone broth, and homemade juices. These can be customized with your favorite ingredients to suit your taste and nutritional needs.[/vc_column_text][/vc_tta_section][vc_tta_section title=”Section”][/vc_tta_section][/vc_tta_accordion][/vc_column][/vc_row]
[vc_row][vc_column][vc_column_text]When it comes to heartwarming comfort food, meatloaf reigns supreme. This classic dish, with its savory blend of ground meats, seasonings, and a deliciously tangy glaze, has been a family favorite for generations. Imagine the rich aroma of a perfectly baked meatloaf wafting through your kitchen, promising a satisfying, hearty, and flavorful meal. Whether gathering the family for a cozy dinner, hosting a informal get-together, or simply craving a comforting classic, this ultimate meatloaf recipe is designed to impress. Dive into this guide to discover how to make meatloaf that meets and exceeds your expectations, with tips & tricks that will elevate your dish to new levels of deliciousness.
Set the oven first to 375°F (190°C). This step is crucial as it ensures the oven reaches the proper temperature for even cooking. Preheating the oven allows your meatloaf to bake uniformly, ensuring a well-cooked and perfectly textured loaf.
Prepare the Meat Mixture
Combine Meats: Combine 1 lb (450g) ground beef with 1/2 lb (225g) ground pork in a large mixing bowl. These two types of meat create a rich and flavorful base for the meatloaf.
Add Ingredients: Add 1 cup (100g) of bread crumbs to the bowl, 1/2 cup (120 ml) of milk, and 1 egg. Mix until the bread crumbs are soaked and the egg is fully incorporated.
Incorporate Vegetables: Stir in 1 small finely chopped onion, 2 chopped garlic cloves, & 1/2 cup (80g) of grated carrot. These ingredients add depth and a slight sweetness to the meatloaf.
Season: Season the mixture with 1 tablespoon of Worcestershire sauce, 1 teaspoon of dried oregano, 1 teaspoon of dried thyme, and salt and pepper to taste. Mix gently to combine, exercising caution not to overwork the blend, as this can result in a dense loaf.
Shape the Meatloaf
Transfer the meat mixture onto a savoury plate lined with parchment paper or into a loaf pan. If using a loaf pan, lightly grease it to prevent sticking. Form the meat blend into a loaf shape. Smooth the top and sides to ensure even cooking. A well-shaped loaf helps the meatloaf cook uniformly and makes it easier to slice after baking.
Prepare the Best Glaze
Within a little bowl, mix 1/4 cup (60ml) of ketchup, 2 tablespoons of brown sugar, 1 tablespoon of Mustard Dijon, and 1 tablespoon of apple cider vinegar. Whisk the ingredients together until smooth and the sugar is fully dissolved. This glaze adds a sweet & tangy flavor that caramelizes during baking.
Apply the Glaze
Evenly spread the prepared glaze over the top of the meatloaf. Make sure the entire surface is covered to create a delicious, flavorful crust. The glaze will caramelize as the meatloaf bakes, adding both taste and visual appeal.
Bake the Meatloaf
Place the meatloaf in the heated up oven and bake for approximately 60 to 75 minutes. The precise cooking time may vary based on your oven and the size of your meatloaf. Use a meat thermometer to confirm for doneness; the inside temperature should reach 160°F (70°C). The meatloaf should be browned on the outside and cooked through on the inside.
Rest the Meatloaf
Once the meatloaf is fully cooked, pleaseremove it from the oven & rest for 10 minutes. This resting period is important as it lets the juices redistribute throughout the meatloaf. Resting also helps the meatloaf retain its moisture and makes slicing easier.
Serve
After resting, slice the meatloaf into servings and serve it hot. Meatloaf pairs beautifully with various sides, like mashed potatoes, roasted vegetables, or a crisp salad. This versatility makes it an excellent choice for any meal, whether a informal weeknight dinner or a hearty family gathering.
How Long to Cook Meatloaf
The cooking time for meatloaf can vary based on several factors, including the size and shape of the meatloaf and your oven’s accuracy. Here’s a general guideline:
Standard Meatloaf (1.5 lbs to 2 lbs): Bake at 375°F (190°C) for 60 to 75 minutes. The meatloaf is done when the inside temperature reaches 160°F (70°C) and is no longer pink in the center.
Mini Meatloaf (Individual Servings): Bake at 375°F (190°C) for 30 to 40 minutes. Mini loaves will cook faster, so check for doneness earlier.
Meatloaf in a Loaf Pan: Due to its denser shape, meatloaf in a loaf pan may take a bit longer to cook. Expect a cooking time of 70 to 80 minutes.
For best results, use a meat thermometer to check the inside temperature. This ensures the meatloaf is cooked and safe to eat without overdone.
Choosing the right meat is crucial for making the perfect meatloaf. Here’s a detailed look at the best options:
Ground Beef: For a juicy meatloaf, opt for ground beef with a 15-20% fat content. This provides the right balance of flavor and moisture. A mixture of chuck and sirloin is also a great choice. Ground beef is the traditional option, offering a rich, beefy flavor that pairs well with various seasonings and sauces.
Ground Pork: Ground pork adds moisture and tenderness due to its higher fat content, usually around 20%. It complements ground beef well and adds depth to the flavor profile. Pork has a slightly sweet & savory taste that enhances the overall taste of the meatloaf.
Ground Turkey or Chicken: These leaner options are lower in fat but can sometimes produce drier meatloaf. If using poultry, consider adding extra moisture with vegetables or oil. Ground turkey or chicken has a milder flavor, so it may require additional seasoning to achieve the same depth of flavor as beef or pork.
Ground Veal: Ground veal is another tender and flavor option, though it is often more expensive. It is typically mixed with beef or pork to add richness. Veal provides a delicate, subtle flavor that complements other meats well.
Custom Blends: A blend of ground beef and pork is often considered the best choice for meatloaf. The meat provides flavor, while the pork adds fat and moisture, creating a balanced and flavorful meatloaf.
Meatloaf Sauce
The meatloaf sauce is a crucial component that elevates the dish from ordinary to extraordinary. This simple yet versatile sauce combines ketchup, brown sugar, Dijon mustard, apple cider vinegar and provides a perfect balance of sweet & tangy flavors.
As it bakes, the sauce caramelizes into a glossy, flavorful coating, adding a delightful texture and enhancing the overall taste of the meatloaf. Whether you spice it up with a dash of hot sauce or experiment with different sweeteners like honey or maple syrup, the meatloaf sauce confirm that every bite is bursting with delicious, savory goodness.
Tips For Best Meatloaf Recipe
Use a mix of ground meats for a balanced flavor and texture.
Keep the meatloaf mixture the same; this can make the loaf dense.
Incorporate vegetables for added flavor and moisture.
Rest the meatloaf after baking to allow the juices to redistribute.
Nutrition Information (Based on 8 Servings)
Nutrient
Amount (Per Serving)
Calories
350 kcal
Protein
22g
Fat
25g
Saturated Fat
10g
Carbohydrates
20g
Fiber
1g
Sugars
9g
Cholesterol
85mg
Sodium
750mg
What to Serve with Meatloaf
To create a well-rounded meal with meatloaf, consider pairing it with these classic and complementary side dishes:
Mashed Potatoes: buttery and creamy mashed potatoes are a timeless accompaniment that pairs beautifully with meatloaf. The smooth texture of the potatoes is perfect for soaking up any extra meatloaf glaze, adding richness and enhancing the overall flavor of your meal.
Green Beans Almondine: Fresh green beans sautéed with almonds and butter offer a crunchy texture and a touch of elegance to your plate. The light, nutty flavor of the almonds complements the savory meatloaf, adding a delightful contrast.
Roasted Carrots: Roasting carrots caramelizes their natural sugars, resulting in a sweet and savory side that contrasts nicely with the hearty meatloaf. The slightly crispy exterior and tender interior of roasted carrots make them an ideal partner for this dish.
Creamed Spinach: This meatloaf is enhanced by the velvety texture and flavorful burst of this rich and creamy side dish. The creaminess of the spinach provides a luxurious mouthfeel that balances the savory elements of the meatloaf.
Steamed Broccoli: Light and nutritious, steamed broccoli offers a healthy& colorful addition to your meal. Its crisp texture & mild flavor provide a refreshing balance to the richness of the meatloaf.
Dinner Rolls: Soft, fluffy dinner rolls are perfect for mopping up the delicious meatloaf glaze. Their warm, buttery texture complements the meatloaf, making each bite even more satisfying.
Coleslaw: A crisp and tangy coleslaw adds a refreshing crunch that contrasts nicely with the meatloaf’s texture. The tangy dressing and crunchy vegetables provide a vibrant and crisp element to the meal.
How to Store and Freeze Meatloaf
Storing Leftovers
Refrigeration: After serving, let the meatloaf cool to room temperature. Transfer it to an airtight packing box and store it in the refrigerator for up to 4 days. Reheat individual slices in the microwave or oven before serving to restore their original flavor and texture.
Freezing Meatloaf
Freezing Whole: Wrap the cooled meatloaf tightly in wrap with plastic and aluminum foil to prevent freezer burn. Place the wrapped meatloaf in a freezer-safe bag or container. It can be frozen for up to 3 months. This method is ideal for preserving the meatloaf’s quality and ease of storage.
Freezing Slices: For more convenient portions, slice the meatloaf before freezing. Wrap each slice separately in plastic wrap & aluminum foil, then put them in a bag that is secure to freeze. This allows you to defrost only the amount you need and is perfect for quick meals.
Reheating Frozen Meatloaf
Thawing: To ensure even reheating, thaw the meatloaf in the refrigerator overnight. This gradual thawing helps maintain the texture and flavor of the meatloaf.
Reheating: Preheat your oven to 350°F (175°C) and reheat the meatloaf until warm. For slices, you can use the microwave, placing them on a microwave-safe plate & heating them until hot. Reheating in the oven is preferable for retaining the meatloaf’s original texture and flavor.
Conclusion
This ultimate meatloaf recipe, featuring the best glaze, is perfect for any meal. Its tender meat, flavorful seasonings, and sweet and tangy topping make it a standout dish that’s sure to please. Whether enjoying it with classic sides or experimenting with new flavors, this meatloaf is a timeless favorite that will become a staple in your recipe collection. Enjoy every savory bite of this comforting meal.[/vc_column_text][/vc_column][/vc_row][vc_row][vc_column width=”1/1″][us_separator][vc_column_text]
Frequently Asked Questions (FAQ)
[/vc_column_text][us_separator][vc_tta_accordion title_size=”max( 1rem, 1.5vw )” title_tag=”h3″][vc_tta_section title=”What does meatloaf taste like? ” tab_link=”%7B%22url%22%3A%22%22%7D”][vc_column_text] Meatloaf offers a savory and comforting flavor with a rich blend of ground meats, herbs, and spices. Its taste is often enhanced by a sweet and tangy glaze, creating a delicious balance of savory and slightly sweet notes. The texture is typically moist and tender, with a hearty and satisfying mouthfeel. Overall, it’s a flavorful, classic dish that combines simple ingredients into a satisfying meal.[/vc_column_text][/vc_tta_section][vc_tta_section title=”What is a meatloaf made of? ” tab_link=”%7B%22url%22%3A%22%22%7D”][vc_column_text]Meatloaf is primarily made of ground meats such as beef, pork, or turkey, mixed with ingredients like breadcrumbs, eggs, and seasonings. It often includes vegetables like onions and garlic for added flavor. The mixture is shaped into a loaf and baked, often topped with a glaze or sauce.[/vc_column_text][/vc_tta_section][vc_tta_section title=”Can I use only ground beef for meatloaf?” tab_link=”%7B%22url%22%3A%22%22%7D”][vc_column_text]Yes, you can use only ground beef for meatloaf. However, combining ground beef with ground pork adds extra flavor and moisture. If you prefer, you can also use ground turkey or chicken for a leaner option.[/vc_column_text][/vc_tta_section][vc_tta_section title=”How can I make my meatloaf more flavorful?” tab_link=”%7B%22url%22%3A%22%22%7D”][vc_column_text]Enhance your meatloaf’s flavor by adding finely chopped vegetables like bell peppers, celery, or mushrooms. Incorporating herbs such as parsley or basil, and adding a splash of hot sauce or Worcestershire sauce can also elevate the taste.[/vc_column_text][/vc_tta_section][vc_tta_section title=”Can I prepare meatloaf ahead of time?” tab_link=”%7B%22url%22%3A%22%22%7D”][vc_column_text]Yes, you can prepare meatloaf ahead of time. Assemble the meat mixture and shape it into a loaf, then cover and refrigerate for up to 24 hours before baking. You can also freeze it for longer storage. Just make sure to thaw it in the refrigerator before baking.[/vc_column_text][/vc_tta_section][vc_tta_section title=”How do I know when meatloaf is fully cooked?” tab_link=”%7B%22url%22%3A%22%22%7D”][vc_column_text]Use a meat thermometer to check the internal temperature of the meatloaf. It should reach 160°F (70°C) to ensure it is fully cooked. The meatloaf should be browned on the outside and no longer pink in the center.[/vc_column_text][/vc_tta_section][vc_tta_section title=”Can I use a different type of glaze for meatloaf?” tab_link=”%7B%22url%22%3A%22%22%7D”][vc_column_text]Absolutely! Feel free to experiment with different glazes. You can use barbecue sauce, a combination of honey and mustard, or even a tangy tomato-based sauce. Just ensure it complements the flavors of the meatloaf.[/vc_column_text][/vc_tta_section][/vc_tta_accordion][/vc_column][/vc_row]
[vc_row][vc_column][vc_column_text]Bagels with cream cheese represent a quintessential breakfast and snack choice cherished for their simplicity and satisfying flavor. This classic combination is easy to prepare & versatile, making it suitable for a wide range of tastes and dietary preferences. Whether enjoying a bagel with cream cheese as a quick morning bite or a leisurely brunch, understanding how to choose the right ingredients and prepare them creatively can elevate your experience. In this comprehensive guide, we’ll explore everything you need to know about bagels with cream cheese, including ingredient choices, preparation tips, nutritional information, and inventive ways to enjoy this delightful treat.
Ingredient of Bagel with Cream Cheese
Choosing the Right Bagel
The quality of your bagel is crucial to achieving the best flavor and texture in your bagel with cream cheese. Here’s a closer look at different types of bagels you might consider:
Bakery Fresh Bagels: Bakery-fresh bagels are typically the best choice for a superior bagel with cream cheese. These bagels are freshly baked and often have a soft, chewy interior with a slightly crispy crust. They are usually made with high-quality ingredients and offer a richer flavor than pre-packaged options. You can find them at local bakeries, gourmet food shops, or specialty stores.
Supermarket Bagels: Supermarket bagels are a convenient alternative to bakery-fresh options. These bagels are readily available in most grocery stores and can be found in the bread aisle. While they may not be as fresh or flavorful as bakery bagels, they are generally a good option for everyday use and come in various flavors.
Frozen Bagels: Frozen bagels are a practical choice when fresh or supermarket bagels are unavailable. They are often pre-sliced and can be stored for extended periods. Although they might not have the same texture as freshly baked bagels, toasting them can help restore some of their original quality.
Bagel Flavors and Styles
Bagels come in various flavors and styles, each offering a unique taste experience. Here are some popular options:
Plain Bagels: Plain bagels are versatile and can pair well with any cream cheese. Their neutral flavor allows the cream cheese to be the show’s star. Plain bagels are perfect for those who prefer a classic strategy or want to experiment with different cream cheese flavors.
Flavored Bagels: Flavored bagels, such as blueberry, cinnamon raisin, and poppyseed, add an extra dimension of taste. When paired with complementary cream cheese flavors, these bagels can enhance the overall experience. For example, a blueberry bagel pairs well with plain cream cheese, while a cinnamon raisin bagel might be delicious with honey or spiced cream cheese.
Whole Wheat and Multigrain Bagels: Whole wheat and multigrain bagels offer more fiber and nutrients than traditional bagels. These options are ideal for those seeking a healthier choice while enjoying the classic bagel and cream cheese combination. They work well with various cream cheese flavors, from savory to sweet.
Choosing the Right Cream Cheese
The cream cheese you choose can significantly impact the taste and texture of your bagel. Here’s an overview of different types of cream cheese:
Plain Cream Cheese: Plain cream cheese is the traditional choice for bagels. It is smooth, creamy, and versatile, providing a classic flavor that pairs well with any bagel. Plain cream cheese can be enjoyed independently or used as a base for adding other ingredients.
Flavored Cream Cheese: Flavored cream cheese adds a taste to your bagel. Varieties such as chive and onion, garden vegetables, and smoked salmon offer different flavor profiles that can enhance your bagel experience. Flavored cream cheese can complement plain bagels or add flavor to specialty bagels.
Low-Fat and Alternative Cream Cheeses: For those looking to reduce calorie intake, low-fat cream cheese is a suitable option. It provides a similar creamy texture with fewer calories and fat. Non-dairy cream cheeses are available for those with dietary restrictions or lactose intolerance, offering a comparable taste and consistency.
Brands and Quality
Philadelphia is a well-known brand that offers a wide range of cream cheese products, including plain and flavored options. It is recognized for its quality and consistency. However, many other reputable brands and homemade options can also provide excellent results. Exploring different brands and types of cream cheese can help you find the perfect match for your taste preferences.
To make a delicious bagel with cream cheese, follow these straightforward steps:
Slicing the Bagel: If your bagel is not pre-sliced, cut it in half with a serrated knife. A serrated knife is ideal for creating a clean cut without compressing the bagel. This step ensures your bagel toasts evenly and holds the cream cheese well.
Toasting: Toast the bagel halves in a toaster or oven to achieve a crispy exterior and a warm, soft interior. Toasting enhances the bagel’s texture and flavor, making eating more enjoyable. Adjust the toasting based on your preference for crispiness.
Spreading Cream Cheese: Use a butter knife or spreader to apply a generous layer of cream cheese to each half of the bagel. Ensure an even distribution to avoid clumps or uneven coverage. The amount of cream cheese can be adjusted based on personal preference.
Enhancements and Variations
Consider these creative ideas to elevate your bagel with cream cheese:
Bagel Sandwiches: Transform your bagel with cream cheese into a hearty sandwich by adding ingredients like smoked salmon, capers, red onions, and fresh herbs. This combination adds protein and flavor, creating a satisfying meal.
Sweet Bagel Variations: Spread fruit preserves or honey over the cream cheese for a lovely twist. Options like strawberry, raspberry, or blueberry preserves can add a delightful contrast to the creamy cheese.
Savory Toppings: Experiment with additional toppings such as sliced tomatoes, cucumbers, or avocado. These additions enhance the flavor and increase the nutritional value of your bagel.
How Many Calories in a Bagel with Cream Cheese?
The calorie content of a bagel with cream cheese varies based on several factors, including the size of the bagel & the type of cream cheese used. Small bagels typically contain around 150 calories, while medium-sized bagels fall between small and large in calorie count. Large bakery bagels can have up to 400 calories due to their size and density. Cream cheese also contributes significantly to the overall calorie count.
Regular cream cheese adds approximately 50 calories per tablespoon, whereas low-fat cream cheese contains about 35 calories. Therefore, a small bagel with low-fat cream cheese totals around 220 calories, while an extra-large bagel with regular cream cheese can reach up to 500 calories. Adjusting the bagel’s size and the cream cheese type can help manage calorie intake according to your dietary needs.
Tips for Reducing Calories
To make a lighter version of bagel with cream cheese:
Opt for a Smaller Bagel: Choose a mini or thin bagel to reduce calorie intake.
Use Less Cream Cheese: Spread a thinner layer or select low-fat cream cheese to reduce calories.
Select Whole Grain Bagels: These options often provide added fiber and nutrients, contributing to a more filling and healthier choice.
Health Benefits of Bagels with Cream Cheese
Here are the health benefits of bagels with cream cheese:
Nutritional Benefits of Whole Grains: Whole grain bagels provide dietary fiber, which supports digestive health & helpsmaintain stable blood sugar levels. Fiber also contributes to a feeling of fullness.
Protein Contribution: Cream cheese adds a small amount of protein to your bagel, which aids in muscle repair and can help increase satiety, reducing overall appetite.
Customization for Healthier Options: Opting for low-fat cream cheese and whole-grain bagels can reduce calorie and fat intake while enjoying the creamy texture and flavors.
Balanced Meals: Incorporating bagels with cream cheese as part of a balanced meal with fruits or vegetables can provide a nutritious and satisfying breakfast or snack option.
Creative Ways to Enjoy Bagels with Cream Cheese
Bagel with Cream Cheese Dip
Transform your bagel and cream cheese into a delicious dip by mixing the cream cheese with garlic, herbs, & a touch of lemon juice. This creamy dip pairs well with bagel chips, fresh vegetables, or pita bread, making it an ideal appetizer or snack for gatherings.
Bagel Pizza
Create a fun twist on traditional pizza by spreading cream cheese on the bagel halves, adding tomato sauce, shredded mozzarella cheese & your favorite toppings. Bake the bagels before the cheese is melted and bubbly. This savory creation is perfect for a quick lunch or a casual dinner.
Bagel Breakfast Wraps
Turn your bagel with cream cheese into a satisfying breakfast wrap. Spread the cream cheese on the bagel halves and layer with scrambled eggs, cooked bacon, and fresh vegetables like spinach or bell peppers. Roll or fold the bagel halves to create a nutritious and filling breakfast wrap.
Bagel with Cream Cheese and Fruit
Add a fruity touch to your bagel by topping it with fresh fruit slices such as strawberries, apples, or pears. A drizzle of honey or a scatter of cinnamon can further enhance the sweetness and flavor. This variation provides a refreshing and light breakfast or snack option.
Savory Bagel Sandwich
Elevate your bagel with cream cheese by making it into a savory sandwich. Layer the bagel with sliced turkey or ham, cheese, and vegetables like lettuce and tomatoes. The cream cheese acts as a flavorful spread, adding richness and tying the sandwich ingredients together.
Bagel with Cream Cheese and Smoked Salmon
Top your bagel with cream cheese and smoked salmon for a classic and elegant option. Garnish with capers, red onions, and a squeeze of lemon juice for a delightful brunch choice. This combination offers a sophisticated flavor profile and duos well with a side salad or fresh fruit.
Bagel and Cream Cheese Mini Sandwiches
Cut bagels into smaller rounds to create mini sandwiches. Spread with cream cheese and add fillings like sliced cucumbers, cherry tomatoes, and fresh herbs. These mini sandwiches are perfect for parties, snacks, or a light meal.
Conclusion
Bagels with cream cheese are more than just a simple breakfast—they are a versatile and delicious treat that can be customized to suit various tastes and preferences. By selecting high-quality bagels and cream cheese, experimenting with creative variations, and understanding the nutritional aspects, you can enjoy this classic combination in numerous delightful ways. Whether you prefer a straightforward spread or a more elaborate creation, bagels with cream cheese offer a satisfying and enjoyable culinary experience.[/vc_column_text][/vc_column][/vc_row][vc_row][vc_column width=”1/1″][us_separator][vc_column_text]
Frequently Asked Questions (FAQ)
[/vc_column_text][us_separator][vc_tta_accordion][vc_tta_section title=”What goes on a bagel with cream cheese?” tab_link=”%7B%22url%22%3A%22%22%7D”][vc_column_text]
A bagel with cream cheese typically includes a sliced bagel spread with a generous layer of cream cheese. You can customize it with additional toppings like fresh herbs, smoked salmon, or sliced vegetables. For a sweet twist, consider adding fruit preserves or honey. This combination creates a delicious and versatile meal option.
[/vc_column_text][/vc_tta_section][vc_tta_section title=”Is a bagel with cream cheese healthy?” tab_link=”%7B%22url%22%3A%22%22%7D”][vc_column_text]
A bagel with cream cheese can be part of a healthy diet when consumed in moderation. It provides carbohydrates and protein, but calorie and fat content vary based on bagel size and cream cheese type. Opting for whole grain bagels and low-fat cream cheese can make it a healthier choice. Balancing it with fruits or vegetables enhances its nutritional value.
[/vc_column_text][/vc_tta_section][vc_tta_section title=”Is cream cheese only for bagels?” tab_link=”%7B%22url%22%3A%22%22%7D”][vc_column_text]
No, cream cheese isn’t just for bagels. It’s a versatile ingredient used in various dishes, including spreads for crackers, fillings for pastries, and toppings for baked goods. It also serves as a base for dips, sauces, and creamy desserts. Its rich texture and flavor make it a popular choice in many recipes.
[/vc_column_text][/vc_tta_section][vc_tta_section title=”What can I mix with cream cheese?” tab_link=”%7B%22url%22%3A%22%22%7D”][vc_column_text]
You can mix cream cheese with a variety of ingredients for different flavors. Try adding herbs and spices for a savory spread, or blend in fruit preserves or honey for a sweet touch. It can also be combined with garlic for a flavorful dip or mixed with chocolate for creamy desserts. The possibilities are endless!
[vc_row][vc_column][vc_column_text]Low FODMAP Soups offer a fantastic solution for those following a Low FODMAP diet, providing satisfying and soothing meal options. These soups are designed to be gentle on the digestive system while delivering a range of comforting and flavorful dishes. Perfect for adhering to dietary restrictions, these recipes ensure you can enjoy varied and enjoyable meals. Here are fifteen unique Low FODMAP soup recipes that cater to different tastes & preferences, ensuring your meals remain delicious and compliant with your dietary needs.
15 Low FODMAP Soup Recipes
1. Classic Low FODMAP Chicken Soup
The Classic Low FODMAP Chicken Soup is a comforting staple that’s easy on the stomach. This recipe combines tender chicken breast with diced carrots, celery, and fresh spinach in a low-sodium chicken broth. Flavored with thyme and basil, it provides a soothing and satisfying meal.
Ingredients:
2 chicken breasts, diced
2 carrots, chopped
2 celery stalks, chopped
2 cups fresh spinach
4 cups low-sodium chicken broth
1 teaspoon dried thyme
1 teaspoon dried basil
Preparation: Bring the chicken broth to a boil in a large pot. Add diced chicken breasts and cook until fully cooked. Add carrots & celery and simmer until tender. Stir in fresh spinach and herbs before serving.
2. Hearty Low FODMAP Beef and Carrot Soup
The Hearty Low FODMAP Beef and Carrot Soup is perfect for those who enjoy a more substantial meal. This soup features chunks of beef simmered with carrots and potatoes in a savory beef broth. Bay leaves and rosemary deepen the flavor, making it a hearty and nourishing option.
Ingredients:
1 pound beef chunks
3 carrots, sliced
2 potatoes, diced
4 cups low-sodium beef broth
2 bay leaves
1 teaspoon rosemary
Preparation: Brown beef chunks in a pot. Add beef broth, carrots, and potatoes. Season with bay leaves and rosemary, and simmer until the beef is delicate & the vegetables are cooked.
3. Creamy Low FODMAP Tomato Soup
The Creamy low-FODMAP tomato Soup blends pureed tomatoes with lactose-free cream or coconut milk for a smooth and rich texture. Seasoned with basil and oregano, it offers a classic tomato flavor while remaining compliant with low-FODMAP guidelines.
Ingredients:
4 cups tomato puree
1 cup lactose-free cream or coconut milk
1 teaspoon dried basil
1 teaspoon dried oregano
Preparation: Combine tomato puree and lactose-free cream or coconut milk in a pot. Heat gently, and season with basil and oregano. Simmer until heated through, then serve.
4. Spinach and Zucchini Pureed Soup
The Spinach and Zucchini Pureed Soup is a light and nutrient-rich option. This recipe involves cooking fresh spinach and zucchini until tender, then pureeing them with coconut milk. Ginger adds a subtle, warming flavor to this smooth soup.
Ingredients:
2 cups fresh spinach
2 zucchini, chopped
1 cup coconut milk
1 tablespoon fresh ginger, grated
Preparation: Cook spinach and zucchini in a pot until tender. Blend with coconut milk and ginger until smooth. Heat gently and serve.
5. Low FODMAP Chicken and Sweet Potato Soup
Combining the organic sweetness of sweet potatoes with lean chicken breast, the Low FODMAP Chicken and Sweet Potato Soup is both flavorful and filling. Sage and thyme enhance the ingredients’ natural flavors, making this a comforting choice.
Ingredients:
2 chicken breasts, diced
2 sweet potatoes, peeled and cubed
4 cups low-sodium chicken broth
1 teaspoon dried sage
1 teaspoon dried thyme
Preparation: Simmer chicken and sweet potatoes in the chicken broth. Add sage and thyme until the chicken is fully cooked & the sweet potatoes are tender.
6. Roasted Butternut Squash Soup
The Roasted Butternut Squash Soup features roasted butternut squash blended with lactose-free milk or coconut cream. A touch of nutmeg adds warmth to this creamy, sweet soup, making it a comforting option for colder days.
Ingredients:
1 large butternut squash, peeled and cubed
1 cup lactose-free milk or coconut cream
1/2 teaspoon nutmeg
Preparation: Roast butternut squash until tender. Blend with lactose-free milk or coconut cream and season with nutmeg. Heat through before serving.
7. Low FODMAP Turkey and Vegetable Soup
The Low FODMAP Turkey and Vegetable Soup features lean turkey breast, carrots, celery, and green beans in a low-sodium vegetable broth. Parsley and thyme add a fresh, herbal touch to this nutritious, hearty soup.
Ingredients:
1 pound turkey breast, diced
2 carrots, chopped
2 celery stalks, chopped
1 cup green beans, trimmed and chopped
4 cups low-sodium vegetable broth
1 tablespoon fresh parsley
1 teaspoon dried thyme
Preparation: Cook turkey breast in vegetable broth. Add carrots, celery, and green beans. Season with parsley and thyme, and simmer until all ingredients are tender.
8. Asian-Inspired Low FODMAP Chicken Soup
The Asian-Inspired Low FODMAP Chicken Soup offers a light and aromatic alternative with ginger and bok choy. This soup is perfect for those who enjoy Asian flavors while adhering to a Low FODMAP diet.
Ingredients:
2 chicken breasts, shredded
2 cups bok choy, chopped
1 tablespoon fresh ginger, grated
4 cups low-sodium chicken broth
Preparation: Simmer shredded chicken with ginger and bok choy in chicken broth until bok choy is tender. Serve hot.
9. Low FODMAP Carrot and Ginger Soup
The Low FODMAP Carrot and Ginger Soup blends the sweetness of carrots with the zing of fresh ginger. Blended until smooth and seasoned with cumin and coriander, it is both flavorful and gentle on the digestive system.
Ingredients:
4 carrots, peeled and chopped
1 tablespoon fresh ginger, grated
1 cup coconut milk
1 teaspoon ground cumin
1 teaspoon ground coriander
Preparation: Cook carrots and ginger in a pot until tender. Blend with coconut milk and spices until smooth. Heat gently and serve.
10. Creamy Low FODMAP Cauliflower Soup
The Creamy Low FODMAP Cauliflower Soup uses roasted cauliflower blended with lactose-free cream or coconut milk for a creamy, comforting texture. Chives and thyme add a fresh herbal note to this nutritious soup.
Ingredients:
1 large cauliflower, cut into florets
1 cup lactose-free cream or coconut milk
2 tablespoons fresh chives
1 teaspoon dried thyme
Preparation: Roast cauliflower until tender. Blend with cream or milk and season with chives and thyme. Heat gently and serve.
11. Low FODMAP Green Bean Soup
The Low FODMAP Green Bean Soup features fresh green beans and potatoes in a light, flavorful option. Seasoned with dill, this soup is a refreshing choice for a light meal.
Ingredients:
2 cups green beans, trimmed
2 potatoes, peeled and diced
4 cups low-sodium vegetable broth
1 tablespoon fresh dill
Preparation: Cook green beans and potatoes in vegetable broth until tender. Stir in dill and serve hot.
12. Low FODMAP Pumpkin Soup
The Low FODMAP Pumpkin Soup is a creamy, comforting choice from roasted pumpkin blended with coconut milk. Cinnamon and nutmeg add a warm, spiced flavor, making it perfect for a cozy meal.
Ingredients:
1 giant pumpkin, peeled and cubed
1 cup coconut milk
1/2 teaspoon ground cinnamon
1/4 teaspoon ground nutmeg
Preparation: Roast pumpkin until tender. Blend with coconut milk and spices. Heat through before serving.
13. Low FODMAP Beet and Carrot Soup
The Low FODMAP Beet and Carrot Soup combines roasted beets and carrots for a vibrant, nutrient-rich option. They are blended until smooth and seasoned with fresh herbs, providing a flavorful and healthy meal.
Ingredients:
2 beets, peeled and cubed
3 carrots, peeled and chopped
4 cups low-sodium vegetable broth
2 tablespoons fresh parsley
Preparation: Roast beets and carrots until tender. Blend with broth and parsley until smooth. Heat and serve.
14. Low FODMAP Corn and Red Pepper Soup
Featuring sweet corn and red bell peppers, the low-FODMAP corn and Red Pepper Soup is a colorful and flavorful option. Blended until smooth and seasoned with paprika provides a tasty and satisfying meal.
Ingredients:
2 cups corn kernels
2 red bell peppers, chopped
4 cups low-sodium vegetable broth
1 teaspoon paprika
Preparation: Cook corn and bell peppers in broth. Blend with paprika until smooth. Heat and serve.
15. Low FODMAP Leek and Potato Soup
The Low FODMAP Leek and Potato Soup utilizes the green tops of leeks combined with potatoes for a classic, creamy soup. Thyme adds a fresh, herbal flavor to this comforting dish.
Ingredients:
2 leek greens, chopped
3 potatoes, peeled and diced
4 cups low-sodium vegetable broth
1 teaspoon dried thyme
Preparation: Cook leeks and potatoes in broth until tender. Blend with thyme until smooth. Heat gently and serve.
Conclusion
These fifteen Low FODMAP soup recipes offer a diverse range of comforting and flavorful options tailored to those following a Low FODMAP Soup diet. From classic chicken soups to creamy pumpkin and vibrant beet soups, each recipe is designed to provide warmth and nourishment while being gentle on the digestive system. By incorporating these soups into your meal plan, you can enjoy a variety of tastes & textures that support your digestive health and make adhering to dietary restrictions easier. Enjoy these soups as part of a balanced diet and savor the comfort of a well-prepared meal.[/vc_column_text][us_separator][vc_column_text]
Frequently Asked Questions (FAQ)
[/vc_column_text][us_separator][vc_tta_accordion][vc_tta_section title=”What is a Low FODMAP Soup?” tab_link=”%7B%22url%22%3A%22%22%7D”][vc_column_text]A Low FODMAP soup is a type of soup made with ingredients that are low in fermentable oligosaccharides, disaccharides, monosaccharides, and polyols (FODMAPs). These soups are designed to be gentle on the digestive system and suitable for individuals with irritable bowel syndrome (IBS) or other digestive disorders.[/vc_column_text][/vc_tta_section][vc_tta_section title=”What ingredients should I avoid in a Low FODMAP Soup?” tab_link=”%7B%22url%22%3A%22%22%7D”][vc_column_text]When making a Low FODMAP soup, avoid ingredients high in FODMAPs such as onions, garlic, certain beans and legumes, wheat, and high-fructose corn syrup. Instead, use ingredients like carrots, zucchini, spinach, potatoes, and lean meats.[/vc_column_text][/vc_tta_section][vc_tta_section title=”Are there any good alternatives to high-FODMAP ingredients?” tab_link=”%7B%22url%22%3A%22%22%7D”][vc_column_text]For onions and garlic, you can use the green tops of scallions or leeks (the green parts only). For thickening soups, use potato or rice flour instead of wheat flour.[/vc_column_text][/vc_tta_section][vc_tta_section title=”Can I freeze Low FODMAP Soups?” tab_link=”%7B%22url%22%3A%22%22%7D”][vc_column_text]Yes, most Low FODMAP soups freeze well. Allow the soup to cool completely before transferring it to freezer-safe containers. Label and date the containers for easy identification. Reheat thoroughly before serving.[/vc_column_text][/vc_tta_section][vc_tta_section title=”How can I make a Low FODMAP Soup more filling?” tab_link=”%7B%22url%22%3A%22%22%7D”][vc_column_text]To make your soup more filling, add low-FODMAP ingredients such as cooked chicken, turkey, or tofu. You can also incorporate potatoes or rice for added substance.[/vc_column_text][/vc_tta_section][vc_tta_section title=” What are some easy Low FODMAP Soup recipes to start with?” tab_link=”%7B%22url%22%3A%22%22%7D”][vc_column_text]Some easy recipes to try include Classic Low FODMAP Chicken Soup, Creamy Low FODMAP Tomato Soup, and Hearty Low FODMAP Beef and Carrot Soup. These recipes are straightforward and use ingredients that are typically well-tolerated on a Low FODMAP diet.[/vc_column_text][/vc_tta_section][/vc_tta_accordion][/vc_column][/vc_row]
You are wondering how to make frozen French fries in air fryer. If you love crispy, golden fries but want a healthier and more convenient cooking method, an air fryer is the perfect solution. This innovative kitchen appliance uses hot air to achieve the same crispy feel as deep-frying but with significantly less oil. Whether you’re craving a quick snack or a side dish for a meal, mastering the art of making frozen French fries in an air fryer can transform your cooking routine. This guide will walk you through everything you need to know to achieve perfectly crispy fries every time.
Types of Fries
Thin Fries are cut into slender, uniform strips and are among the most commonly found frozen fries. Due to their tiny size, they cook quickly, achieving a crispy exterior & a tender interior. In an air fryer, thin fries typically need about 12 to 15 minutes at 400°F (200°C).
Regular Fries are slightly thicker than thin fries, offering a balanced texture that combines a crispy exterior with a softer, airy interior. They take longer to cook than thin fries, generally requiring 15 to 20 minutes at 400°F (200°C) in an air fryer.
Crinkle-cut fries feature a distinctive wavy pattern that increases their surface area, making them extra crispy. The crinkles help these fries hold onto seasonings better, and they usually cook in about 15 to 20 minutes at 400°F (200°C) in an air fryer.
Steak Fries are thick-cut and provide a hearty bite. They are larger and more substantial than regular fries. They are designed to be crispy on the outside while remaining soft and fluffy inside. Cooking time for steak fries in an air fryer is typically between 20 and 25 minutes at 400°F (200°C).
Curly Fries come with a spiral shape and are often seasoned, which adds a flavorful twist to traditional fries. Their unique shape helps them achieve a crispy texture and hold seasoning well. Curly fries usually require 15 to 20 minutes of cooking at 400°F (200°C) in an air fryer.
Waffle Fries have a grid-like pattern that provides a distinctive texture and increases their surface area. This pattern allows them to hold up well to dips and seasonings. In an air fryer, waffle fries typically cook for 15 to 20 minutes at 400°F (200°C).
Jacket Fries are characterized by their thick-cut style and skin-on texture, giving them a rustic, hearty feel. They are crisp on the outside with a robust and tender interior. Jacket fries generally need 20 to 25 minutes of cooking time at 400°F (200°C) in an air fryer.
Ingredients
While frozen French fries are delicious, adding additional ingredients can elevate their flavor. Here’s how to enhance your fries with some simple yet effective additions:
Oil Spray: To achieve that perfectly crispy texture, consider using a non-stick oil spray or a small amount of oil. This step helps the fries achieve a golden-brown exterior and prevents them from sticking to the air fryer basket. While this is optional, a light oil coating can significantly enhance your fries’ crispiness.
Seasonings: Add various seasonings to elevate their flavor profile once your fries are cooked. Here are some popular options:
Salt is the classic and indispensable seasoning for French fries. It enhances the natural taste of the fries, making them more enjoyable and flavorful.
Garlic Powder: For a savory & aromatic twist, garlic powder is a great addition. It infuses the fries with a rich, garlicky flavor that complements their crispy texture.
Paprika: If you enjoy a hint of smokiness, paprika is an excellent choice. This seasoning adds depth and a mild smoky flavor, which pairs well with the crispiness of the fries.
Parmesan Cheese: For a cheesy, umami boost, sprinkle some Parmesan cheese on your fries. The cheese melts slightly, creating a delightful, savory coating that enhances the overall taste.
Chili Powder: If you like a bit of heat, chili powder can include a spicy kick to your fries. This seasoning brings a vibrant, warming flavor that contrasts nicely with the fries’ crispiness.
By incorporating these ingredients, you can customize your frozen French fries to suit your tastes, making them even more delicious and satisfying.
Preparing Frozen French Fries
Preheat the Air Fryer
Preheating the air fryer is a Important step to ensure even cooking. It allows the air fryer to reach the optimal temperature before adding fries.
Set the Temperature: Preheat your air fryer to 400°F (200°C). This temperature is ideal for Reaching a crispy texture.
Time: Allow the air fryer to preheat for 3-5 minutes. Refer to your air fryer’s manual for specific preheating instructions if needed.
Prepare the Air Fryer Basket
To prevent the fries from sticking and to ensure an even crispiness, prepare the air fryer basket:
Coat the Basket: Lightly coat the basket with a non-stick oil spray. If you don’t have spray, use a small amount of oil, but be cautious not to overdo it.
Avoid Excess Oil: Excess oil can cause the fries to become greasy. A light coating is sufficient to enhance crispiness without adding unnecessary fat.
Cooking Frozen French Fries
Basic Cooking Instructions
Add the Fries: Place the frozen French fries in the air fryer basket. Make sure not to crammed the basket to allow proper air circulation. If necessary, cook the fries in batches.
Set the Temperature and Time: Cook the fries at 400°F (200°C). The cook time will vary based on the type of fries and their thickness:
Shake the Basket: Shake the basket midway through the cooking process to ensure even cooking. This step helps the fries achieve a uniform crispiness.
Check for Crispiness: After the first cooking time, check the fries for the desired level of crispiness. If they requried more time, continue cooking for 2-3 minutes.
Cooking Times and Temperatures
Different types of fries will require different cooking times. Here’s a general guide:
Thin Fries: Cook for 12-15 minutes at 400°F (200°C).
Regular Fries: Cook for 15-20 minutes at 400°F (200°C).
Thick Cut Fries: Cook for 20-25 minutes at 400°F (200°C).
Modify the cooking time depending on your air fryer’s performance and the thickness of the fries.
Shaking and Tossing
Shaking or tossing the fries midway through cooking is crucial for even crispiness. This helps redistribute the fries and ensures that every piece gets the same heat and air circulation.
Seasoning and Serving
Seasoning Frozen French Fries
Once the fries are cooked, season them to enhance their flavor. Popular seasoning options include:
Salt: A fundamental and essential seasoning.
Garlic Powder and Parmesan: Mix for a savory, cheesy flavor.
Paprika and Chili Powder: Combine for a smoky and spicy kick.
Add seasonings immediately after cooking while the fries are hot so the flavors adhere better.
Serving Suggestions
French fries can be enjoyed with a variety of dips and meals:
Ketchup: A classic and beloved condiment.
Ranch Dressing: For a creamy and tangy option.
Aioli or Garlic Sauce: For a gourmet touch with a rich flavor.
Pairing with Meals
French fries make a great side dish for many meals:
Burgers: A traditional pairing with any burger.
Chicken Tenders: Complements the crispy texture of chicken.
Steak: Provides a crunchy contrast to a juicy steak.
Tips for Perfect French Fries
Avoid Overcrowding
Overcrowding the air fryer basket can lead to uneven cooking and soggy fries. To achieve the best results, cook fries in a single layer or batches if needed. Ensuring enough space allows the hot air to circulate freely around each fry, giving it an even, crispy texture.
Adjust for Thickness
Thicker fries require a longer cooking time than thinner ones. Monitor the fries closely and adjust the cooking time based on their thickness. If you’re cooking different types of fries in one batch, consider separating them by thickness to ensure they cook evenly.
Preheat the Air Fryer
Always preheat your air fryer before adding the fries. Preheating ensures that the air fryer reaches the optimal temperature for cooking, which helps achieve a consistent and crispy texture. This step can make a discernible difference in the final result.
Shake or Toss Regularly
Shaking or tossing the fries halfway through the cooking process is crucial for even cooking. This helps redistribute the fries in the basket, ensuring all pieces are exposed to the hot air and become uniformly crispy. It also prevents them from sticking together.
Use the Right Temperature
Cooking at the right temperature is critical to achieving crispy fries without burning them. Generally, 400°F (200°C) is ideal for most frozen fries. However, adjust the temperature if your air fryer cooks faster or slower than average. Regularly check the fries to find the perfect temperature for your specific model.
Avoid Excess Oil
While a light oil coating can enhance crispiness, too much oil can make fries greasy. Use a non-stick oil spray or minimal oil to achieve the desired texture without adding unnecessary fat. Excess oil can also cause smoke and affect the taste of the fries.
Experiment with Seasonings
Customize your fries by experimenting with different seasonings. Fresh herbs, spices, and cheese can add unique flavors. Try seasoning the fries immediately after cooking while they are still hot so the seasonings adhere better and enhance the taste.
Consider Batch Cooking
Consider cooking fries in batches rather than overloading the basket for larger quantities. This ensures that each batch is cooked evenly and reaches the desired level of crispiness. It may take longer, but the result will be worth the effort.
Clean the Air Fryer Regularly
Regular cleaning of your air fryer is important for maintaining its execution and ensuring the fries taste fresh. Follow the manufacturer’s instructions for cleaning to prevent grease buildup and keep the air fryer’s efficiency.
Troubleshooting Common Issues
Soggy Fries
Soggy fries can result from:
Overcrowding: Ensure enough space in the basket for air to circulate.
Insufficient Cooking Time: Cook the fries for a bit longer if they need to be crispy enough.
Uneven Cooking
If the fries are not evenly distributed in the basket, uneven cooking may occur. Shake or toss the fries midway through the cooking process to ensure even cooking.
Burnt Fries
Burnt fries may be due to the following:
Too High Temperature: If fries are burning, reduce the temperature slightly.
Overcooking: Check the fries frequently and adjust the cooking time as needed.
Health Benefits of Air Frying
Lower Fat Content
Air frying uses significantly less oil compared to traditional deep frying, resulting in foods that are lower in fat and calories. This makes air frying a healthier choice for enjoying crispy foods without the added fat, contributing to better cardiovascular health.
Reduced Acrylamide Formation
Air frying reduces acrylamide formation by operating at lower temperatures and using less oil. Compared to deep frying, this method can lower acrylamide levels in foods by up to 90%, helping to minimize potential health risks associated with this compound.
Less Mess and Cleanup
Air frying produces minimal oil splatter, resulting in a cleaner cooking environment. The air fryer basket is typically non-stick and easy to clean, making cooking more convenient and reducing the time spent on cleanup.
Conclusion
Frozen French fries in an air fryer are a simple, quick, and healthier way to enjoy this classic treat. By following the steps & tips outlined in this guide, you can achieve crispy, golden fries with minimal effort. Experiment with different seasonings & serving ideas to find your favorite way to enjoy fries. With an air fryer, you can enjoy completely cooked fries any time without the hassle and extra calories.
Cottage cheese is a flexible and nutritious ingredient that can transform your meals with its creamy texture and mild flavor. Whether you want to incorporate more protein into your diet or enjoy experimenting with new recipes, cottage cheese can be a star ingredient in your kitchen. Its versatility allows it to shine in both sweet and savory dishes, making it a valuable addition to any meal plan.
In this article, we’ll explore some innovative cottage cheese recipes you can try this week. From breakfast to dinner, these recipes highlight the best ways to enjoy this wholesome ingredient. Get ready to discover delicious and nutritious meals that will make cottage cheese a staple in your diet.
Why Cottage Cheese is an Incredible Addition to Your Diet?
Before diving into the recipes, let’s explore why cottage cheese is an excellent choice for your diet:
High in Protein: Cottage cheese is a fantastic option for those looking to maintain a healthy weight or build muscle due to its high protein content.
Low in Fat: It’s available in various fat content levels, including low-fat and fat-free options, making it suitable for different dietary needs.
Rich in Nutrients: Cottage cheese provides essential nutrients like calcium, phosphorus, and B vitamins, contributing to overall health.
Versatile: It is adaptable and works well in both savory and sweet recipes, allowing for creative and varied meal options.
Cottage Cheese Pancakes
Fluffy Cottage Cheese Pancakes with Fresh Berries
These pancakes are fluffy, protein-packed, and perfect for breakfast or brunch. They are quick to make and a delicious way to start your day.
Ingredients
1 cup cottage cheese
1/2 cup rolled oats
Two eggs
1/2 teaspoon baking powder
One teaspoon of vanilla extract
1/4 teaspoon salt
Instructions
Blend Ingredients: In a blender, combine cottage cheese, eggs, rolled oats, baking powder, vanilla extract, and salt. Process till smooth.
Cook Pancakes: Grease a nonstick skillet with oil and heat it on medium heat. To make pancakes, ladle little portions of batter onto the skillet. Cook until surface bubbles appear, then turn and cook until golden brown.
Serve: Stack the pancakes and serve with fresh fruit and a drizzle of honey.
Tips: You can incorporate nutmeg or cinnamon into the batter for taste.
Savory Cottage Cheese and Spinach Stuffed Peppers
Savory Cottage Cheese and Spinach Stuffed Peppers
These stuffed peppers are a delightful dinner dish. They are loaded with protein and flavor and make a great main course or side dish.
Ingredients
Four bell peppers, halved and seeded
1 cup cottage cheese
1 cup fresh spinach, chopped
1/2 cup quinoa, cooked
1/4 cup grated Parmesan cheese
One clove of garlic, minced
Salt and pepper to taste
Instructions
Preheat Oven: Turn the oven on to 375°F, or 190°C.
Prepare Filling: In a large bowl, combine cottage cheese, cooked quinoa, minced garlic, Parmesan cheese, and chopped spinach. Season with pepper and salt.
Stuffed Peppers: Spoon the cottage cheese mixture into each side of a bell pepper.
Bake: The filled peppers should be covered with foil on a baking tray. After 30 minutes, take off the foil and continue baking for ten more minutes or until the peppers are soft and the tops turn brown.
Serve: Serve hot, garnished with fresh herbs if desired.
Tips: You can add some shredded chicken or turkey for extra protein.
Cottage Cheese and Herb Dip
Fresh cottage cheese and herb dip, served with colorful vegetable sticks and crispy crackers.
This cool dip is great as a healthy snack or at celebrations. It tastes great as a spread on sandwiches, fresh veggies, or pita chips.
Ingredients
1 cup cottage cheese
1/4 cup Greek yogurt
Two tablespoons fresh chives, chopped
Two tablespoons fresh parsley, chopped
One tablespoon of fresh dill, chopped
One clove of garlic, minced
Salt and pepper to taste
Instructions
Blend Base: Blend the cottage cheese and Greek yogurt until smooth in a food processor.
Mix in Herbs: Spoon the mixture into a bowl, then mix with the chopped garlic and herbs.
Season: To taste, add salt and pepper for seasoning.
Serve: Serve with fresh vegetables and pita chips, or use them as a spread on sandwiches.
Tips: Add a small pinch of red pepper flakes for some heat.
Cottage cheese is not just delicious but also offers numerous health benefits:
Supports Weight Loss: High in protein and low in fat, it helps keep you full longer.
Promotes Muscle Gain: Its high protein content benefits muscle recovery and growth.
Bone Health: Rich in calcium and phosphorus, it supports strong bones.
Digestive Health: The probiotics in cottage cheese aid in maintaining a healthy gut.
Conclusion
Cottage cheese is a nutritious and versatile ingredient, ideal for a wide range of innovative recipes. From breakfast to dinner, and from sweet to savory, there are countless delicious cottage cheese recipes to incorporate into your meals. Its high protein content and rich nutrients make it a perfect addition to any diet. Experimenting with cottage cheese can add variety and excitement to your daily meals.
Try these cottage cheese recipes this week to discover new favorite dishes that not only taste great but also offer significant health benefits. Whether you’re looking to boost your protein intake or enjoy a healthy snack, cottage cheese recipes can be your go-to for delicious, nutritious meals. Embrace the versatility of cottage cheese and elevate your culinary creations.
[/vc_column_text][/vc_column][/vc_row][vc_row][vc_column width=”1/1″][us_separator size=”small”][us_text text=” Frequently Asked Questions (FAQs) ” link=”%7B%22url%22%3A%22%22%7D” tag=”h2″][vc_tta_accordion][vc_tta_section title=”What are some unique ways to use cottage cheese in recipes?” tab_link=”%7B%22url%22%3A%22%22%7D”][vc_column_text]Cottage cheese can be used in various innovative ways, such as in savory stuffed peppers, sweet cottage cheese pancakes, creamy pasta sauces, or as a base for healthy smoothies and dips.
[/vc_column_text][/vc_tta_section][vc_tta_section title=”Are cottage cheese recipes suitable for weight loss?” tab_link=”%7B%22url%22%3A%22%22%7D”][vc_column_text]Yes, cottage cheese is high in protein and low in fat, making it a great choice for weight loss. Incorporating it into your meals can help you feel full longer and support your weight management goals.[/vc_column_text][/vc_tta_section][vc_tta_section title=”Can I use cottage cheese in desserts?” tab_link=”%7B%22url%22%3A%22%22%7D”][vc_column_text]Absolutely! Cottage cheese can be used in desserts like cheesecake, pudding, or mixed with fruit for a healthy treat. Its mild flavor works well in both sweet and savory dishes.[/vc_column_text][/vc_tta_section][vc_tta_section title=”What are some quick cottage cheese recipes for busy weeknights?” tab_link=”%7B%22url%22%3A%22%22%7D”][vc_column_text]For quick meals, try cottage cheese with fresh fruit and nuts, savory cottage cheese and veggie wraps, or a simple cottage cheese and herb dip served with crackers or veggies.[/vc_column_text][/vc_tta_section][vc_tta_section title=”How can I make cottage cheese recipes more flavorful?” tab_link=”%7B%22url%22%3A%22%22%7D”][vc_column_text]Enhance the flavor of cottage cheese recipes by adding herbs, spices, or citrus zest. You can also mix in ingredients like garlic, onion, or fresh vegetables for added taste and texture.[/vc_column_text][/vc_tta_section][vc_tta_section title=”Section”][/vc_tta_section][/vc_tta_accordion][/vc_column][/vc_row]

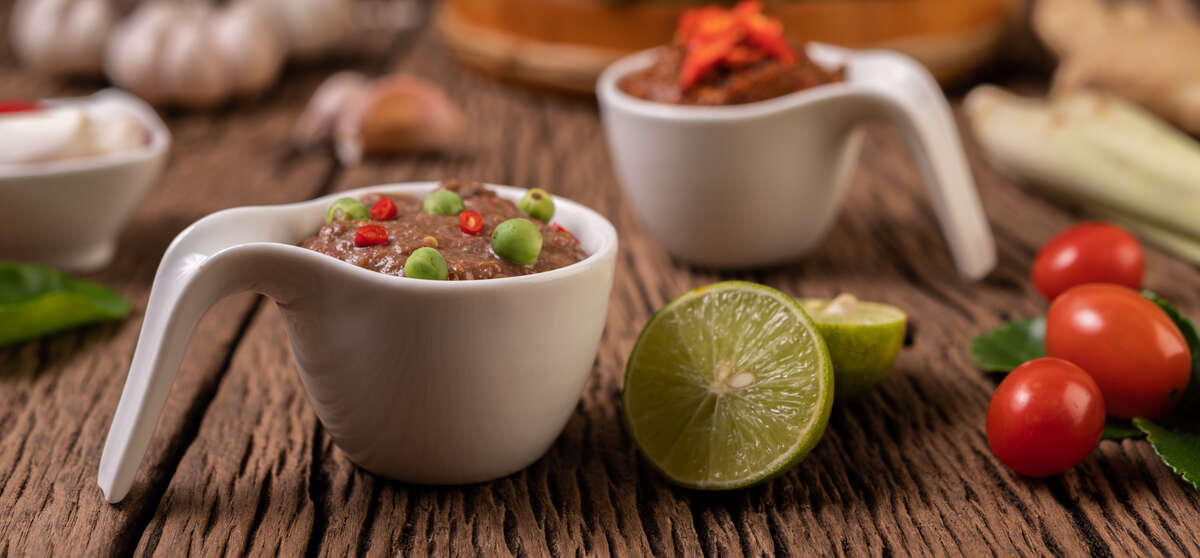 Ingredients You’ll Need
 Conclusion